
Overview: Why and When to Replace the vIDM Certificate
VMware Identity Manager (vIDM), also known as Workspace ONE Access, uses an SSL certificate to secure its web interface and establish trust with integrated VMware products (like vRealize/Aria Automation and Operations). Replacing this certificate is important in scenarios such as:
- Certificate Expiry: SSL certificates have expiration dates. You should replace the vIDM certificate before it expires to avoid service disruptions. An expired certificate can cause login failures and management tasks (like powering on vIDM or updating it) to fail.
- Self-Signed to CA-Signed: Out-of-the-box or lab deployments often use self-signed certificates, which trigger browser warnings and may not be trusted by other systems. Replacing a self-signed certificate with one signed by a trusted Certificate Authority (CA) eliminates these trust warnings and meets security compliance requirements.
- Security or Policy Requirements: Your organization might require using specific corporate CA certificates or updating certificates periodically for security. If the current certificate was compromised or if the domain name of the vIDM appliance changes, a replacement is needed.
- Integration Trust Issues: vIDM acts as the authentication provider for other VMware products. If those products do not trust vIDM’s certificate (e.g., after an update or if using a new CA), you should replace or re-trust the certificate to ensure seamless integration.
In summary, proactively replace the vIDM certificate before it expires or whenever you need to switch to a certificate signed by a trusted CA. This ensures uninterrupted user access and integration with other services. Always schedule certificate updates during a maintenance window, as the process will restart services on vIDM and could temporarily disrupt logins.
Preparation: Prior to making any changes, take a backup or snapshot of your vIDM appliance (and the Aria Suite Lifecycle Manager appliance). This snapshot allows a quick rollback in case any issues occur during the certificate replacement. Additionally, ensure you have administrator access to Aria Suite Lifecycle Manager (v8.18) and that vIDM is currently managed by it (typically as part of a “global environment” in Aria Suite LCM).
Generating a New Certificate via a Certificate Authority (CA)
Replacing the vIDM certificate with a CA-signed certificate involves generating a Certificate Signing Request (CSR) and obtaining a signed certificate from your CA. VMware Aria Suite Lifecycle Manager 8.18 provides a Locker service to help manage certificates, including CSR generation and certificate import. Follow these steps:
1. Generate a CSR for the vIDM Certificate
Using Aria Suite Lifecycle (vRSLCM/Aria LCM) to generate the CSR ensures the private key is captured securely for later import.
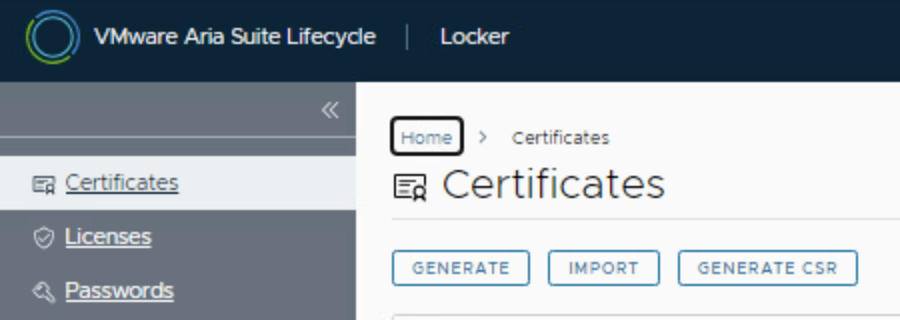
- Open the Certificate Locker: Log in to the Aria Suite Lifecycle Manager 8.18 UI as an admin (typically in a non VCF environment admin@local or in a VCF environment vcfadmin@local). Navigate to Locker(often under “My Services” or via Home > Locker > Certificates in the UI). In the Certificates section, you should see entries for existing certificates (if any). Use the options menu (ellipsis “…“) next to the vIDM certificate entry and select “Generate CSR”.
- Fill in CSR Details: A form will prompt for certificate details. Fill in the required fields for the CSR: a friendly Name (for identification in the Locker), Common Name (CN) (the primary FQDN that users use to access vIDM, e.g. vidm.company.com), your Organization (O), Organizational Unit (OU), Country (C), State/Province, Locality (City), and key length (2048 or 4096 bits). You will also specify Subject Alternative Names: in the Server Domain/Hostname field, enter all applicable domain names for vIDM. For a standalone vIDM, this might just be the primary FQDN; for a cluster or if accessed via a load balancer, include the cluster VIP or load balancer FQDN and each node’s hostname as DNS entries (and IP addresses if needed, in the IP Address field).
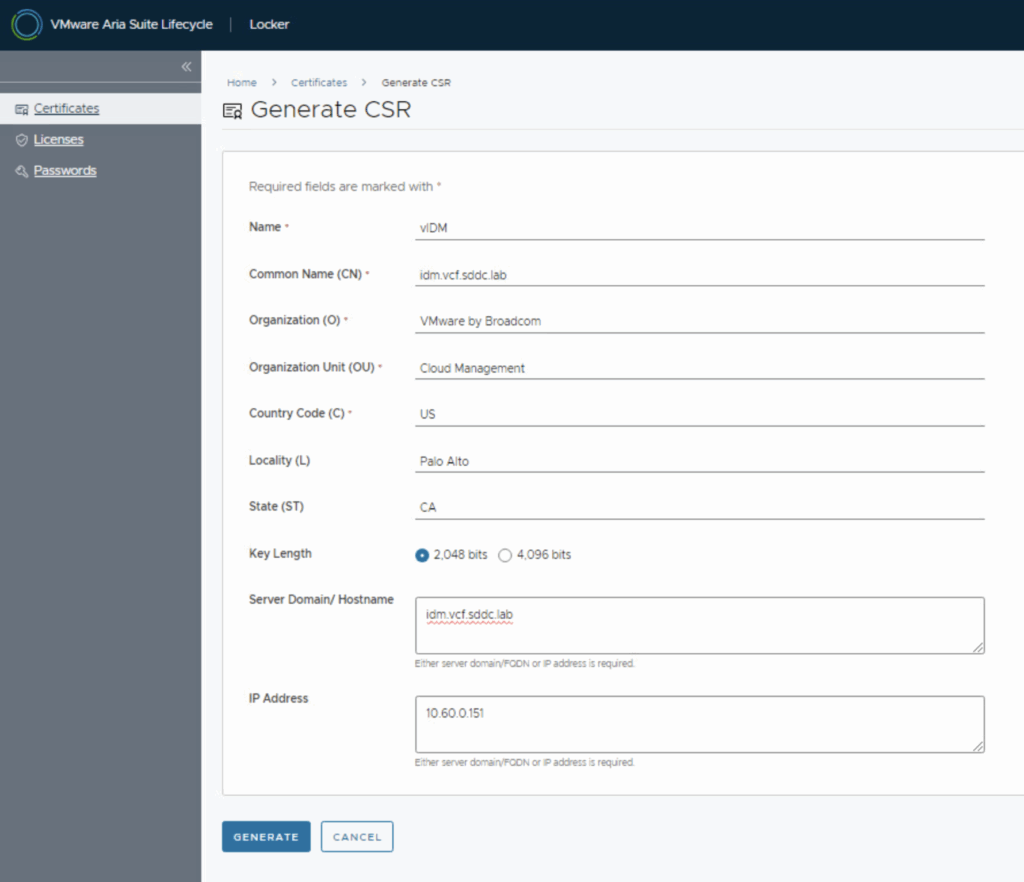
- Generate and Save the CSR: Click Generate to create the CSR. Aria LCM will generate a PEM file containing both the CSR and a new private key. Your browser will download this PEM file (e.g., CSR_fqdn_<Name>.pem). Save this file in a secure location. It contains:
- The Certificate Signing Request (between —–BEGIN CERTIFICATE REQUEST—– and —–END CERTIFICATE REQUEST—–) – this is what you will submit to the CA.
- The Private Key (between —–BEGIN PRIVATE KEY—– and —–END PRIVATE KEY—–) – do not share this. You will need it later to import the signed certificate in Aria LCM, so keep it safe .
- Open the PEM in a text editor and verify it has both the CSR and private key blocks . You may optionally split these into separate files (one for the .csr and one for the .key) for easier handling. For example, the CSR file will begin with “—–BEGIN CERTIFICATE REQUEST—–” and end before the private key section, as shown below:
-----BEGIN CERTIFICATE REQUEST-----
MIIC7TCCAdUCAQAwbTELMAkGA1UEBhMCVVMxCzAJBgN...
... (CSR contents) ...
-----END CERTIFICATE REQUEST-----
-----BEGIN PRIVATE KEY-----
MIIEvAIBADANBgkqhkiG9w0BAQEFAASCBKYwggSiAgE...
... (Private key contents) ...
-----END PRIVATE KEY------ The above shows an example CSR and private key generated by Aria LCM .
- (Optional: Snapshot) If you haven’t already, ensure you have a current snapshot of the vIDM appliance (and any load balancer, if applicable). This isn’t part of CSR generation per se, but it’s a prudent step now before making changes. (We mentioned this earlier, but it cannot be stressed enough – it’s a safety net.)
2. Submit the CSR to a Certificate Authority and Obtain the Signed Certificate
With the CSR in hand, request a signed certificate from your organization’s Certificate Authority or a third-party CA:
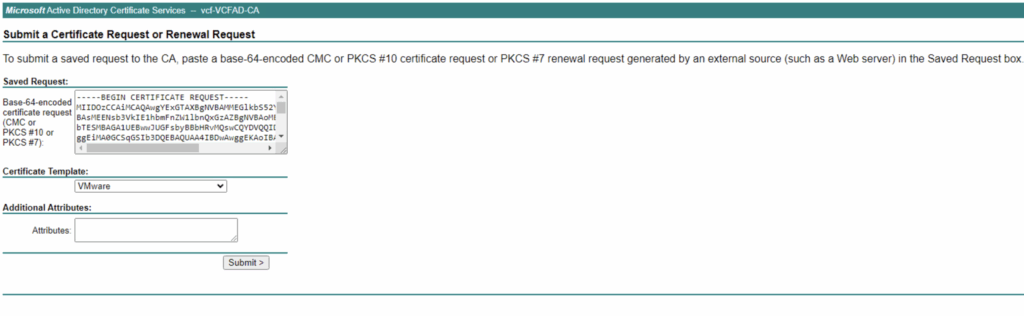
- Submit CSR to CA: Use your CA’s process for certificate requests. For example, in a Microsoft Active Directory Certificate Services (AD CS) web portal, navigate to the certificate request page (usually http://ca-server
/certsrv). Choose the “Request a certificate” option, then “advanced certificate request.” Paste the Base-64 encoded CSR text (the part from BEGIN CERTIFICATE REQUEST to END CERTIFICATE REQUEST, not including the private key) into the request form . Select the appropriate certificate template if required (e.g., a Web Server or SSL template), and submit the request. - If using a public CA (like DigiCert, Let’s Encrypt, etc.), follow their procedure to submit the CSR – often through a web interface or API.
- Ensure the Common Name and SANs in the CSR meet the CA’s requirements (some CAs enforce having the primary CN also listed in SAN, etc.).
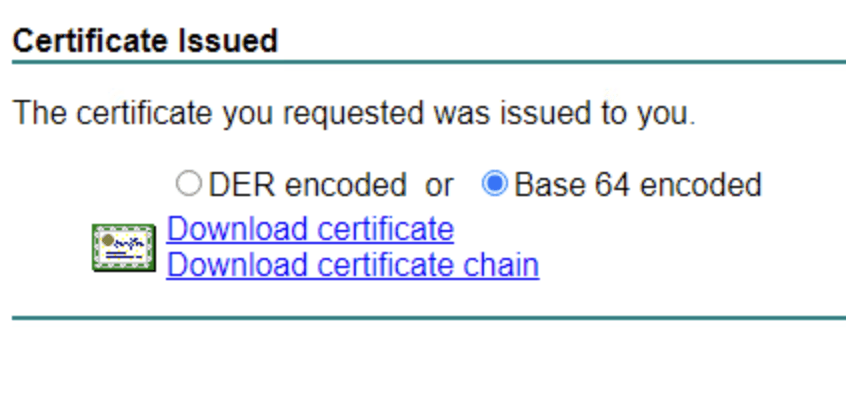
- Download the signed certificate: Once the CA approves and signs the request, download the certificate in Base64 PEM format (often a .cer or .pem file). Many enterprise CAs will give you the option to download as Base-64 encoded. Save this file (e.g., vidm_company_com.cer). If your CA provides separate files for intermediate and root certificates, download those as well.
- Construct the certificate chain PEM: It’s critical to have the full trust chain for import. Open the signed certificate file you got (it may contain just the server certificate) in a text editor. Append the intermediate CA certificate and then the root CA certificate to it (one after the other, each enclosed in their —–BEGIN CERTIFICATE—– and —–END CERTIFICATE—– blocks). The final PEM file should contain the server certificate first, then any Intermediate CA certificate, Root CA certificate, and finally the private key. For example:
-----BEGIN CERTIFICATE-----
(Your vIDM server certificate)
-----END CERTIFICATE-----
-----BEGIN CERTIFICATE-----
(Intermediate CA certificate)
-----END CERTIFICATE-----
-----BEGIN CERTIFICATE-----
(Root CA certificate)
-----END CERTIFICATE-----
-----BEGIN PRIVATE KEY-----
(Private Key)
-----END PRIVATE KEY------ This combined file represents the certificate chain that will be imported. Make sure no extra characters or line breaks are present beyond these blocks . If your CA is a well-known public CA, it might have provided a bundle; otherwise manually concatenating as above is the way to go . Save this combined text – we will copy it into Aria LCM in the next step. Tip: Ensure the private key from the CSR and the certificate match. Since we used the CSR generated by Aria LCM, the signed certificate will naturally correspond to that private key. Just be sure to use the same CSR’s private key when importing.
At this stage, you have:
- The new CA-signed certificate (with its chain and private key combined).
Next, we’ll import this new certificate into Aria Suite Lifecycle’s Locker and perform the replacement on vIDM.
Replacing the Certificate in vIDM via Aria Suite Lifecycle Manager UI
Now that you have the new certificate and its private key, use VMware Aria Suite Lifecycle Manager (8.18) to replace the existing vIDM certificate. Aria LCM will handle updating the vIDM appliance and re-trusting integrated products. The replacement involves two main steps: importing the certificate into Aria’s Locker and then running the Replace Certificate wizard for the vIDM instance.
1. Import the New Certificate into Aria Suite Lifecycle (Locker)
First, add the new certificate (with its key) to Aria LCM’s certificate store (Locker):
- In the Aria Suite Lifecycle UI, navigate to Home > Locker > Certificates. Click the “Import” button to import a new certificate .

- In the Import Certificate dialog, fill in the details:
- Name: Provide a name to identify this certificate (e.g., “vIDM-2025-CA-signed”). This is just a label within Aria LCM.
- Browse: Browse and select the file that includes the combined certificate with the private key.
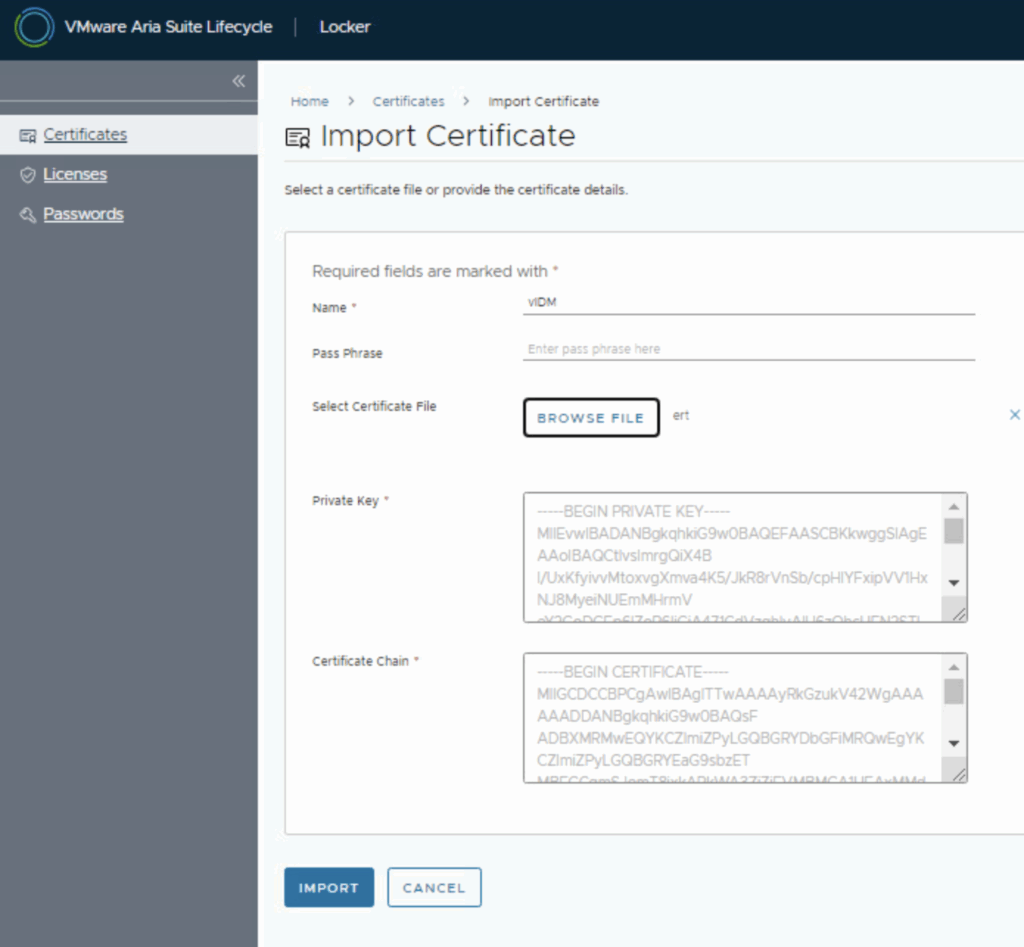
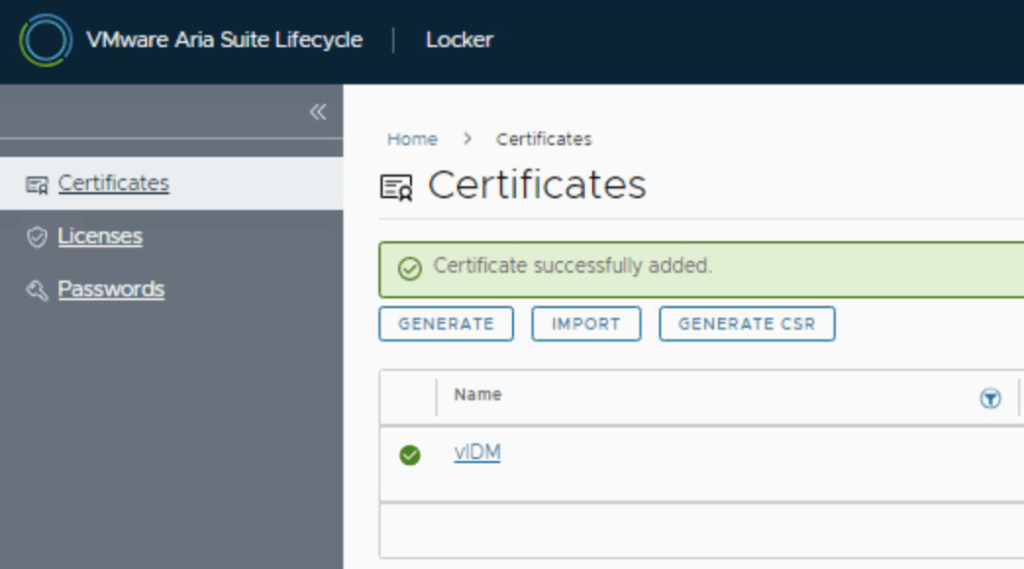
- Click Import. If the format is correct, Aria LCM will add this certificate to its list. You should see a success message and the new certificate listed in the Locker’s certificate library, likely with the name you provided . It’s a good idea to verify the certificate’s details in the Locker list (such as issuer, expiration) to confirm it’s the correct one. At this point, the certificate is stored in Aria LCM but not yet applied to vIDM – it’s just available for use. Note: If the import fails, re-check that the private key matches the certificate and that the chain is complete. A common mistake is missing an intermediate CA. Aria LCM may also validate that the certificate’s CN/SAN matches the vIDM appliance FQDN; ensure those are correct.
2. Run the Certificate Replacement Wizard for vIDM
With the certificate in the locker, you can now initiate the replacement on the vIDM service:
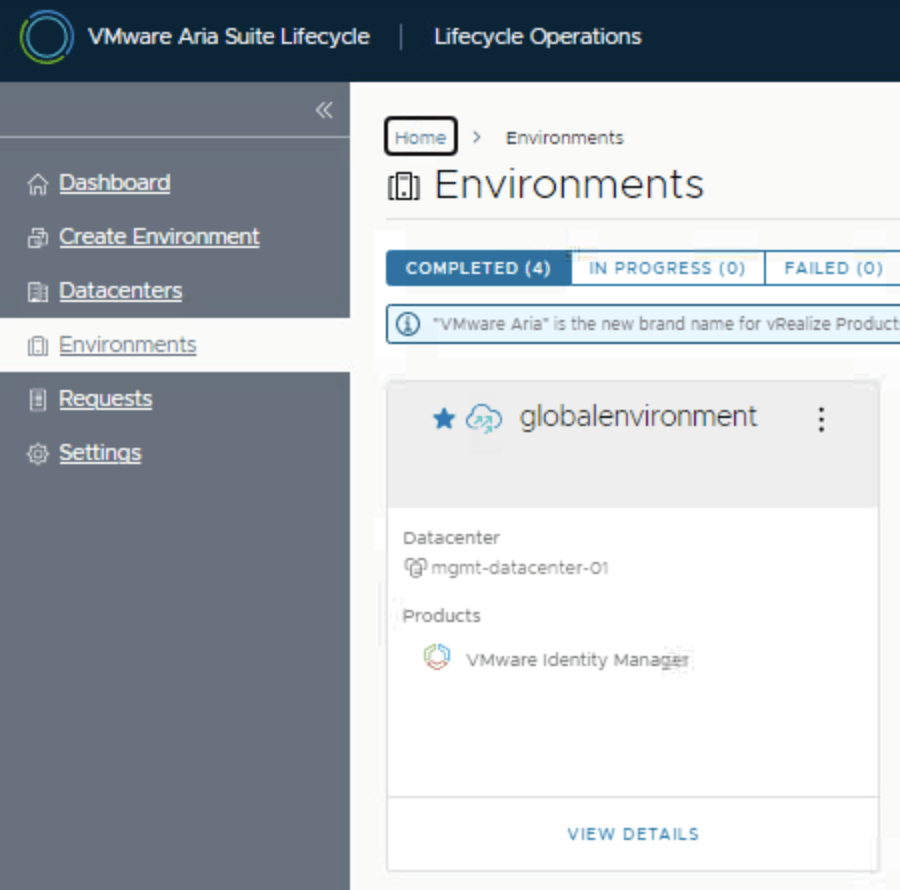
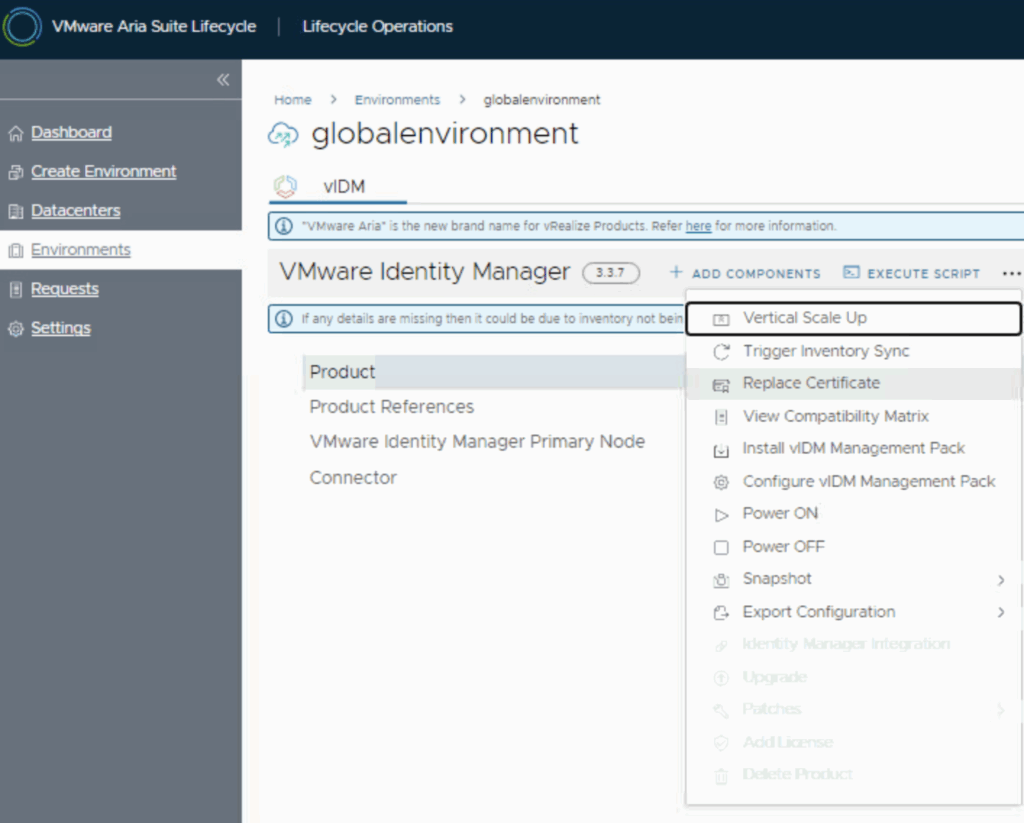
- Open the Environment: Navigate to Home > Lifecycle Operations > Environments in Aria Suite LCM. Identify the environment that contains your VMware Identity Manager. In many setups, this is the special “globalenvironment” which holds vIDM (especially if vIDM is deployed as the global SSO for other products). If you are unsure, look for an environment entry that lists VMware Identity Manager in its components. Click on the environment (or use its Actions “…” menu) and select “Replace Certificate.” (In some versions, you might first select the vIDM product within the environment, then choose Replace Certificate. In 8.18, selecting Replace Certificate at the environment level will prompt you to pick which certificate to replace if multiple are present – choose the vIDM/Workspace ONE Access instance.)
- Current Certificate Review: A wizard opens, showing the current certificate details. You’ll see the existing certificate’s subject, issuer, and expiration. Review this information (and optionally take note of the expiration date to verify you’re indeed updating to a later one). Click Next to proceed.
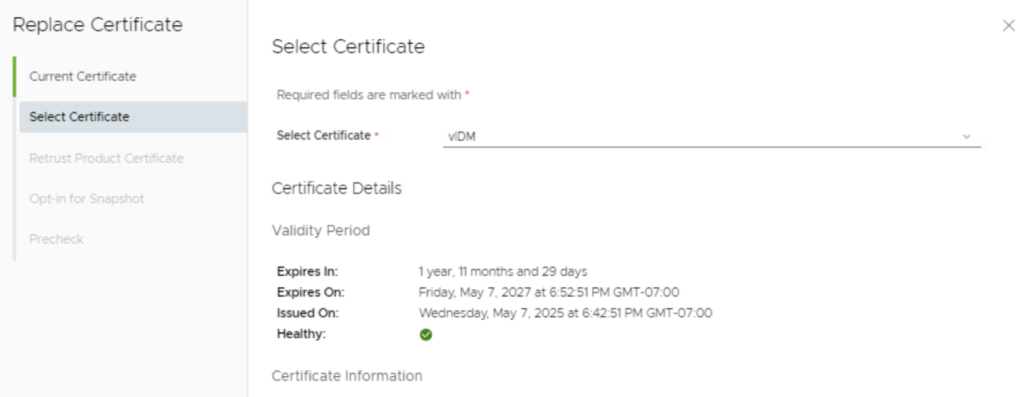
- Select New Certificate: In the next step, you are prompted to select the replacement certificate. There will be a dropdown or list populated by the certificates stored in the Locker. Choose the new certificate you imported (the name you gave it in the locker) from the Select Certificate dropdown . The UI will display the details of that selected certificate (issuer, validity period, subject, SAN, etc.) so you can confirm it’s the correct one. After confirming the selection, click Next.
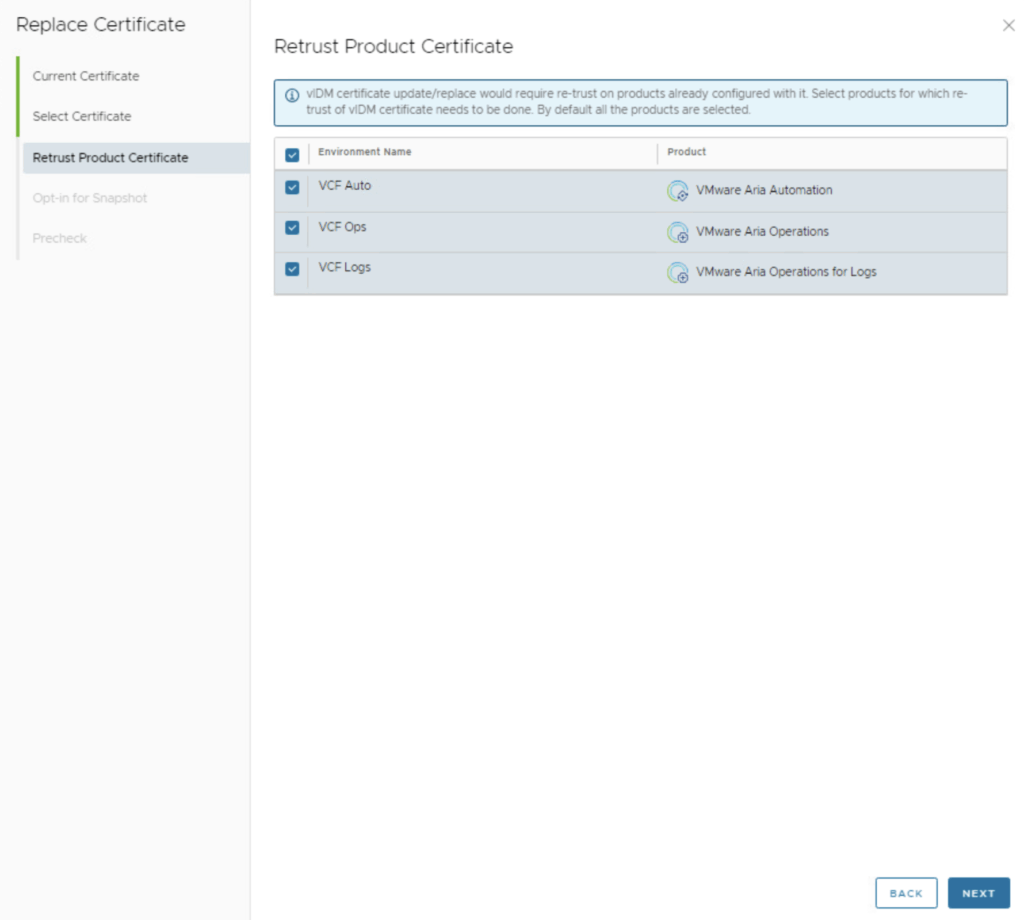
- (Re-)Trust Integrated Products: If your vIDM is integrated with other Aria Suite products (like Aria Automation, Aria Operations, etc.), Aria LCM will prompt to re-trust the certificate on those products. This is the “Re-Trust Product Certificate” step . By default, all products that were configured to trust the old vIDM certificate are selected to have their trust updated to the new certificate. For example, if you have vRealize Automation or vRealize Operations in the environment, Aria LCM will propagate the new vIDM certificate to those products so they trust vIDM going forward.
- If no other products are integrated (i.e., vIDM is standalone or nothing else is using it via LCM), this step might either be skipped or just show vIDM itself.In our case, let’s assume the default: leave all relevant products checked for re-trust. (If you had a reason to exclude one, you could uncheck it, but typically you want all to trust the new cert.)
- Click Next after reviewing the list of products to retrust. (The UI might combine this with the next step in 8.18, but conceptually it’s ensuring all components accept the new certificate.)
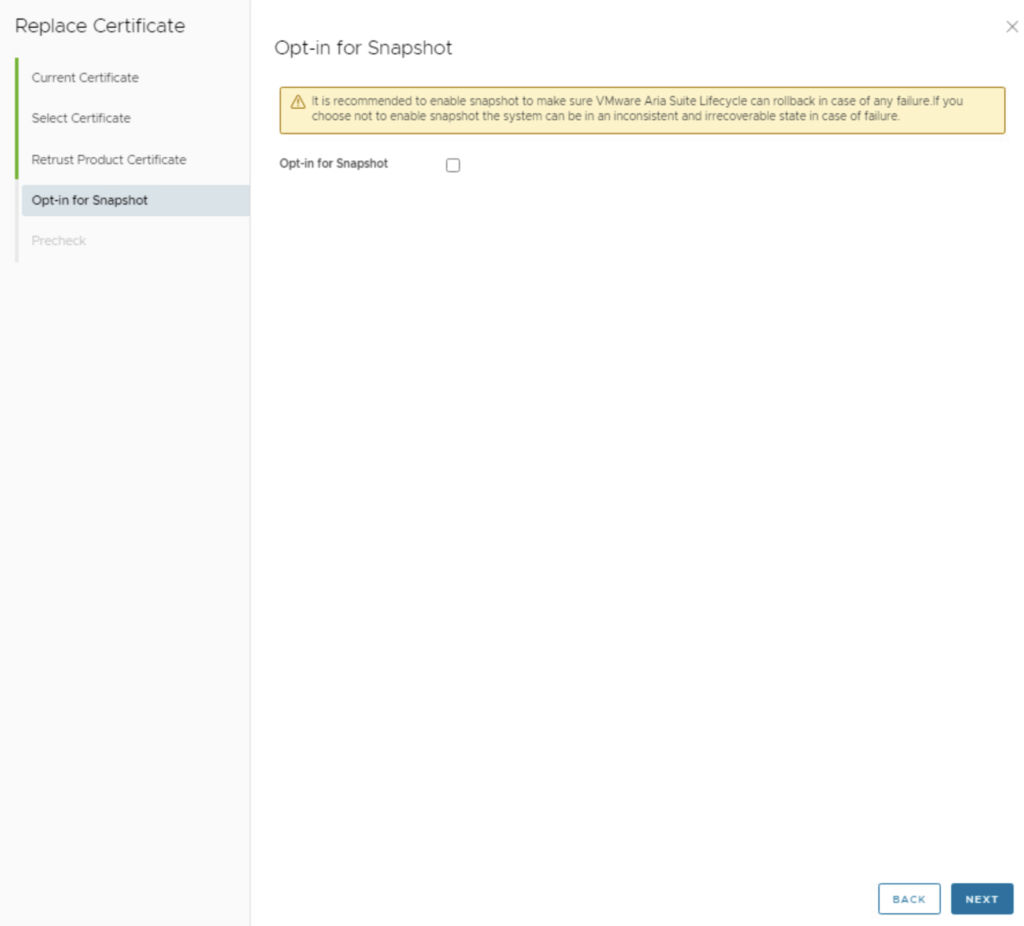
- Snapshot Option (Rollback Plan): Aria Suite LCM may offer an “Opt-in for Snapshot” checkbox during the wizard . This feature will automatically create snapshots of the vIDM appliance (and possibly other products) before applying the new certificate, in case a rollback is needed. This is particularly useful for products that don’t have an easy built-in certificate rollback. vIDM (Workspace ONE Access) is one of those products where a snapshot is recommended (because if something goes wrong with the certificate, you might need to revert to a snapshot) .
- If you did not manually snapshot earlier, it’s wise to check this box so LCM takes care of snapshots now. (LCM will snapshot vIDM and any selected products that lack native rollback; the wizard will indicate which ones are included.)
- In our scenario, since we already took snapshots manually, you might leave it unchecked to avoid duplicate snapshots.
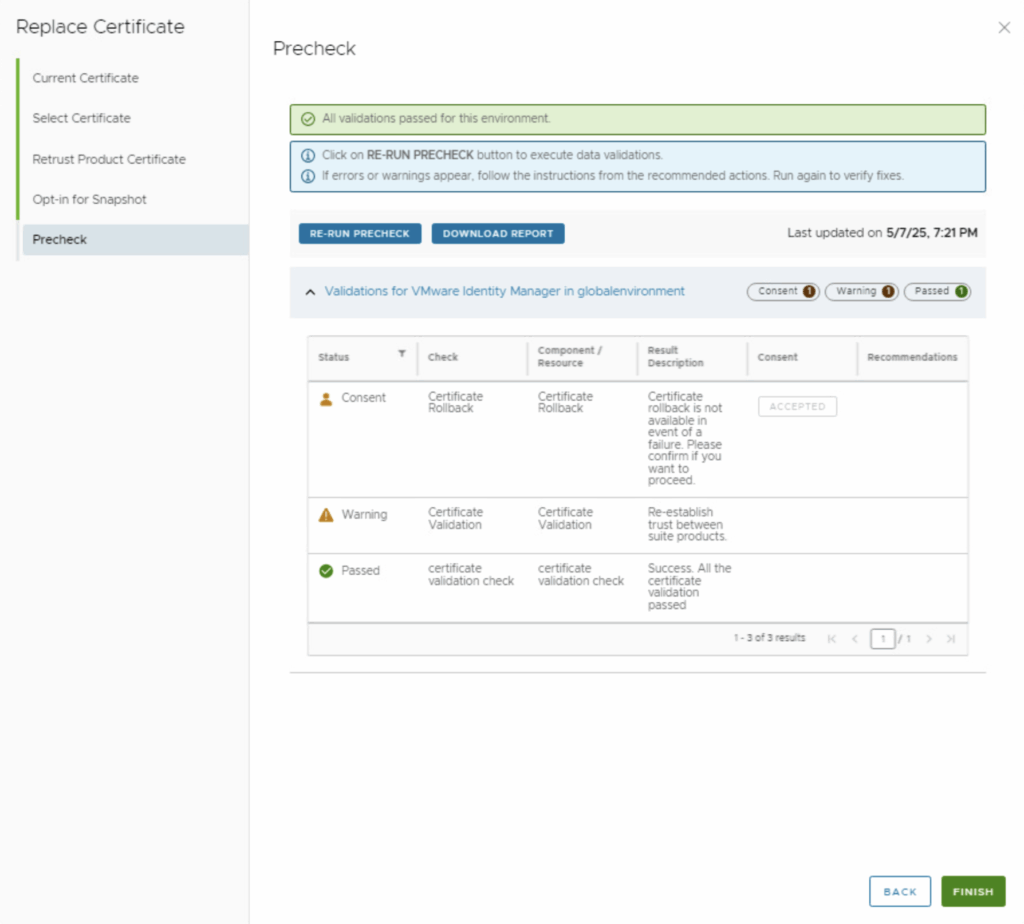
- Pre-Check and Validation: Before applying changes, Aria LCM runs a pre-check to validate the new certificate and the environment. This includes verifying the certificate format, that the vIDM service is reachable, and that integrated products are ready for the trust update. If the wizard has a Precheck step, run it and wait for the results.
- Ensure you get a “All validations passed” message. You might see a warning about re-trusting products (highlighted in the image) – this is normal, reminding you that after the process you should verify the other products trust the new certificate . If any errors appear, address them before proceeding (for example, an error could indicate a mismatch in the certificate chain or connectivity issues).Once pre-check passes, click Finish (or Replace/Submit) to kick off the certificate replacement process.
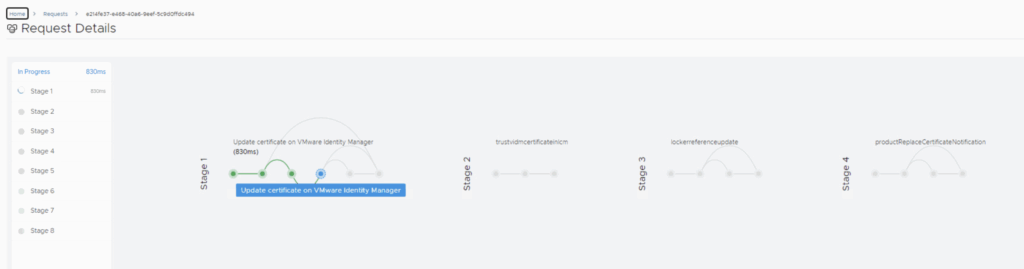
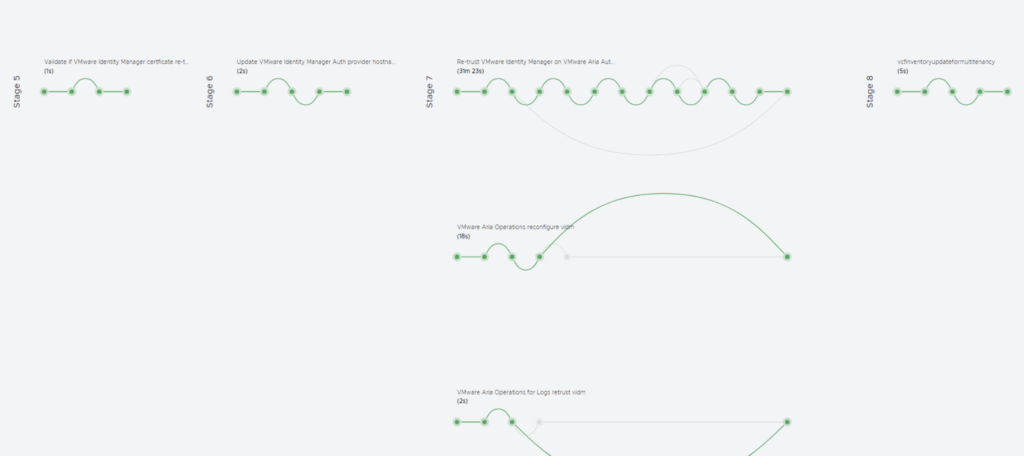
- Process Execution: Aria Suite LCM will now automate the certificate replacement. This typically involves updating the vIDM appliance’s keystore with the new certificate, restarting the vIDM service, and updating trust on each integrated product. You will see a request initiated in Aria LCM with multiple stages (tasks) executing . Monitor the progress in the UI’s request/task viewer. In 8.18, there may be around 5-6 stages (e.g., taking snapshot if chosen, installing cert on vIDM, restarting services, updating product trusts, etc.).The process can take several minutes. During this time, user logins through vIDM might be unavailable, so do this in a maintenance window.
- Completion and Verification: Once the request finishes successfully (all stages completed), verify the new certificate is in effect:
- Open a web browser and navigate to the vIDM URL (e.g., the vIDM admin UI or user portal). Ensure the browser shows a secure connection with the new certificate. The certificate details should show the new issuer (your CA) and the updated validity period . No more browser warnings should appear if the CA is trusted by the client machine.
- Log in to the vIDM admin console, go to https://idm_server:8443/cfg/ssl, and confirm it lists the new certificate information.

-
- In Aria Suite LCM’s Certificates view (Locker), you should see that the new certificate is now marked as “In Use” for the vIDM service . The old certificate may still be present in the locker but no longer associated with the environment.
- Test integration points: for example, if vIDM is used to log in to vRealize Automation or others, try those apps to ensure you can still log in and that they trust the new vIDM cert. (LCM should have re-trusted automatically, but it’s good to confirm.)
If everything looks good, the vIDM certificate has been successfully replaced with your new CA-signed certificate. 🎉
Replacing the Certificate via Automation/Scripts (Aria LCM 8.18)
VMware Aria Suite Lifecycle Manager 8.x provides REST APIs that allow automation of many tasks – including certificate management. This is useful if you need to script the certificate replacement across multiple environments or integrate it into a broader automation pipeline. In version 8.18, you can perform the same steps we did in the UI programmatically via the Aria LCM API or PowerShell scripts.
Capabilities for automation include: generating a CSR, importing a certificate into the locker, and triggering the replace certificate operation on an environment. VMware’s API programming guide and community examples illustrate how this works . Here’s an outline of how one could automate the vIDM cert replacement:
- API Access & Authentication: Use Aria LCM’s API (typically at https://<LCM-host>/lcm/lcops/api/v2/…). Authenticate with your LCM credentials to obtain a token or use basic auth as supported. For scripting, PowerShell’s Invoke-RestMethod or tools like curl can be used. (Ensure you have network access to LCM and proper credentials/roles.)
- Generate CSR via API (optional): There is an API endpoint to generate a CSR, similar to the UI. (Alternatively, you might generate the CSR externally or via the UI as above. In automation, you could also use OpenSSL to create key/CSR, since either way you’ll need the key.) If using API, you’d call an endpoint like POST /api/v2/certificates with the CSR details – refer to the API guide for exact specs.
POST "https://arialcm_url/lcm/locker/api/v2/certificates/csr" -H "accept: */*" -H "Authorization: Password" -H "Content-Type: application/json" -d "{ \"c\": \"US\", \"cN\": \"vIDM_replacement\", \"host\": [ \"idm.vcf.sddc.lab\" ], \"ip\": [ \"10.60.0.151\" ], \"l\": \"US\", \"o\": \"VMware by Broadcom\", \"oU\": \"Cloud Management\", \"sT\": \"CA\", \"size\": 2048, \"tenant\": \"string\"}"- Import Certificate via API: After obtaining the signed cert, you must import it into the Locker via API. This likely involves a POST to an endpoint such as /api/v2/certificates with a JSON payload containing the name, private key, and certificate chain. The API Guide provides the JSON structure; essentially you’d provide the same info as the UI form (private key and cert chain PEM) . On success, the API returns an identifier (ID) for the newly added certificate. Take note of this Locker Certificate ID.
POST "https://arialcm_url/lcm/locker/api/v2/certificates/import" -H "accept: */*" -H "Authorization: Password" -H "Content-Type: application/json" -d "{ \"alias\": \"cert2\", \"certificateChain\": \"-----BEGIN CERTIFICATE-----\\\...\\\-----END CERTIFICATE-----\\\-----BEGIN CERTIFICATE-----\\\...\\\-----END CERTIFICATE-----\\\\", \"passphrase\": \"cert2\", \"privateKey\": \"-----B...\\\-----END PRIVATE KEY-----\\\\"}"- Find Environment and Product IDs: You will need to identify the environment ID and product ID for vIDM in your Aria LCM setup. You can retrieve environments via GET /lcm/lcops/api/v2/environments and find the one corresponding to your global environment/vIDM (look for the environment name and the product list inside it). vIDM’s product identifier is usually “vidm” . For example, the environment might have a JSON structure where products includes an entry with “product”: “VIDM” or similar, and an id like vidm.
GET "https://arialcm_url/lcm/lcops/api/v2/environemnts" -H "accept: application/json" -H "Authorization: Password"- Pre-Validate Certificate via API: (Optional but recommended) Aria LCM offers a pre-validation API call to test the certificate on the target before fully applying it. This corresponds to the pre-check we saw in the UI. For vIDM, the endpoint would be:POST /lcm/lcops/api/v2/environments/<envId>/products/vidm/certificates/<certId>/pre-validatewhere <envId> is your environment identifier and <certId> is the locker ID of the new certificate . This call will kick off a validation task (returning a request ID). You can then poll GET /lcm/request/api/v2/requests/<requestId> to check if the state is COMPLETED . Ensuring it completes without error is akin to passing the pre-check (you might retrieve details of any warnings/errors via another endpoint or the request status).
POST "https://arialcm_url/lcm/lcops/api/v2/environemnts/globalenvironemnt/products/vidm/certificates/new_cert/pre-validate" -H "accept: application/json" -H "Authorization: Password"- Replace Certificate via API: To actually replace, you use a HTTP PUT request. The endpoint for replacement is: PUT /lcm/lcops/api/v2/environments/<envId>/products/vidm/certificates/<certId> . This triggers the replacement process. The response will typically include a request ID indicating the task has started . You then monitor this request just like the pre-validate, by polling the requests API until the status is COMPLETED.
PUT "https://arialcm_url/lcm/lcops/api/v2/environemnts/globalenvironemnt/products/vidm/certificates/new_cert" -H "accept: application/json" -H "Authorization: Password"- Post-Replace Checks: Your script can also call back to verify the environment’s certificate status after completion. For example, you could GET the environment details to see if the certificate thumbprint or ID for vIDM has changed to the new one. Nonetheless, it’s good to have the script output instruct an admin to manually verify in a browser (unless you automate that check too via an HTTPS call to vIDM).
Using the API can save time when you have to do this on many instances or as part of CI/CD for your environment configurations. Always refer to the official VMware Aria Suite Lifecycle API Programming Guide for the correct endpoints and JSON formats .
Note: Ensure that the Aria LCM appliance trusts the CA that issued the new certificate (this is usually handled if the CA cert was part of the chain you imported). If not, you may need to import the CA’s root cert into Aria LCM’s trust store separately. In our steps above, including the full chain in the import typically covers this.
Troubleshooting Tips and Best Practices
Replacing certificates in a complex environment can sometimes present challenges. Below are some best practices to follow and troubleshooting pointers in case you encounter issues:
- Plan Ahead for Expiration: Do not wait until the vIDM certificate is expired to replace it. If the certificate is already expired, Aria LCM might have trouble communicating with vIDM, causing replacement to fail. In such cases, you may need to update trust manually or use a load balancer to bridge the trust. Always renew certificates in advance.
- Load Balancer Considerations: If vIDM is fronted by a load balancer (NSX ALB, F5, etc.) that terminates SSL, you likely have a certificate on the load balancer as well. Update the load balancer’s certificate first, before replacing vIDM’s certificate via LCM . This ensures that Aria LCM (which usually connects to vIDM via the VIP) sees a trusted path. Not updating the LB beforehand can lead to errors like “Unable to trust load balancer’s certificate” or other trust failures in LCM . After LB update, proceed with the vIDM cert replacement as above.
- Ensure vIDM is Healthy: If you have a cluster of vIDM nodes, make sure all nodes are in a healthy state
- Matching Key and Certificate: A very common mistake during import is using a wrong key or certificate file. Remember that the certificate you import must be signed for the CSR you generated, and thus match the private key. If you accidentally mix up files (e.g., copy the wrong key), the import might still succeed, but the replace will fail at validation. Double-check the certificate’s details (CN, SAN) match the vIDM and that you used the correct private key. If in doubt, re-generate a CSR and get a new cert to be sure.
- Certificate Chain Issues: If the new certificate isn’t showing as trusted in browsers or by other products even after replacement, it often means the chain is incomplete:
- Verify that the intermediate and root CA certificates were included in the chain during import .
- On the vIDM appliance, you might need to ensure the trust store has the root CA. Usually Aria LCM does this for you, but if something is amiss, you can manually import the CA cert into vIDM’s keystore or the OS trust (this is advanced and rarely needed if LCM works correctly).
- You can use OpenSSL to test the service: e.g., openssl s_client -connect vidm.url:443 -showcerts to see what certificate chain is presented.
- Post-Replacement Trust Tasks: Aria LCM will re-trust integrated products automatically (and the pre-check warns about it) . However, in some cases you might need an extra step:
- For products like vRealize Operations or Automation that were integrated with vIDM, you may have to re-validate the connection or accept the new certificate in those products’ UIs. For example, vROps might show a certificate trust prompt for the new vIDM cert if not updated. Usually, by going to the integration or auth source settings in those products and clicking “Trust” or “Accept Certificate” will do it. (This is essentially what LCM’s retrust should handle, but it’s good to confirm.)
- If any product was not managed by the same Aria LCM environment and trusts vIDM, you’ll need to manually update its trust. For instance, if some external system uses vIDM’s LDAPS or OAuth, provide it the new CA cert.
- Fallback Plan: If the replacement fails midway for some reason (e.g., vIDM didn’t come back online with the new cert), you have a couple of options:
- Automatic Rollback: Aria LCM 8.18 has a built-in rollback for certain failures if snapshots were taken. If you opted for the snapshot in the wizard, you can use LCM to revert to that snapshot through the LCM UI by marking the task as failed and opting to rollback. Otherwise, you can manually revert the VM snapshot of vIDM.
- Manual Restore: In absence of snapshots, you can try to re-import the old certificate (which should still be in Locker) by running a similar Replace Certificate wizard but choosing the old certificate to reapply it. This might restore functionality as a quick fix.
- vIDM UI/CLI: As a last resort, you can log directly into the vIDM appliance and update its certificate via commands or the admin UI (if accessible) according to VMware’s documentation. However, doing so might break LCM’s awareness, so it’s better to use LCM or snapshots when possible.
- Special Characters in Passwords: A niche but known issue – if the vIDM admin password (configured in LCM for managing vIDM) contains certain special characters (like quotes or slashes), the certificate import or replace might error out due to how LCM passes the password . If you see unexpected errors during the configure stage, consider resetting the vIDM service account password to a simpler one (update it in LCM environment settings) and retry.
- Logging and Support: If things go wrong beyond these tips:
- Check the Requests tab in Aria LCM for the failed request.
- You can download logs from Aria LCM (support bundle) which include detailed workflow logs. Also vIDM’s logs (in
/opt/vmware/horizon/workspace/logs/on the appliance) might show why a service didn’t start (like keystore or certificate errors). - Don’t hesitate to reach out to VMware support if a production environment is impacted and you need assistance; they can interpret LCM logs and guide on fixing trust issues.
- Best Practice – Monitoring: After any certificate change, monitor the system closely. Ensure users can log in to the vIDM portal, and that scheduled jobs or syncs (like Active Directory sync, if configured) still run. Also verify that other suite products (vRA, vROps, etc.) are functioning normally with respect to authentication. It’s wise to notify end-users of the maintenance beforehand so they know to reconnect if needed.
- Document and Schedule Next Renewal: Keep a record of when you replaced the certificate and the steps taken. Note the new certificate’s expiration date and set up a reminder well in advance of that date to perform the next renewal. This prevents last-minute scrambles.
By following the above guidance, you can smoothly replace the VMware Identity Manager certificate using Aria Suite Lifecycle Manager 8.18 with minimal downtime. The process not only updates the certificate on vIDM but also streamlines trust updates to the broader VMware Aria suite, ensuring a secure and integrated cloud management environment.