Setting up a vSAN cluster on a single ESXi host without vCenter is simpler than you might think. This guide walks you through a CLI-based method to configure VMware by Broadcom’s vSAN in a standalone environment. Whether you’re testing in a lab or laying the groundwork for a larger cluster, a single node vSAN deployment offers a flexible starting point that scales as your needs grow.
What Is a Single Node vSAN?
VMware by Broadcom’s vSAN is designed for multi-host clusters managed by vCenter, typically requiring at least two hosts for production resilience. However, with CLI tools, you can establish a vSAN cluster on a single ESXi host. This setup is ideal for experimentation or initiating a cluster, providing a solid base for later expansion with vCenter and additional nodes.
Advantages of Single Node vSAN Deployment
A single node vSAN setup streamlines testing and initial configurations. Built on VMware by Broadcom’s powerful virtualization platform, it offers quick setup, supports proof-of-concept work, and ensures a smooth path to a full cluster—perfect for IT professionals planning phased vSAN implementations.
Prerequisites for Single Node vSAN Setup
Prepare these essentials before configuring your single node vSAN:
- Hardware: One ESXi host with at least two disks—a cache disk (e.g., SSD) and a capacity disk (e.g., SSD or HDD). Check compatibility on VMware by Broadcom’s vSAN HCL.
- ESXi Version: 7.0 Update 3 or later for robust vSAN support.
- Access: SSH enabled on the ESXi host for CLI operations.
- Networking: A VMkernel interface designated for vSAN traffic.
- License: An ESXi evaluation license for testing; a vSAN license is needed with vCenter.
- Time Estimate: 45–75 minutes, depending on CLI expertise.
Step 1: Check Hardware for Single Node vSAN
Confirm your ESXi host meets single node vSAN requirements.
- Log into the ESXi web UI at
https://<ESXi_IP>/ui. - Go to Storage > Devices to examine disks and controllers.
- Validate compatibility using VMware by Broadcom’s vSAN HCL.
- Ensure one cache disk and one capacity disk are available.
Note: HCL-compliant hardware enhances your single node vSAN reliability.
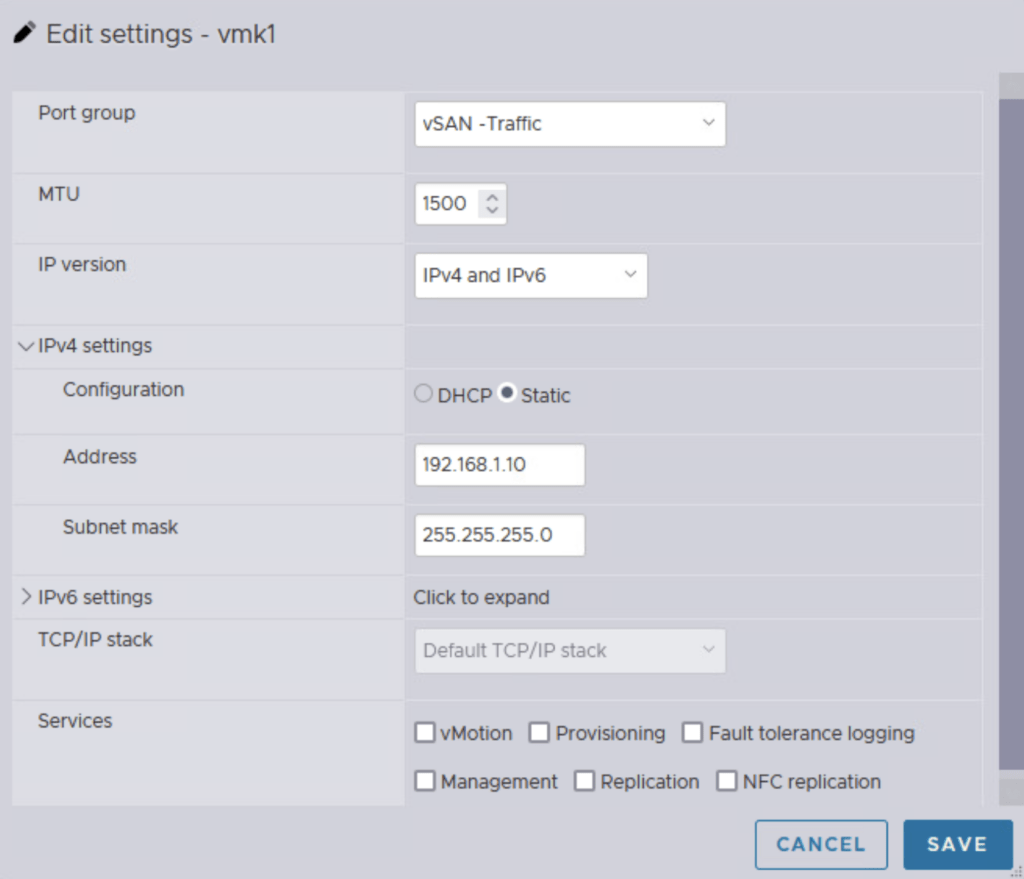
Step 2: Set Up Networking for Single Node vSAN Traffic
Establish a VMkernel interface for vSAN communication.
- Access the ESXi web UI.
- Navigate to Networking > VMkernel NICs and select Add VMkernel NIC.
- Configure it:
- Port Group: Choose or create one (e.g., “vSAN-Traffic”).
- IP Settings: Assign a static IP (e.g., 192.168.1.10) within your subnet.
- Services: Enable vSAN to tag the interface.
- Save and confirm the VMkernel NIC (e.g., vmk1) is operational.

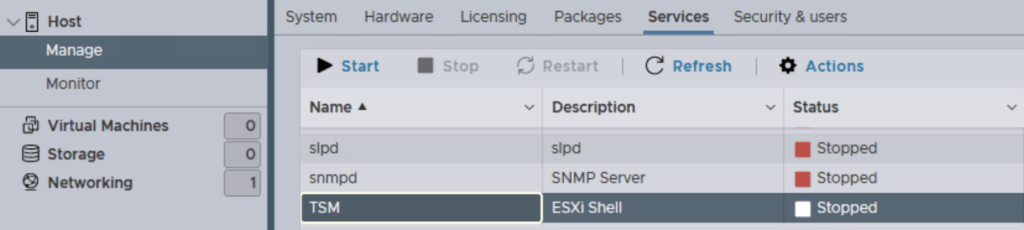
Step 3: Enable SSH for Single Node vSAN Management
Activate CLI access to manage your single node vSAN.
- In the ESXi web UI, go to Manage > Services.
- Find TSM-SSH, select it, and click Start.
- Connect via an SSH client (e.g., PuTTY) using the ESXi IP and root credentials.
Step 4: Build the Single Node vSAN Cluster
Create the vSAN cluster on your ESXi host via CLI.
- In the SSH session, execute:
esxcli vsan cluster new
This establishes a vSAN cluster with the host as the sole member, assigning a sub-cluster UUID.
- Verify the setup:
esxcli vsan cluster get
Check for “Enabled: true” and details like Local Node UUID and Sub- Cluster UUID.
Step 5: Assign Disks to Your vSAN Cluster
Add disks to create a vSAN disk group.
- List available disks:
esxcli storage core device list
Identify cache and capacity disk IDs (e.g., naa.xxx).
- Confirm disks are unclaimed:
Ensure no existing datastores use them.
- Add disks to vSAN (replace placeholders with your disk IDs):
esxcli vsan storage add -s <cache-disk> -d <capacity-disk>
Example: esxcli vsan storage add -s naa.5000cca01abc1234 -d naa.5000cca01def5678.
- Validate the disk group:
esxcli vsan storage list
Ensure disks are claimed and grouped under vSAN.
Step 6: Validate Your Single Node vSAN Deployment
Test the vSAN cluster to confirm it’s running correctly.
- Check cluster status:
esxcli vsan cluster get
Verify “Enabled: true” and a healthy host state.
- In the ESXi web UI, check Storage for the “vsanDatastore”.
- Deploy a test VM:
- Create a small VM in the UI, selecting “vsanDatastore”.
- Power it on and confirm it operates as expected.
Step 7: Prepare for v SAN Cluster Expansion
Plan to scale your single node vSAN configuration.
- Record Key Info: Document the VMkernel IP, disk IDs, and Sub-Cluster UUID (from
esxcli vsan cluster get). - Scaling Steps: To expand:
- Deploy vCenter and integrate this host into a vSAN cluster.
- Add more ESXi hosts using
esxcli vsan cluster join -u <sub-cluster-uuid>. - Incorporate additional disks to expand the vSAN datastore.
- Apply storage policies (e.g., FTT=1) for redundancy.
- Licensing: Obtain a VMware by Broadcom vSAN license for full features.
Tip: Your single node vSAN can evolve into a multi-node cluster with ease.
Conclusion
A single node vSAN on an ESXi host without vCenter provides a versatile option for lab testing or starting a cluster build. It’s a scalable foundation that adapts as you add nodes and vCenter management. For production use, VMware by Broadcom advises a minimum of two hosts with vCenter for full resilience and functionality.