
With VCF 9.1.1 released on September 3, 2026, I wanted to bring the management-service upgrades together in one place. I already wrote a separate walkthrough for each component, but following a collection of individual posts is not how I want to plan a maintenance window. This post is the all-in-one runbook I would use for a VCF 9.1.0.x fleet, including the VCD Migrator that was missing from my earlier set of guides.
VCF 9.1.1 is a maintenance release with an updated Bill of Materials (BOM). The official release notes say that a 9.1.0.x environment starts by patching Fleet Lifecycle. After that, the remaining components follow a small set of dependencies. The release notes also link to the VCF Upgrade Planning Tool, which is useful when the source environment is older than 9.1.0.x.
This article covers the VCF Management page in VCF Operations. It does not replace the supported upgrade path for a VCF 5.2.x or 9.0.x environment, the core SDDC upgrade order, or the migration workflow from older releases. For a fleet-managed 9.1.0.x maintenance patch, use VCF Management; Broadcom does not recommend the manual .PAK method for that case.
The Important Difference From the Older Guides
The VCF Operations page can show an Upgrade (ALL) action after the target version is selected. It is tempting to select every row and let the page run everything at once. Broadcom documents a 9.1 lifecycle issue where concurrent component runs can interfere with the plan records. A component can finish successfully but remain stuck as Ready for upgrade, with the same build on both sides of the upgrade path. That state can block later upgrades and has no customer-side database fix.
For that reason, this is an all-in-one article and execution plan, not a recommendation to launch every component concurrently. Select one component, run its prechecks, upgrade it, wait for the task to show Completed, confirm the version, and then continue. This also makes a failed task much easier to isolate.
What Gets Patched
The exact rows depend on which services are installed in each VCF instance. The build numbers below are the versions shown in my lab and are included to make the upgrade path easy to recognize. Confirm the target offered by your VCF Operations UI against the current 9.1.1 BOM.
| Component | Lab source | Lab target | Detailed walkthrough |
|---|---|---|---|
| Fleet Lifecycle | 9.1.0.0400.25570104 | 9.1.1.0.25713934 | Fleet Lifecycle |
| VCF Operations | 9.1.0.0400.25541561 | 9.1.1.0.25679751 | Operations lab result and method caveat |
| VCF Services Runtime | 9.1.0.0200.25555874 | 9.1.1.0.25714471 | Services Runtime |
| VCF Automation | 9.1.0.0200.25556825 | 9.1.1.0.25714559 | VCF Automation |
| Migration Service Engine (VCD_MIGRATOR) | 9.1.0.0200.25556825 | 9.1.1.0.25714559 | Migration Service Engine |
| SDDC Lifecycle | 9.1.0.0400.25570103 | 9.1.1.0.25713940 | SDDC Lifecycle |
| Identity Broker | 9.1.0.0100.25522734 | 9.1.1.0.25679886 | Identity Broker |
| Salt RaaS | 9.1.0.0100.25434834 | 9.1.1.0.25679895 | Salt RaaS |
| Salt Master | 9.1.0.0400.25544946 | 9.1.1.0.25679895 | Salt Master |
| Log Management | 9.1.0.0400.25544947 | 9.1.1.0.25679624 | Log Management |
| Operations for Networks | 9.1.0.0200.25517220 | 9.1.1.0.25682214 | Operations for Networks |
| Real-Time Metrics Store | 9.1.0.0200.25555874 | 9.1.1.0.25714471 | Real-Time Metrics Store |
| Real-Time Metrics | 9.1.0.0400.25544944 | 9.1.1.0.25679622 | Real-Time Metrics |
| Telemetry | 9.1.0.0.25181946 | 9.1.1.0.25671600 | Telemetry |
The BOM also lists Software Depot 9.1.1.0.25713941, Cloud Proxy 9.1.1.0.25679891, and License Server 9.1.1.0.25679819. Include them in the final inventory check. Cloud Proxy and License Server lifecycle is bundled with VCF Operations in the standard lifecycle workflow. Optional services may add more rows; the table above covers the component walkthroughs already published on this blog.
If the inventory includes Migration Service Engine, that is the VCD Migrator backend. VCF Operations labels the row Migration service engine, while the workflow and download tool use VCD_MIGRATOR and VCF_SERVICE_VCD_MIGRATION_BACKEND. Upgrading this component prepares the migration service; it does not start a VCD workload migration.
Before You Begin
This runbook assumes that the VCF instance is already on 9.1.0.x and that VCF Operations can see its management components. If the environment is on 5.2.x or 9.0.x, use the supported upgrade path first. The VCF 9.1 upgrade guidance covers the larger sequence: VCF Operations, SDDC Manager, VCF Management Services, and then the core domain components.
Before opening the upgrade page:
- Check the source and target builds against the VCF Interoperability Matrix, the release notes, and the BOM. Do not force an upgrade when the target is not a supported path.
- Configure and validate the backup target required by each component under Build -> Lifecycle -> VCF Management -> Backup & Restore. For file-based VCF Management services, an external SFTP server is the recommended target, and you should verify a fresh backup before patching. Use an image-based backup for VCF Operations and Operations for Networks. Keep the encryption passphrase available for a restore. Broadcom lists Telemetry and Real-Time Metrics as N/A for backup, and the runtime file-based backup covers service accounts only. Log Management backups exclude log data, which must be archived separately. Follow the component backup-method table; do not assume every row has an on-demand component backup.
- Download all required binaries before starting. For the primary VCF instance, Broadcom’s required-binaries list includes Fleet Lifecycle, SDDC Lifecycle, VCF Services Runtime, Salt RaaS, Salt Master, Identity Broker, Software Depot, Telemetry, and License Server. Use the VCF Download Tool and binary-management documentation for disconnected environments.
- Check VCF Operations, the VCF services runtime, and every hosted component for healthy nodes, disk, CPU, memory, DNS, certificates, and credentials. A full management-services node or volume can prevent staging; review the node-capacity guidance and volume-capacity guidance if alerts are present.
- If you use custom VCF Automation profiles, review the cleanup procedure in KB 451147 before upgrading. Custom profiles from earlier 9.x releases can make the Automation upgrade fail.
- Record the integrations and user-facing checks you will run afterward. Identity Broker affects SSO, Log Management affects ingestion, Operations for Networks affects network visibility, and Automation affects portals and deployments.
- Plan a maintenance window. Do not start another lifecycle operation while the current component task is running.
The Dependency Order
The release notes give the mandatory boundaries. I use the following order for a maintenance window, while still checking the target and prechecks shown by VCF Operations:
- Fleet Lifecycle must be patched first.
- Run the VCF Operations appliance update by itself. For a fleet-managed 9.1.0.x environment, use the VCF Management lifecycle workflow; the PAK procedure below is included for supported legacy paths only.
- Patch VCF Services Runtime before Identity Broker or Salt RaaS on the same VCF instance. I also keep Salt Master after the runtime so all Salt services are handled in the same dependency boundary.
- Patch VCF Automation before Migration Service Engine (
VCD_MIGRATOR), if it is installed. - If both Log Management and Operations for Networks are installed, I run Log Management to completion before Operations for Networks. This is my safe sequential choice; Broadcom documents a problem with running those operations in parallel in KB 452169.
- Patch every remaining installed component one at a time. Wait for the overall task to show Completed, including inventory synchronization, and verify the component version before starting the next row. This sequential execution follows KB 453246.
Operations and Software Depot are isolated operations in this runbook because their tasks can block binary availability or other lifecycle work. The release notes remain the authority for any component or dependency not listed here.
Before Running the Component Steps
The shared preparation is already covered above. Before every individual row, return to Build -> Lifecycle -> VCF Management -> Upgrade, confirm the intended VCF instance and target, clear other selections, expand Check Required Binaries, and select exactly one component. Use Run Prechecks (1), open Precheck details, remediate failures, and proceed only when the row says Ready for upgrade. After clicking Upgrade, open Upgrade details, wait for Completed, then confirm Components -> Summary -> Running and the expected build. The sections below preserve the component-specific clicks, workflow details, and validation from the individual walkthroughs.
1. Fleet Lifecycle
Fleet Lifecycle is the required first operation. Its card has a dedicated target selector, so do not use the global management-component target for this row.
Checking for the Upgrade
To get started, log in to VCF Operations and go to Build -> Lifecycle -> VCF Management -> Upgrade.
The lifecycle metadata is normally synced automatically. If it has been a while since the last sync, we can trigger one manually. I usually perform a manual sync before starting an upgrade to make sure I have the latest metadata.
To do this, click on Sync in the top right corner and wait for the task to complete before selecting the new version.

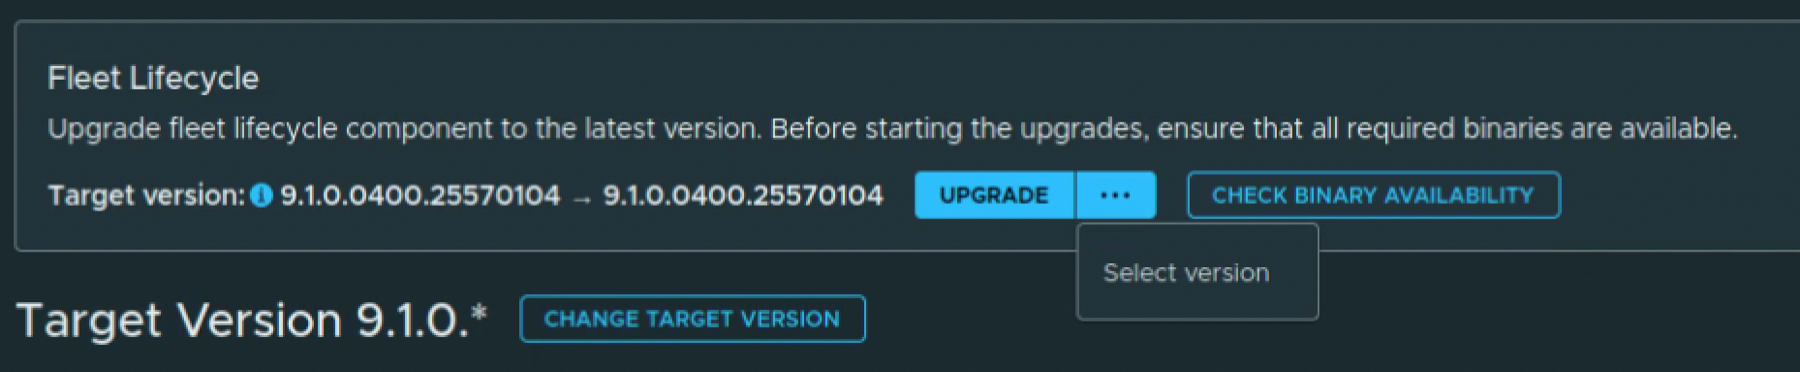
In the capture above, both sides of the version arrow still show 9.1.0.0400.25570104. We need to change the Fleet Lifecycle target before clicking on Upgrade.
Selecting the Target Version
On the Fleet Lifecycle card, click on the … menu and select Select version. Use the menu on this card; the Change Target Version button below it controls the other VCF Management component targets.
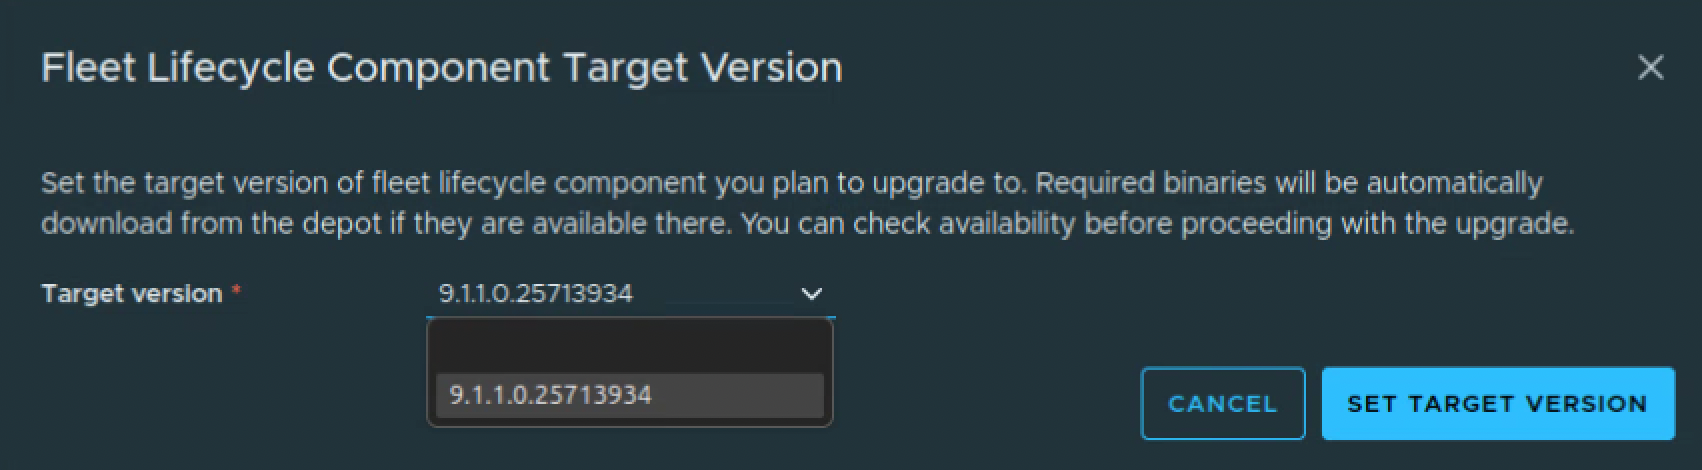
The Fleet Lifecycle Component Target Version dialog opens. Select 9.1.1.0.25713934 and click on Set Target Version.
We can now see the upgrade path from 9.1.0.0400.25570104 to 9.1.1.0.25713934.
Click on Check Binary Availability and confirm that the required binary is available before proceeding. If it is missing, resolve the depot or download issue and run the check again.

Running the Upgrade
Once binary availability is confirmed, click on Upgrade. The card changes to Upgrade in progress. Click on Upgrade details to follow the task.

Here we can see the workflow setting the Fleet Lifecycle upgrade context and staging the Fleet Lifecycle plugin in VCF Services Runtime. In this capture, the first subtask has completed and staging is still in progress.
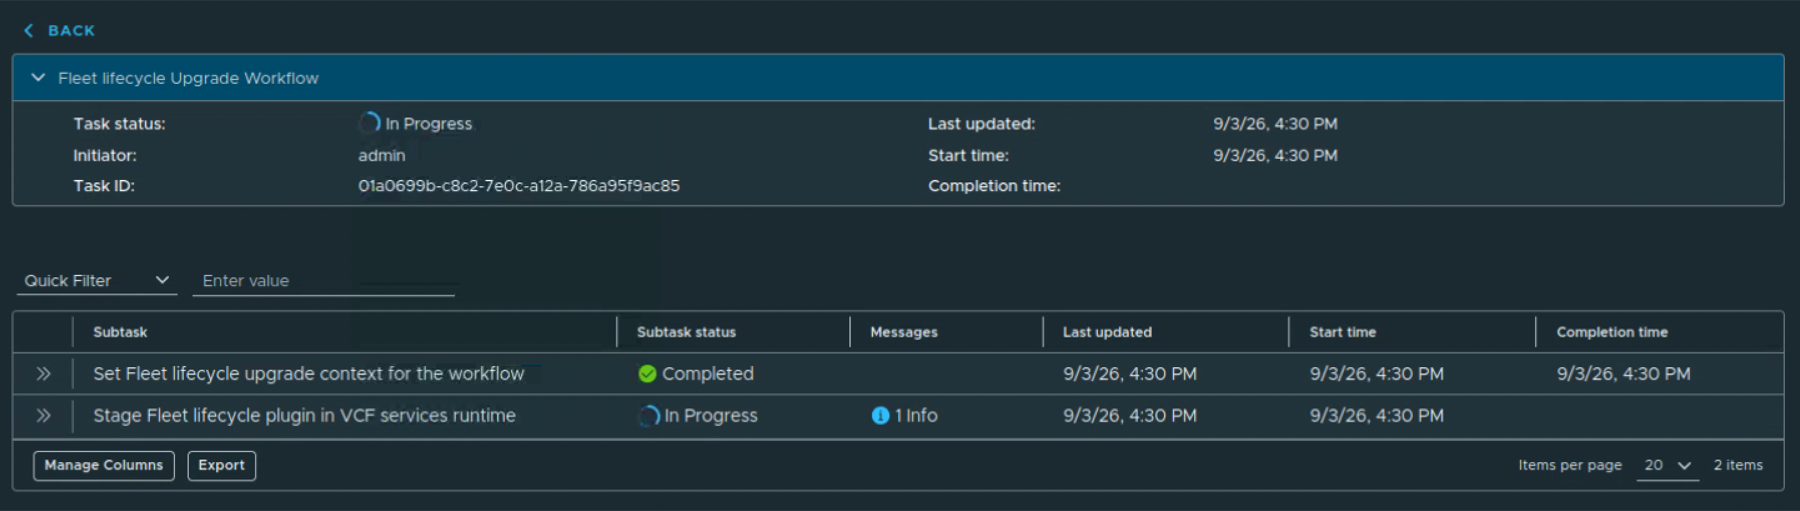
Wait for the workflow to finish. Review any failed task or precheck and resolve the reported issue before retrying the upgrade.
Verifying the New Version
Once the upgrade is complete, return to Build -> Lifecycle -> VCF Management -> Upgrade. Verify that the Fleet Lifecycle card shows Current version: 9.1.1.0.25713934.

We can also check the Tasks tab to verify that the upgrade workflow finished successfully. My final capture shows the last lifecycle metadata sync time as N/A. If an automatic sync has not run recently, we can use Sync before continuing with the other component upgrades.
One known issue to keep in mind: if you plan to scale VCF Services Runtime from Small to Small (High Availability), upgrade SDDC Lifecycle to 9.1.1 as well before doing that. The VCF Operations 9.1.1 release notes document a failure when Fleet Lifecycle is on 9.1.1 while SDDC Lifecycle is still on 9.1.0.
2. VCF Operations (PAK path when supported)
This is the VCF Operations appliance path from the earlier guide. Use it only when your supported source and deployment call for a PAK update. For a fleet-managed 9.1.0.x environment, use the VCF Management lifecycle operation and keep this section as a legacy-path reference.
Downloading the Upgrade PAK
To get started, log in to the Broadcom Support Portal and go to My Downloads -> VMware Cloud Foundation -> VMware Cloud Foundation 9 -> 9.1.1.0. Under VCF Operations, click View Group.

Read both agreements and accept the terms to enable the downloads.

Download Operations-Upgrade-9.1.1.0.25679887.pak. The portal also provides the checksums that we can use to validate the file after the download.

Checking the Cluster Before the Upgrade
Open the VCF Operations administration interface at https://<primary-node-fqdn>/admin and log in with the local admin account.
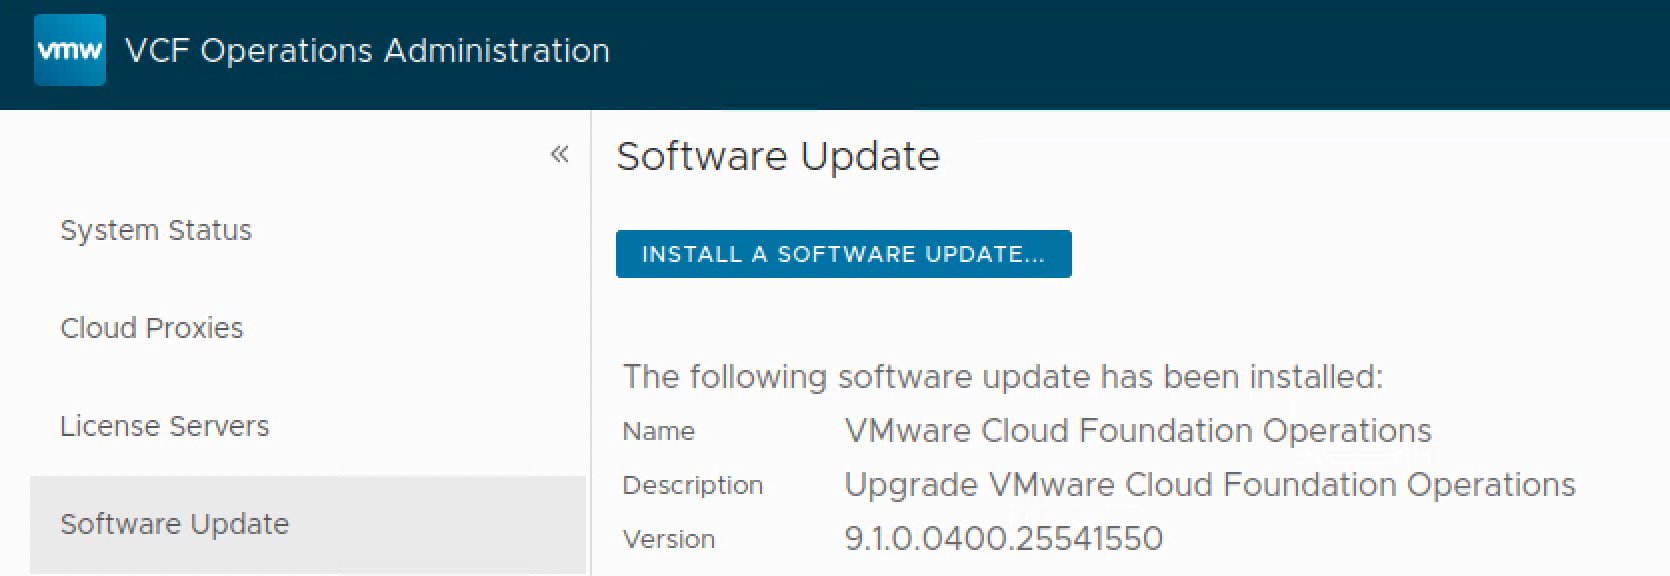
Go to System Status and make sure the cluster is Online and every node is Running. In my lab the starting node version was 9.1.0.0400.25541561.

Go to Software Update. The previously installed update in my lab was 9.1.0.0400.25541550. Click Install a Software Update.
Uploading the PAK File
Click Browse, select Operations-Upgrade-9.1.1.0.25679887.pak, and click Upload. Leave Install the PAK file even if it is already installed unchecked.
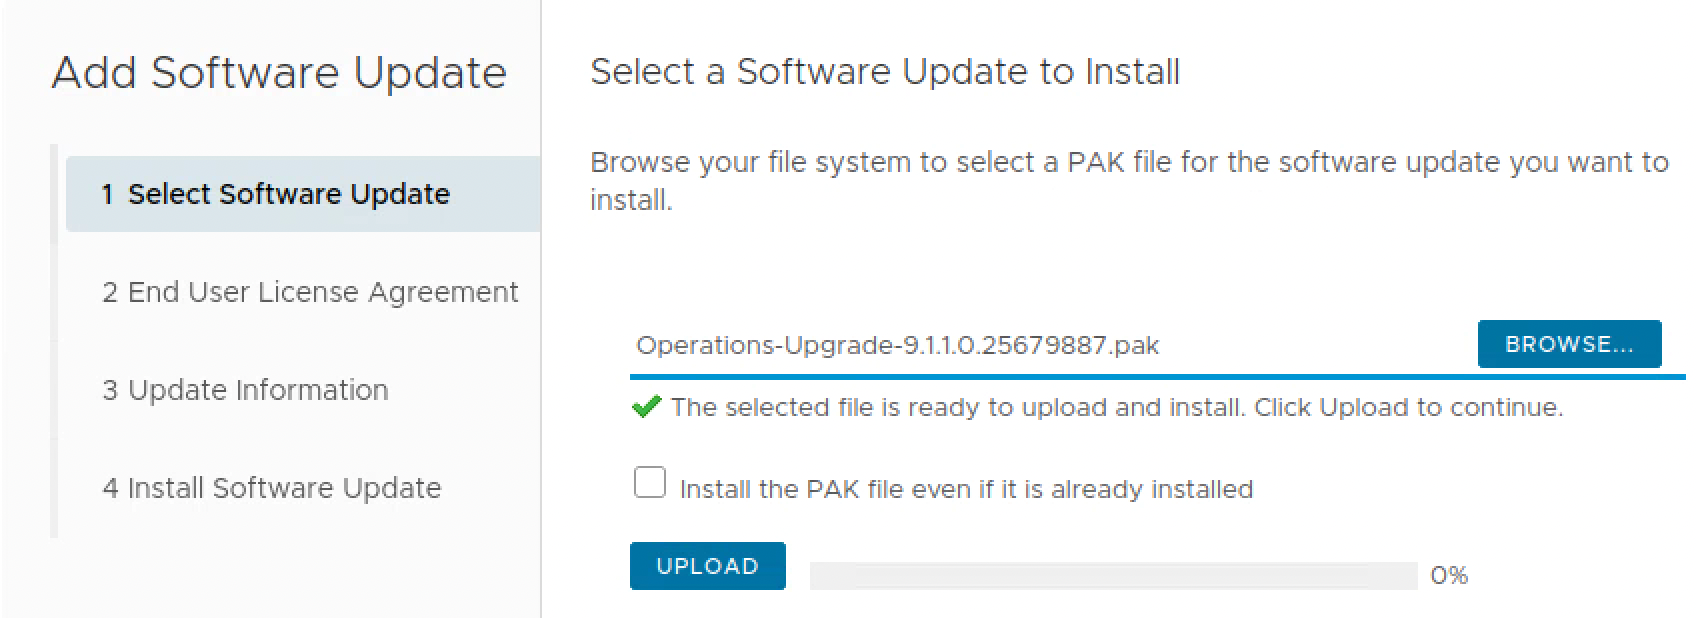
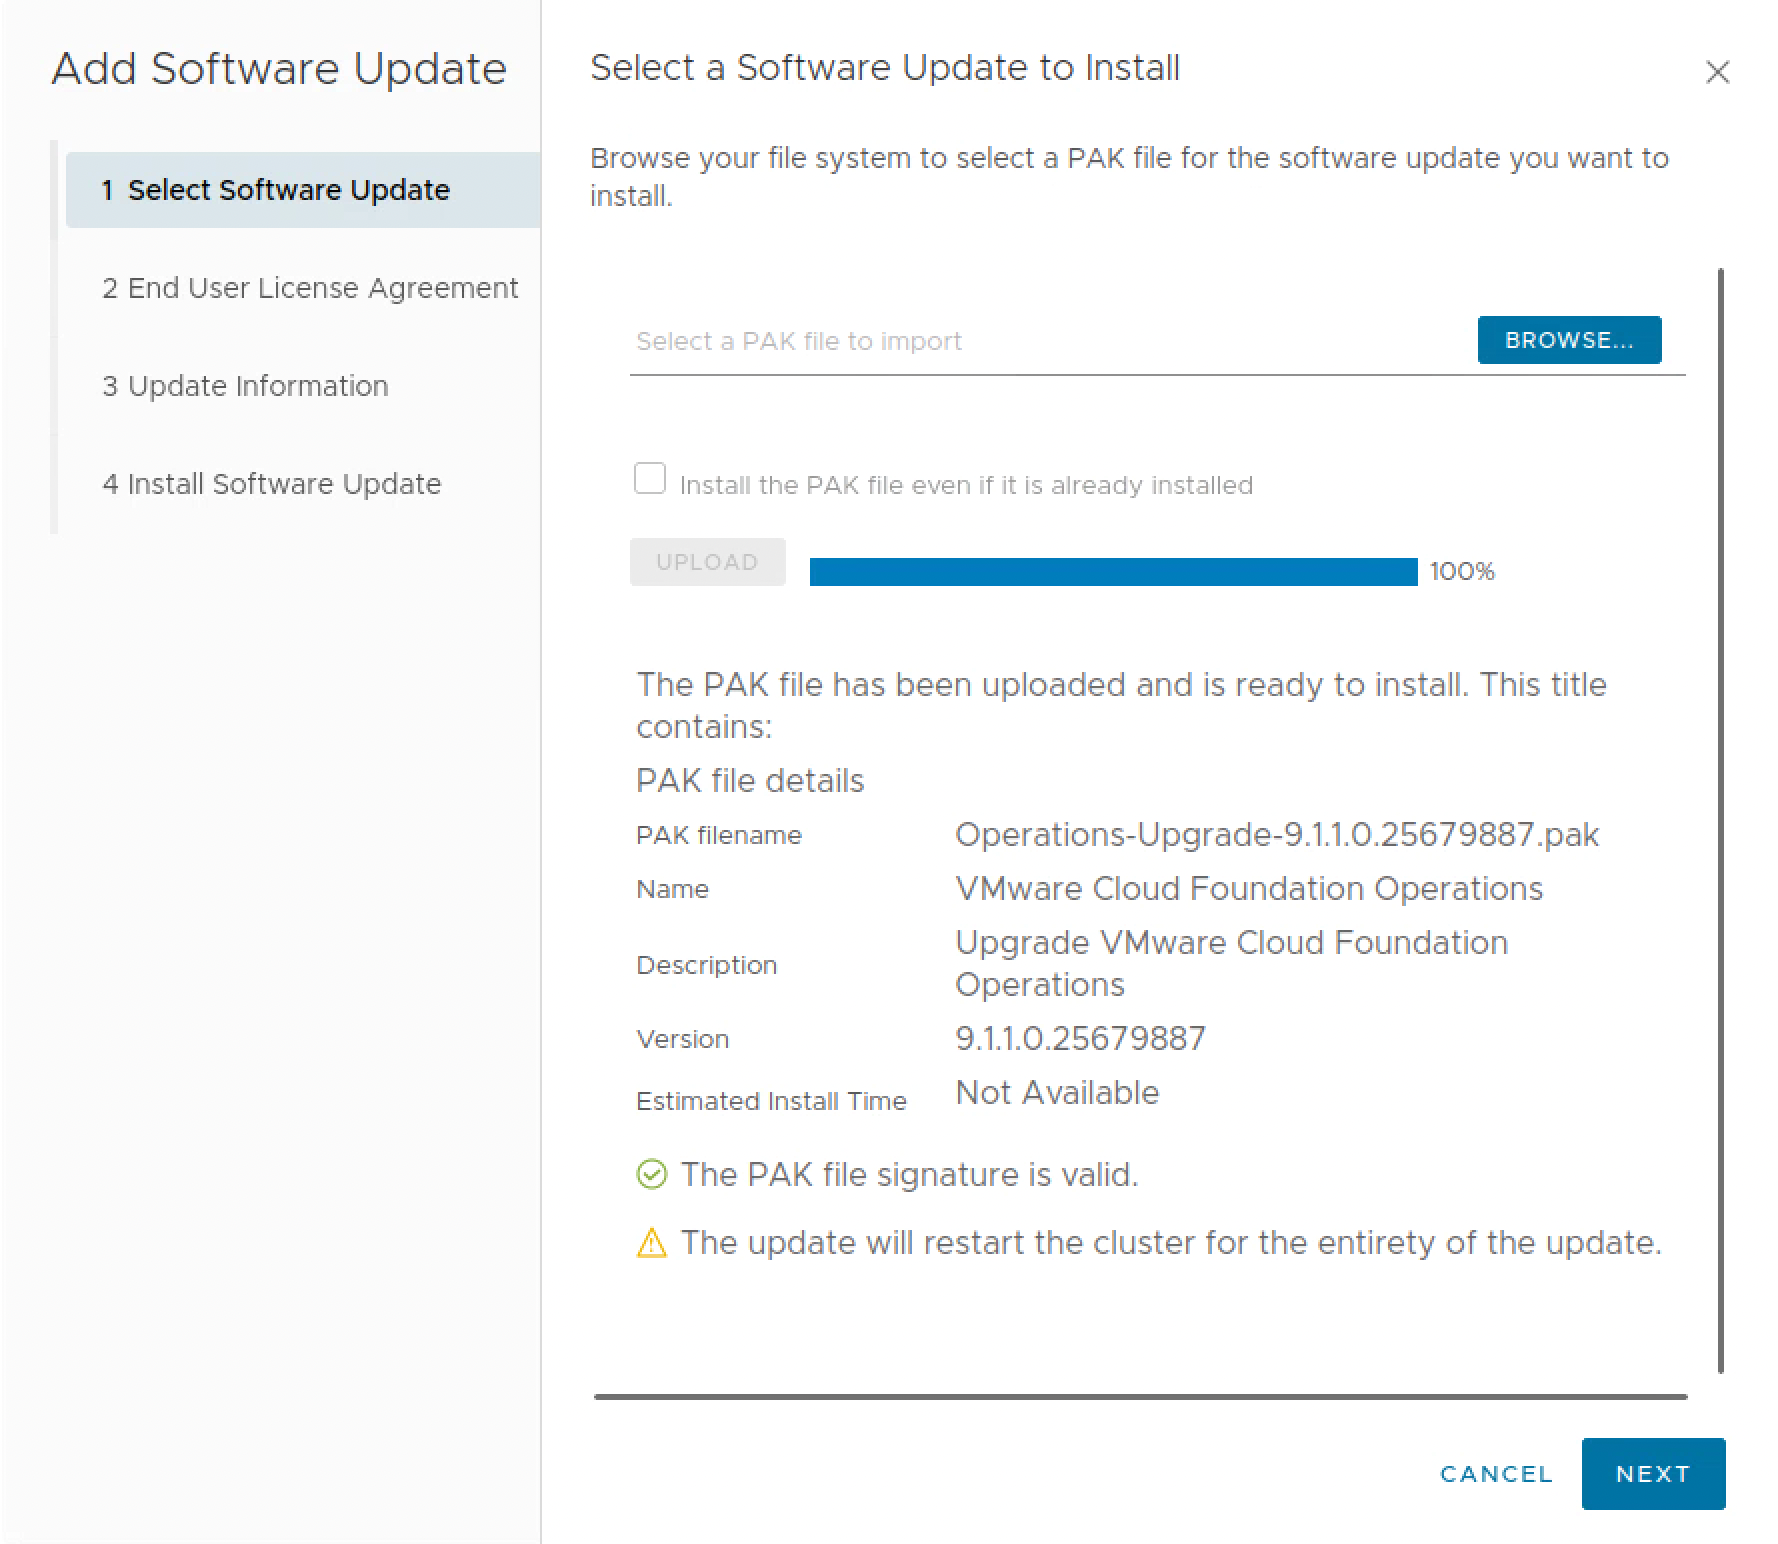
The upload can take some time because the PAK is just over 7 GB. Once it finishes, confirm that the signature is valid and that the version is 9.1.1.0.25679887, then click Next.
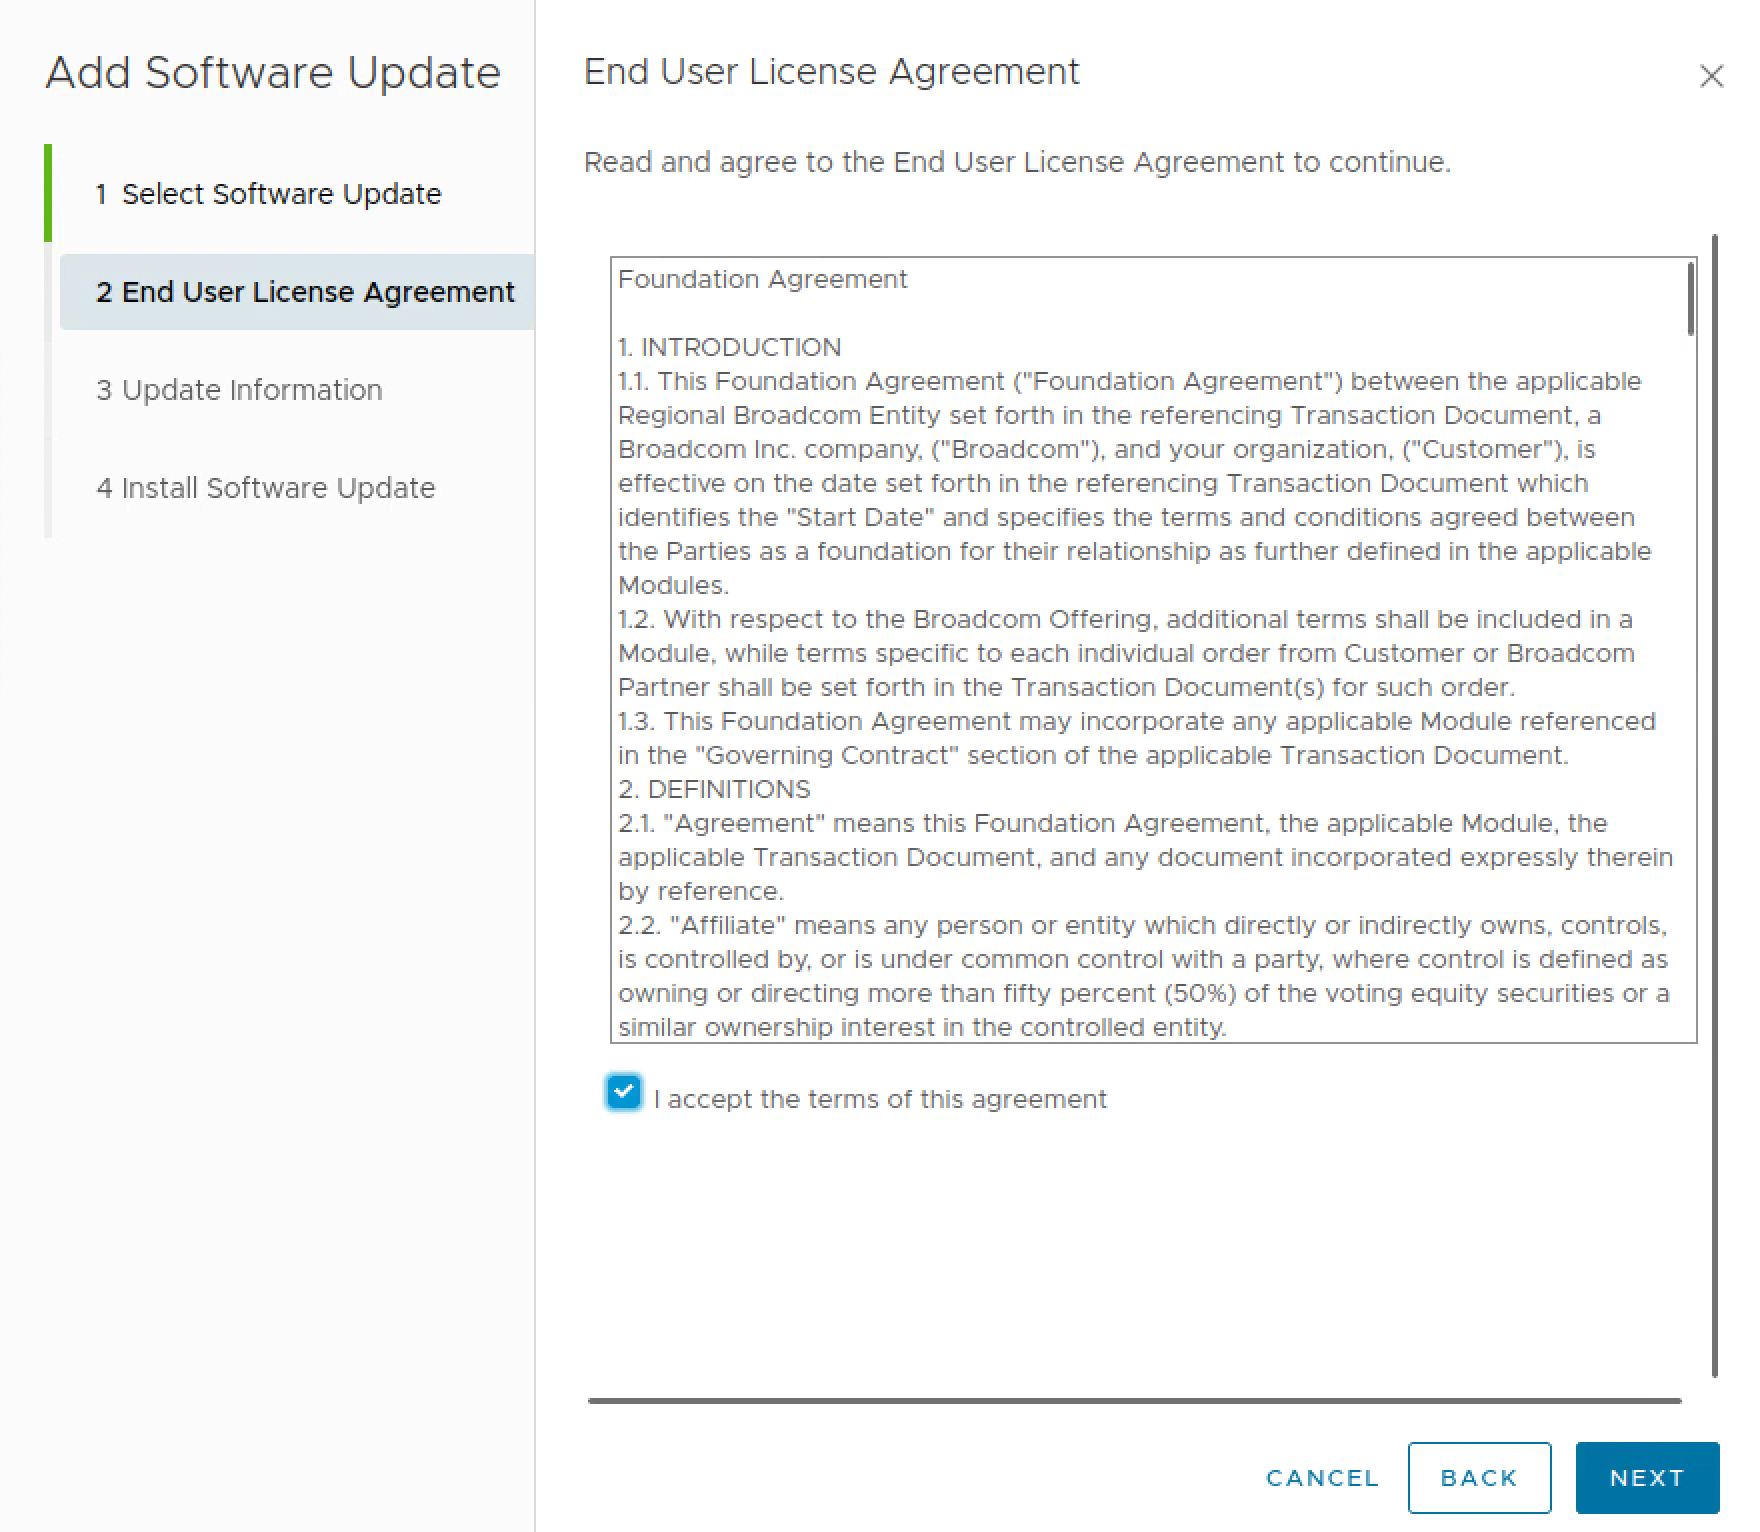
Review the End User License Agreement, select I accept the terms of this agreement, and click Next.
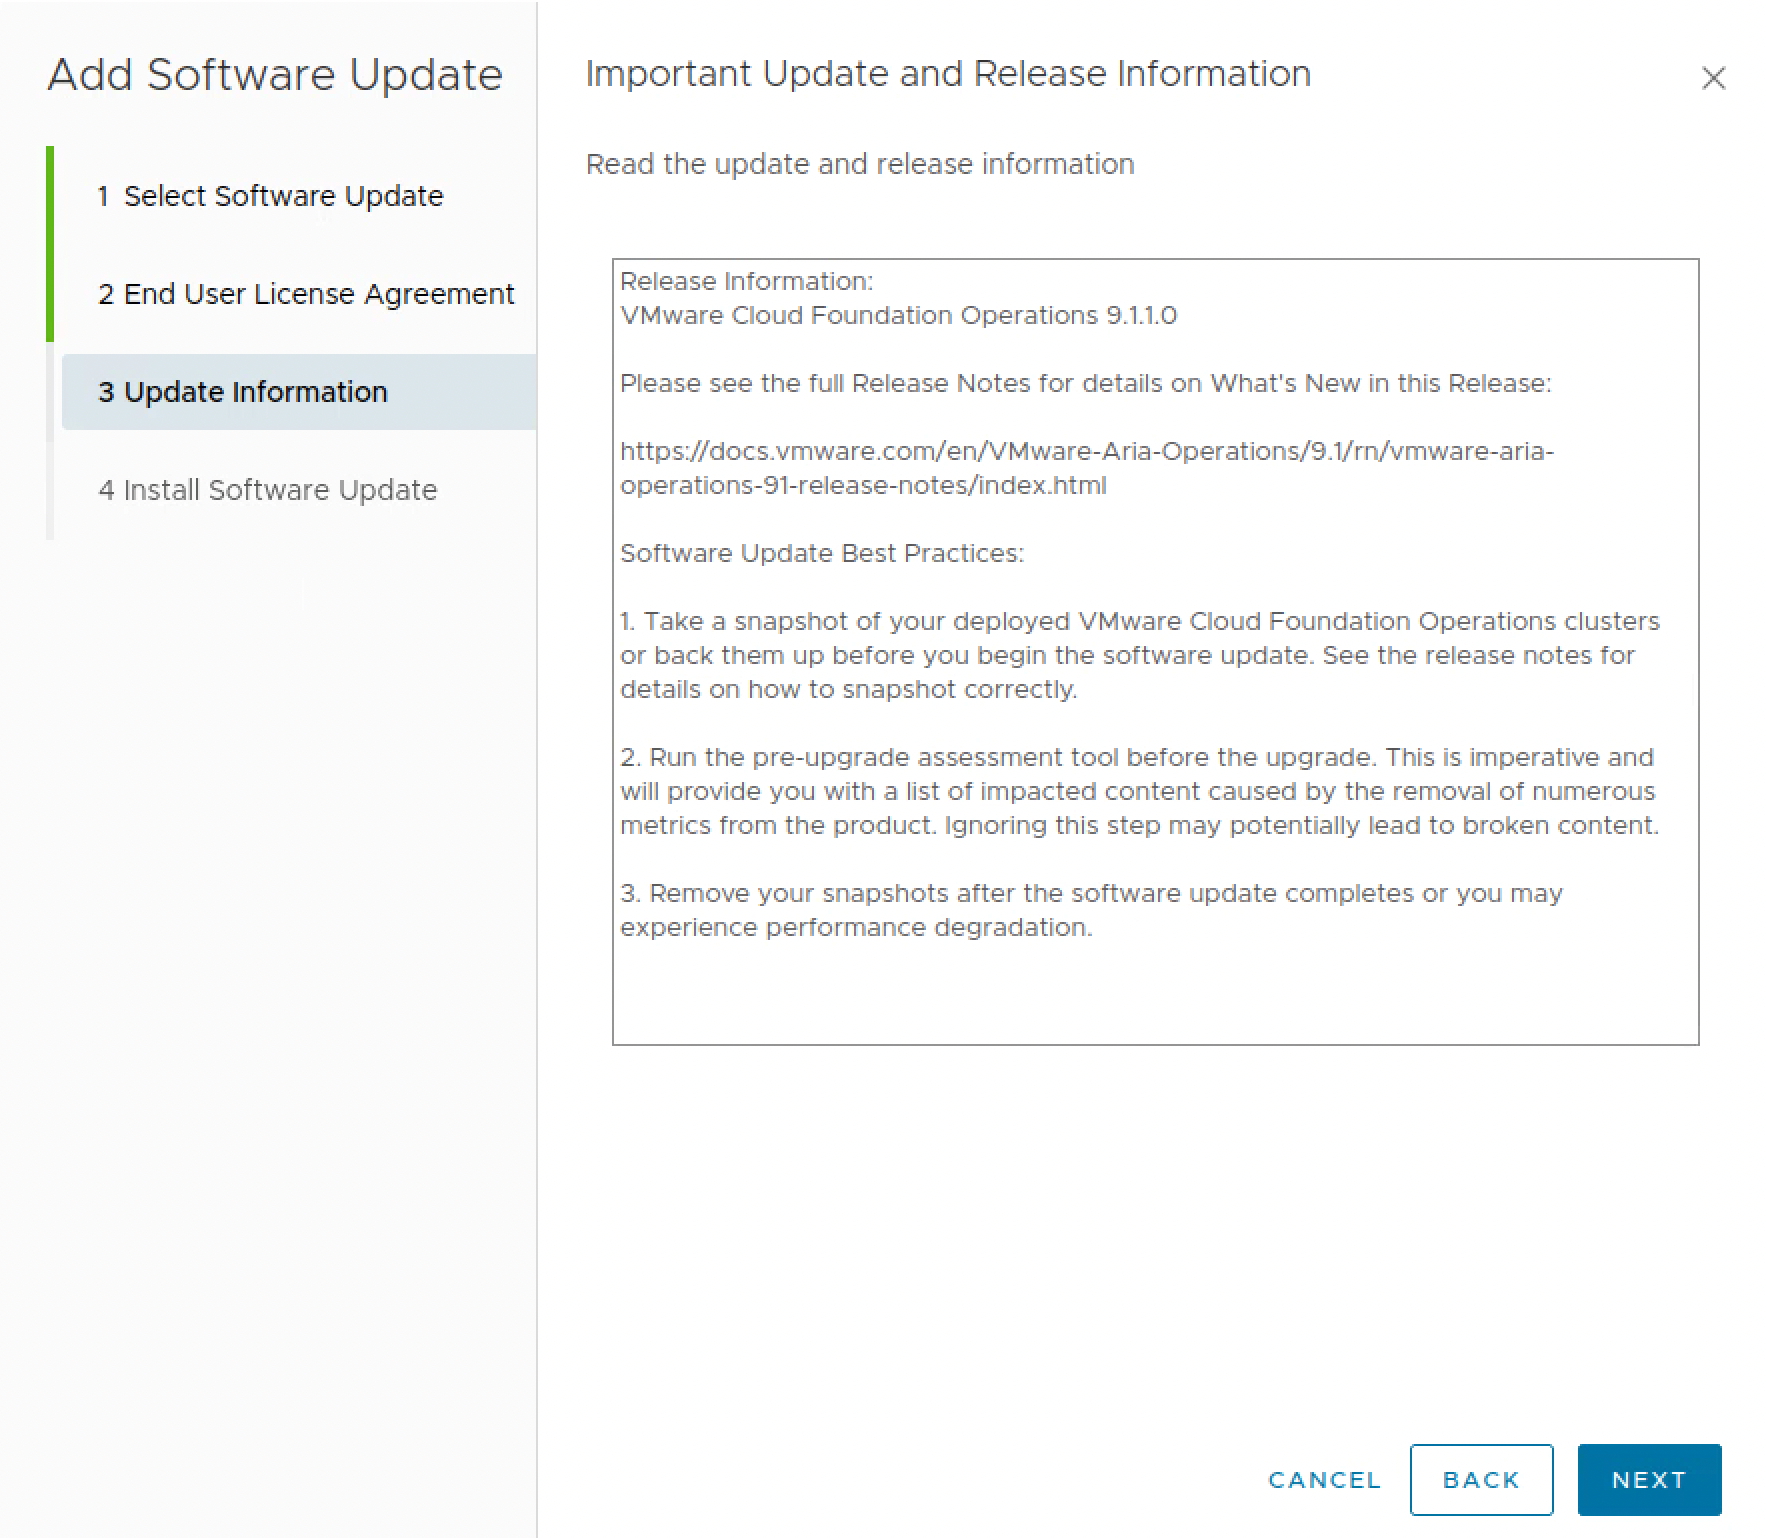
Review the update information and the software update best practices. This screen reminds us to have a backup or snapshots, run the pre-upgrade assessment, and remove the snapshots after the upgrade. Click Next.
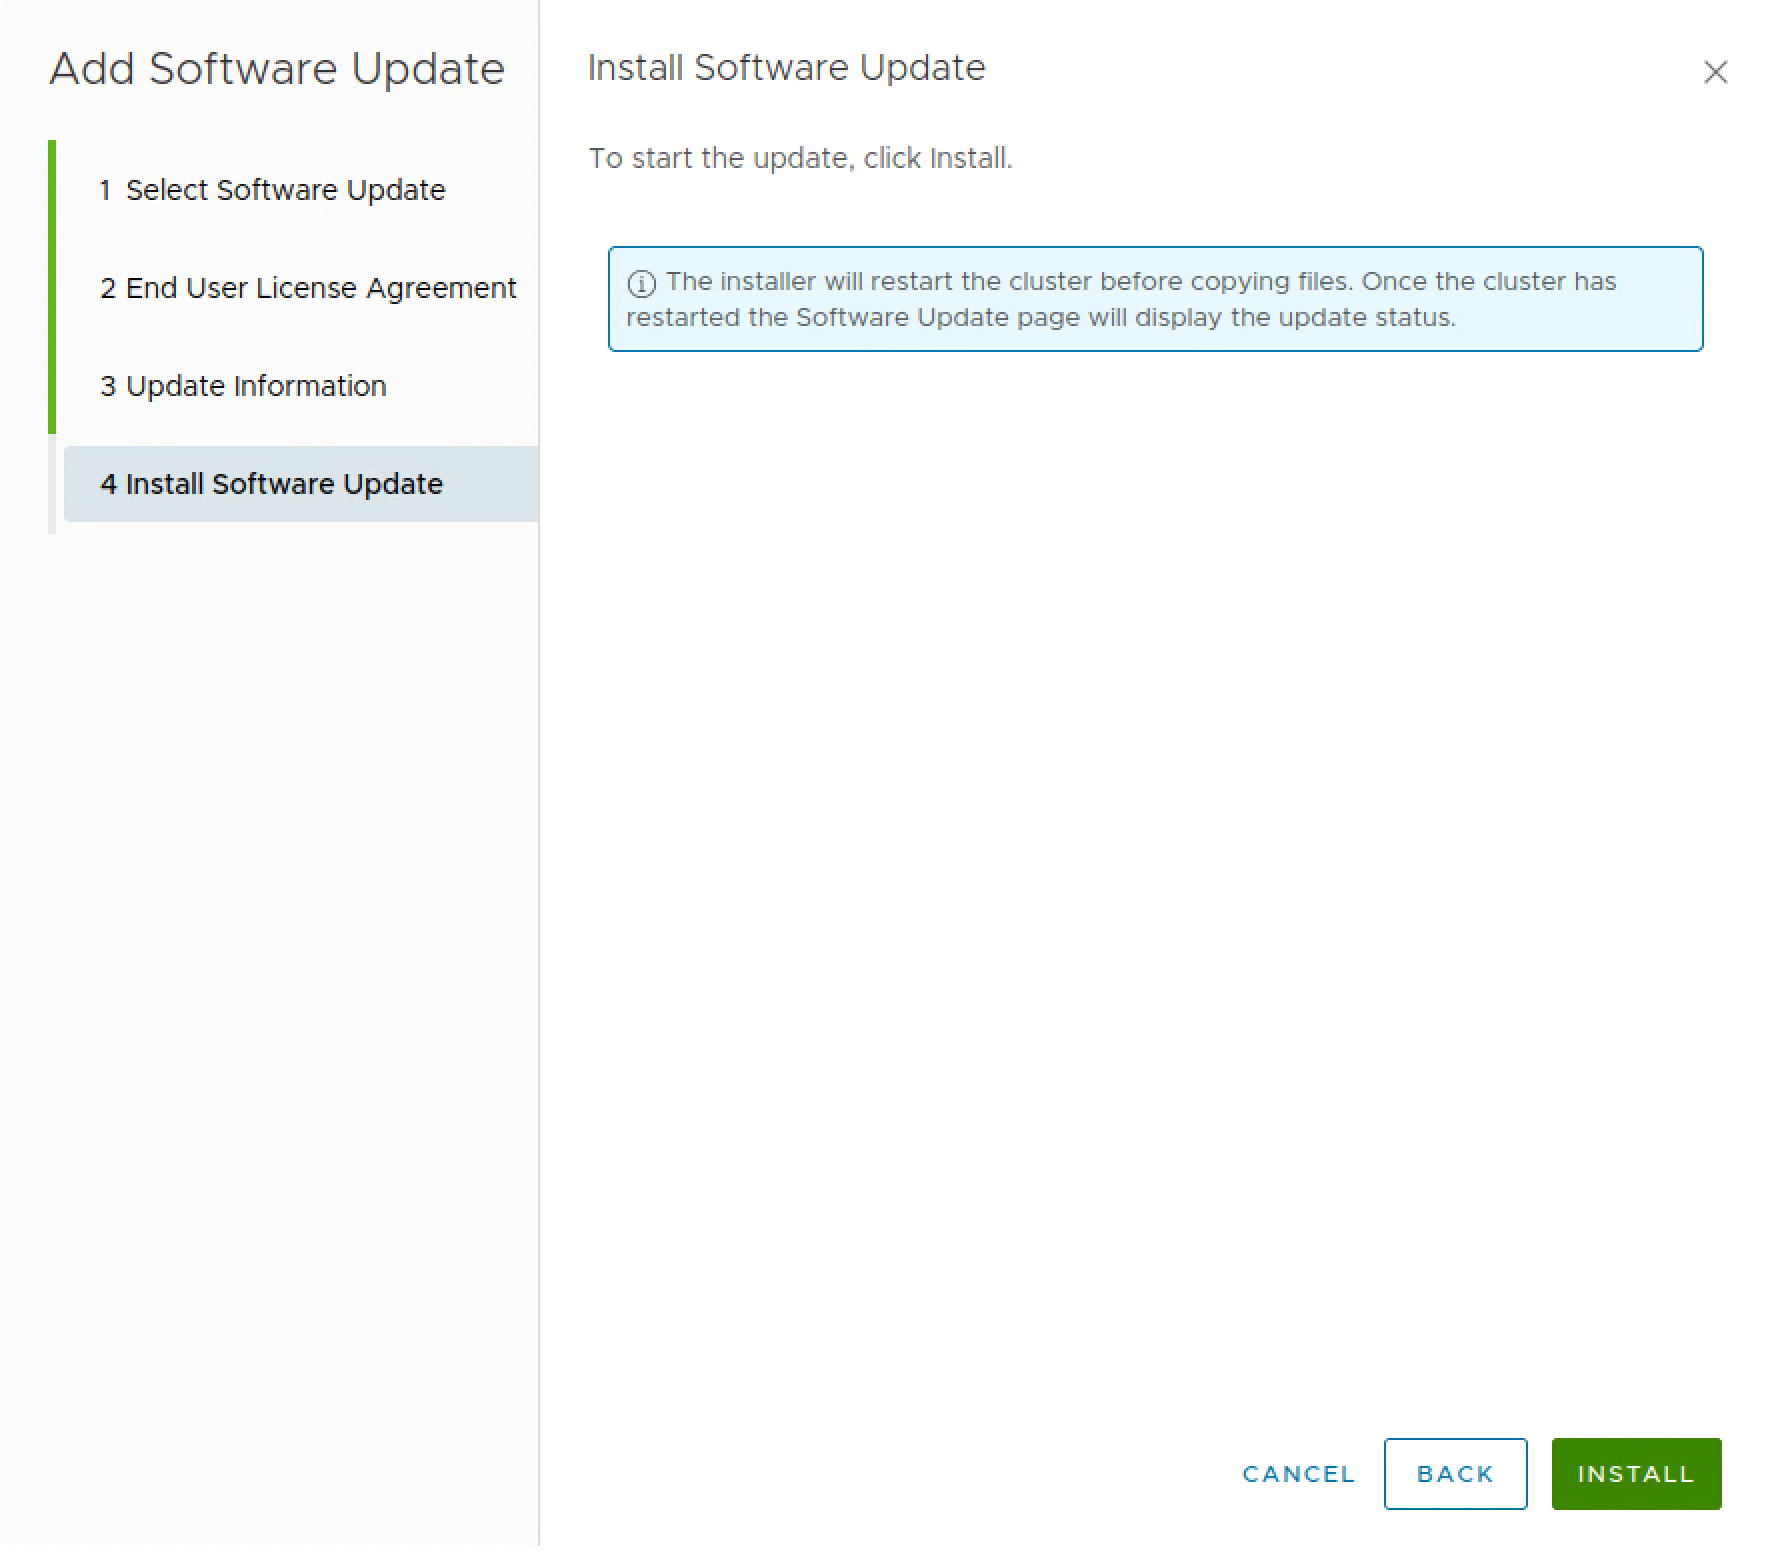
On the last page, click Install. The installer restarts the cluster before copying the files, and the administration interface will become unavailable for a while.
Monitoring the Upgrade
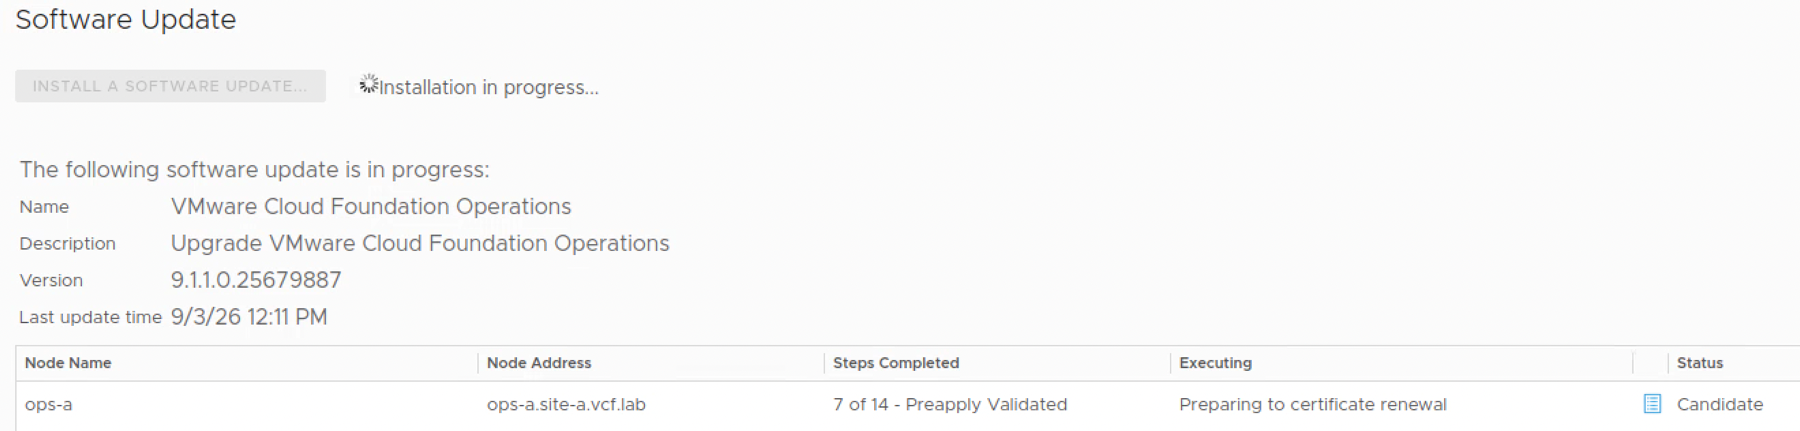
After the administration interface comes back, log in again and go to Software Update to follow the progress. The workflow moves through 14 steps. In the capture below it is at 7 of 14 - Preapply Validated and is preparing for certificate renewal.
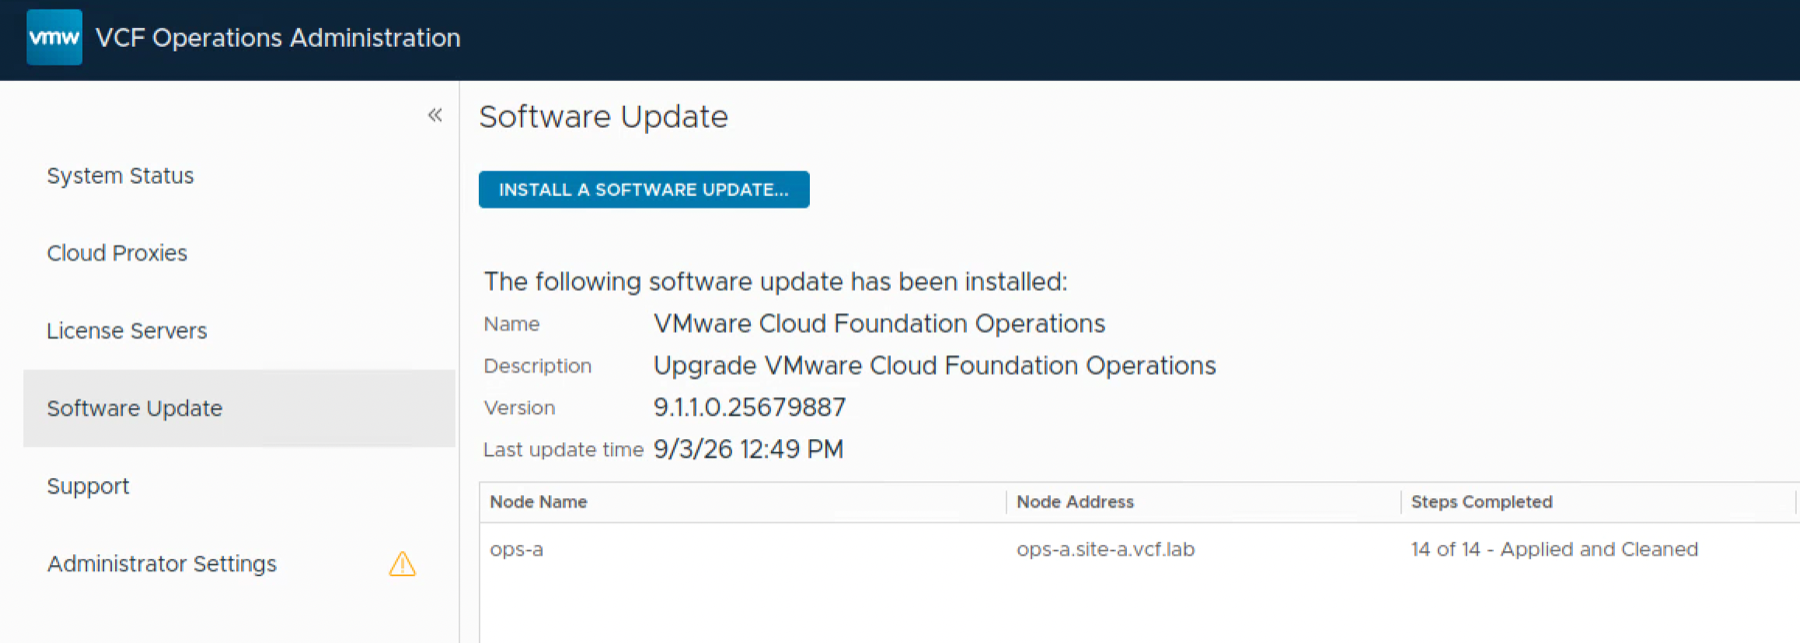
Once all 14 steps complete, the status changes to Applied and Cleaned. In my single-node lab the install took about 40 minutes after the PAK finished uploading.
Verifying the Upgrade
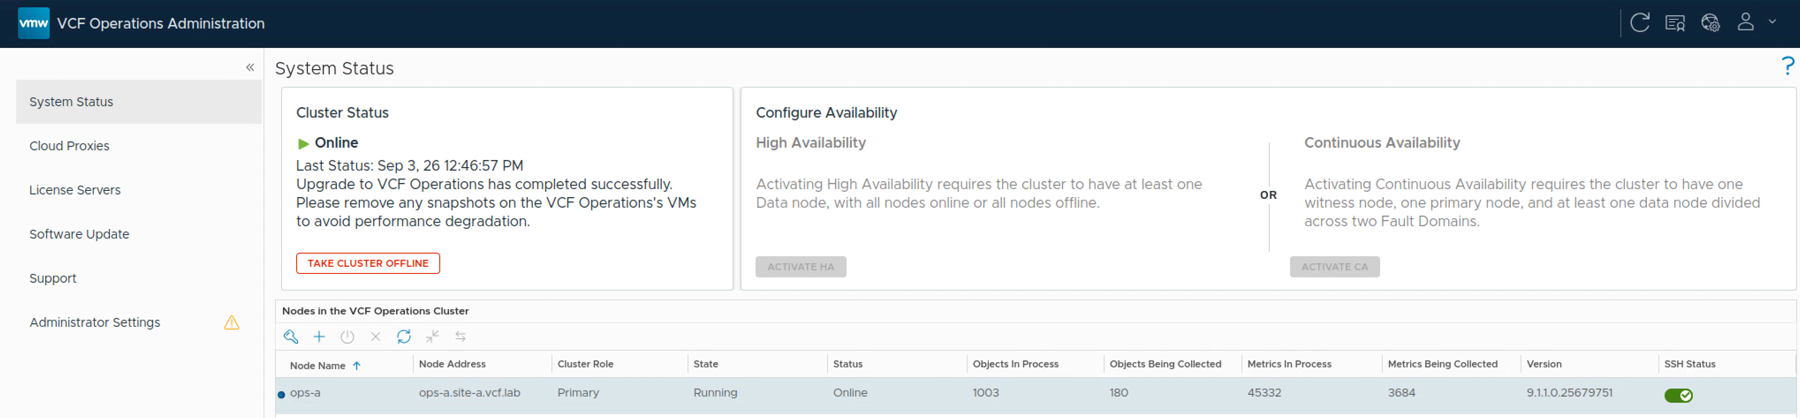
Go back to System Status and verify that the cluster is Online and every node is Running. The final node version in my lab is 9.1.1.0.25679751.
In the standard lifecycle workflow, cloud proxy and license server lifecycle is bundled with VCF Operations. Because this lab used the maintenance PAK route, verify both explicitly instead of assuming they were updated. The 9.1.1 release notes list cloud proxy build 25679891 and license server build 25679819. I also recommend checking that collections have resumed, integrations are healthy, dashboards load, and fresh metrics are coming in.
Don’t forget to remove the snapshots once everything has been validated. Since we are doing an upgrade, I also strongly recommend clearing the browser cache before using the new VCF Operations version.
3. VCF Services Runtime
Run this section after Fleet Lifecycle. The runtime must be at 9.1.1 before its dependent Identity Broker and Salt operations. Its file-based backup covers service accounts only, so retain the individual hosted-service recovery points as well.
Selecting the Target Version
To get started, log in to VCF Operations with an Administrator account and go to Build -> Lifecycle -> VCF Management -> Upgrade.
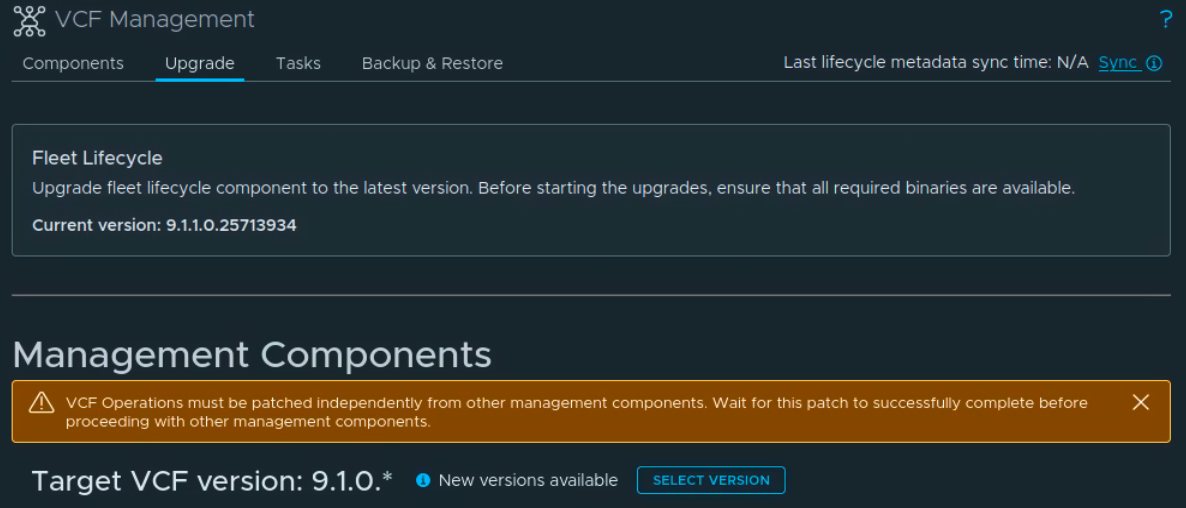
We can see that Fleet Lifecycle is already upgraded, but the management components still have 9.1.0.* selected as the target. If the new release is not available, use Sync to refresh the lifecycle metadata and wait for the task to complete.
Under Management Components, click on Select Version.
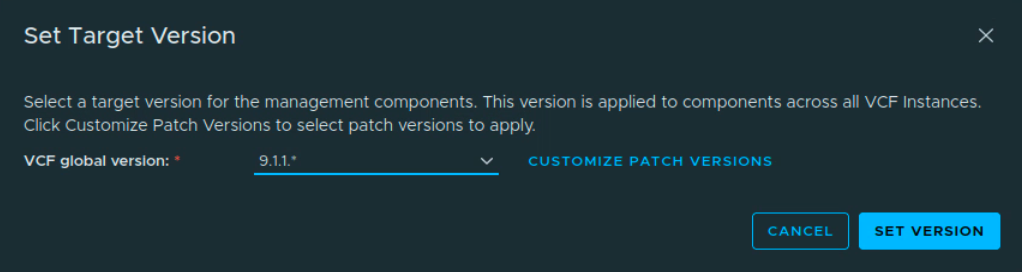
In the Set Target Version dialog, select 9.1.1.* from the VCF global version drop-down and click on Set Version.
Please note that this target applies to management components across all VCF instances. Setting the target does not start the upgrades; we still need to select the component to upgrade.
Running the Runtime Prechecks
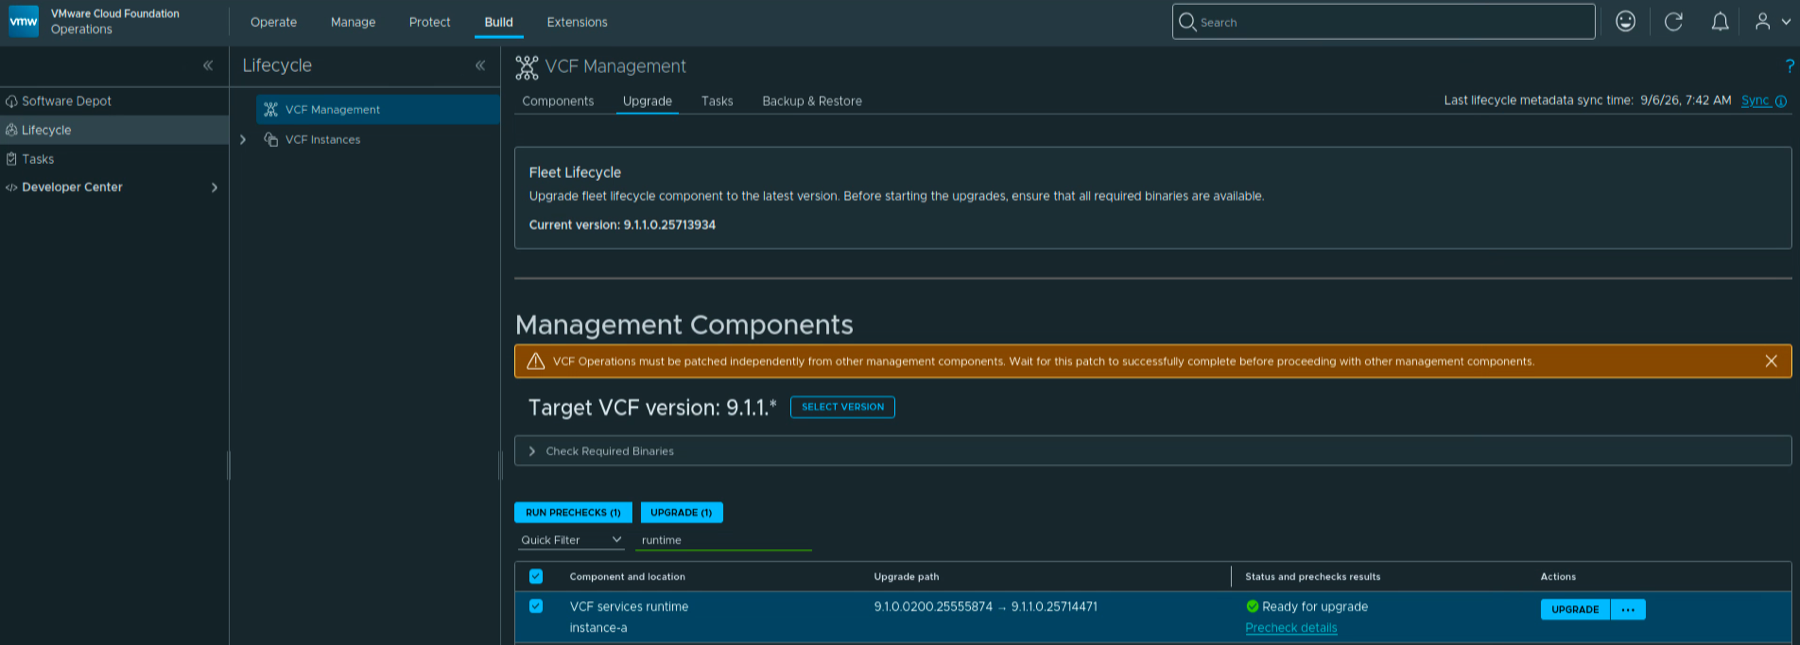
Clear any existing component selections, then filter the list for runtime and select the VCF services runtime row for the instance you want to upgrade. In my lab this is instance-a.
Make sure only the intended runtime is selected. The buttons should show Run Prechecks (1) and Upgrade (1). Check that the upgrade path is 9.1.0.0200.25555874 -> 9.1.1.0.25714471.
Expand Check Required Binaries and confirm that the required binaries are available. Resolve any missing binaries before proceeding.
Click on Run Prechecks (1). Once the task completes, review Precheck details and resolve any errors before starting the upgrade, following the individual component upgrade procedure.
Here we can see the runtime row showing Ready for upgrade, with the Precheck details link available.
Starting the Upgrade
Once the prechecks have completed successfully, click on Upgrade on the runtime row.
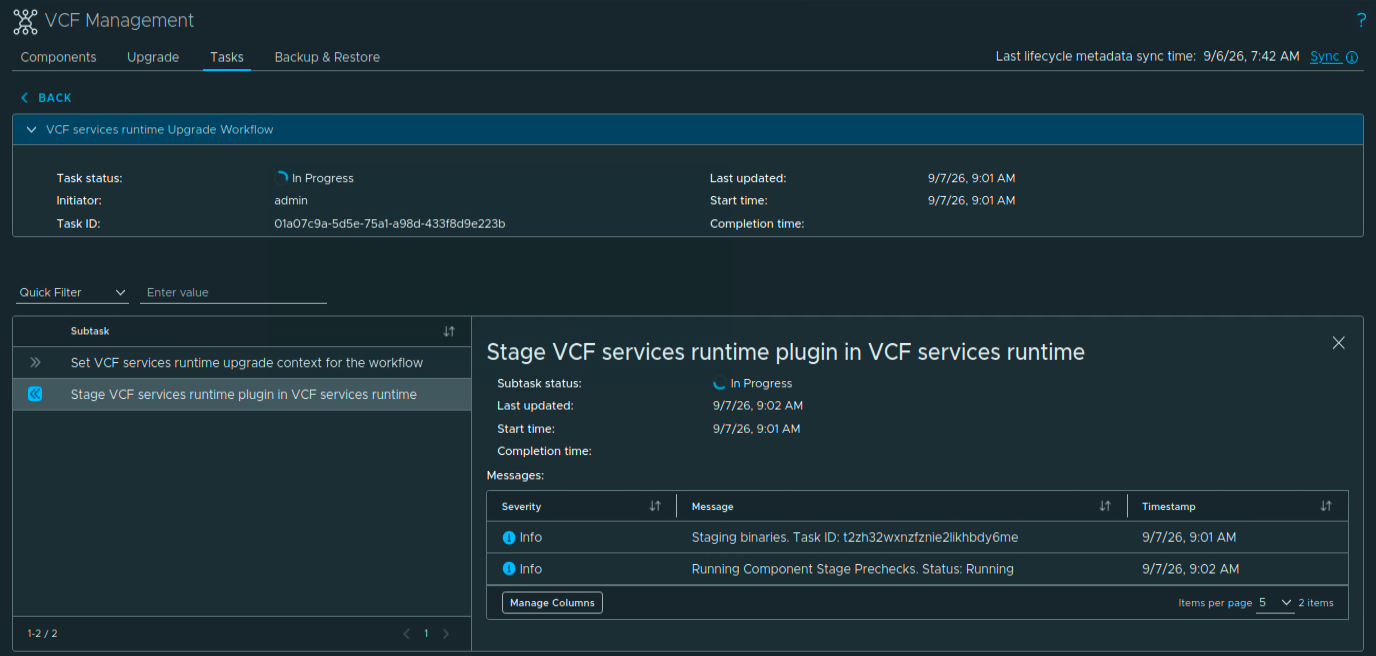
The status changes to Upgrade in progress. We can follow the progress by clicking on Upgrade details.

The workflow starts by setting the runtime upgrade context and staging the runtime plugin. In this capture we can see Staging binaries followed by Running Component Stage Prechecks.
We now have to wait for the workflow to finish. It continues through runtime prechecks, package staging, upgrade preparation, the upgrade itself, and the final inventory sync.
If a task fails, open its details and resolve the reported issue before retrying. The 9.1.1 known issues also explain that a completed workflow can retain failed subtask attempts after successful retries. Review the final task status and component health when checking the result.
Verifying the Upgrade
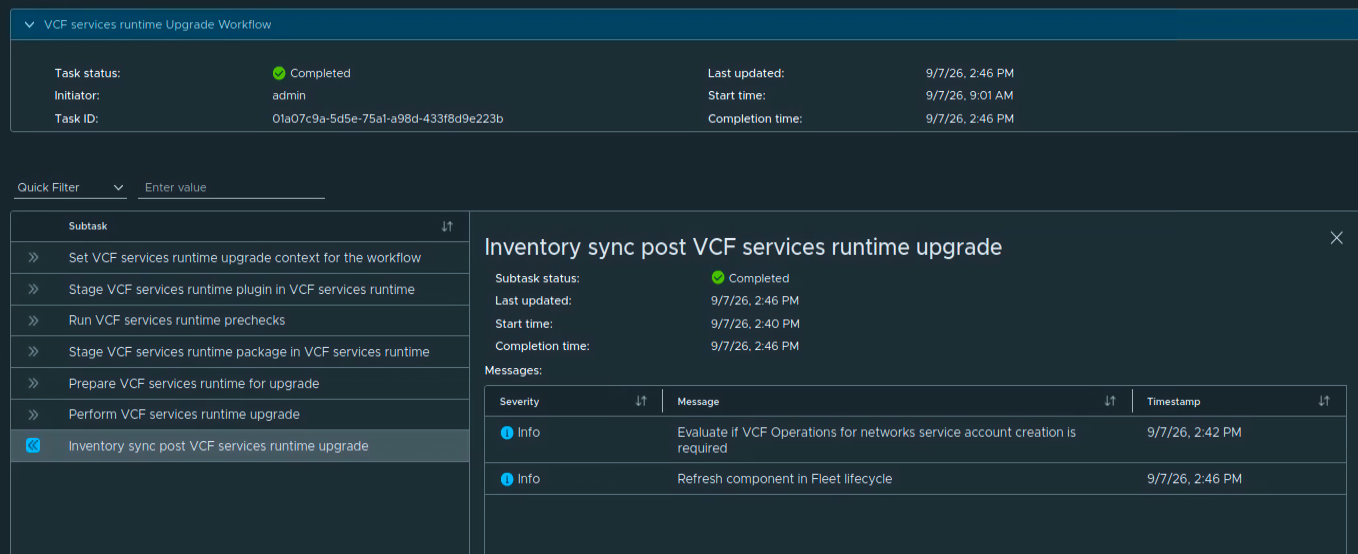
Once the upgrade is complete, the workflow shows Completed. The final Inventory sync post VCF services runtime upgrade subtask also shows Completed.
In my lab the workflow started at 9:01 AM and completed at 2:46 PM on September 7, about 5 hours and 45 minutes. This is the total workflow time shown in my task, not a measurement of service downtime. Allow for your environment to take a different amount of time.
We can verify the installed version by going to Build -> Lifecycle -> VCF Management -> Components and opening VCF Services Runtime for the instance.
Under Summary, check that the status is Running and the version is 9.1.1.0.25714471.
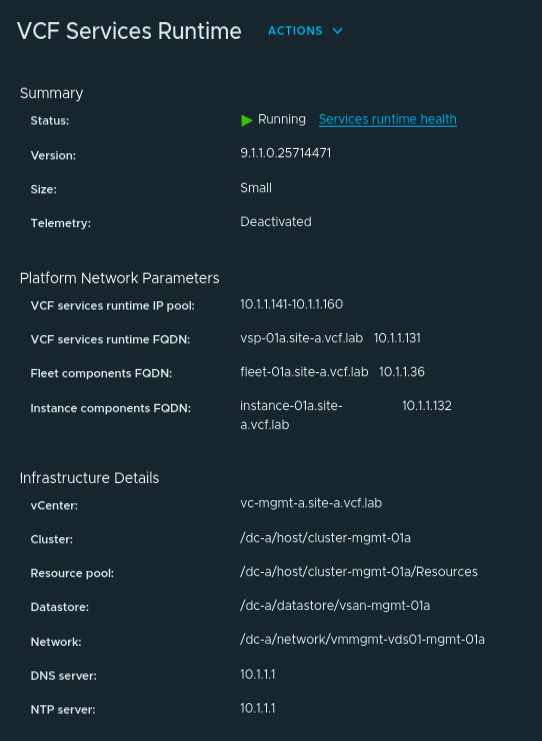
Before moving on, open Services runtime health and check the nodes and hosted services for outstanding health issues. Verify the services you use, such as sign-in, log collection, and lifecycle operations, and confirm that backups are still working.
4. SDDC Lifecycle
Run this as a single component operation. If you plan to scale Services Runtime from Small to Small (High Availability), complete this upgrade before scaling.
Selecting SDDC Lifecycle
To get started, log in to VCF Operations with an Administrator account and go to Build -> Lifecycle -> VCF Management -> Upgrade.
The Target VCF version in my lab is already set to 9.1.1.* from the previous upgrade. If yours is still on 9.1.0.*, click on Select Version and set the target to 9.1.1.*, as covered in the runtime walkthrough.
Clear any existing component selections, filter the list for sddc, and select SDDC lifecycle for the instance you want to upgrade. In my lab this is instance-a. Make sure only the intended component is selected; the buttons should show Run Prechecks (1) and Upgrade (1).
Expand Check Required Binaries and resolve any missing binaries before proceeding. Check that the upgrade path is 9.1.0.0400.25570103 -> 9.1.1.0.25713940.
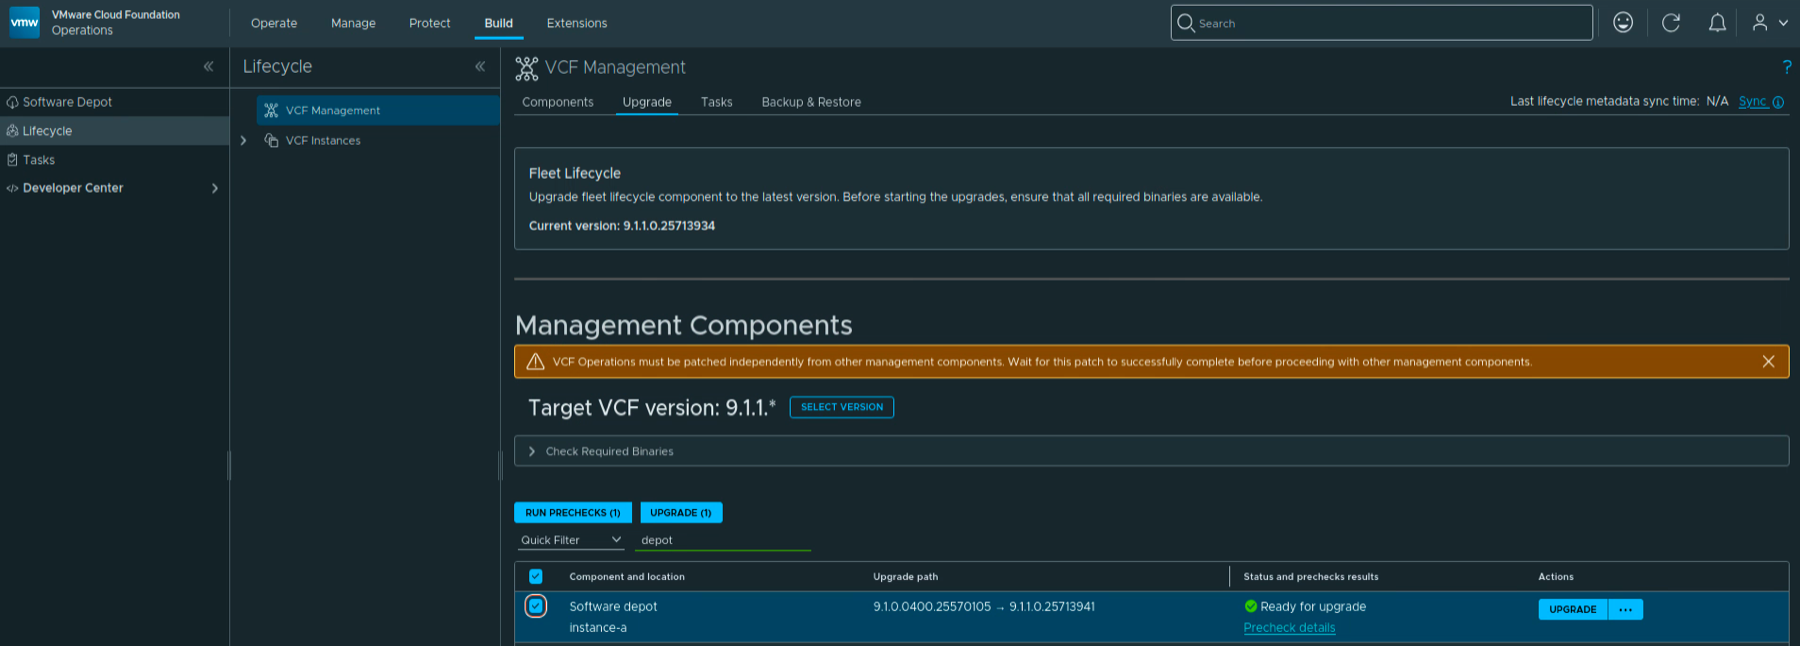
Running the Prechecks
Click on Run Prechecks (1). The row changes to Prechecks in progress.

Click on Precheck details to follow the workflow. The detail view shows the precheck context being set and the SDDC Lifecycle precheck binaries being staged.
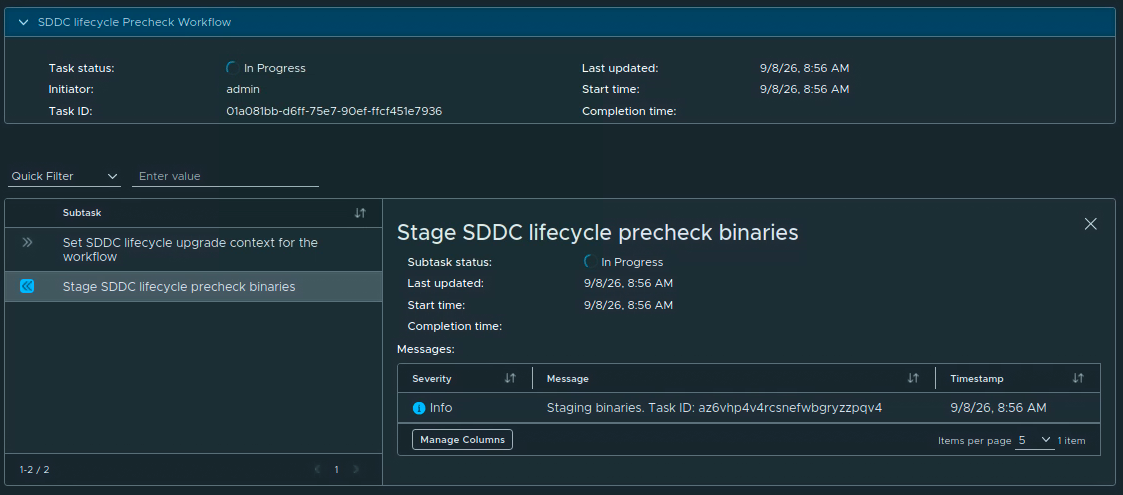
In my lab the precheck started at 8:56 AM and completed at 9:11 AM on September 8. The final result was Passed, including the component package, vCenter, database upgrade, and single-component backup checks.
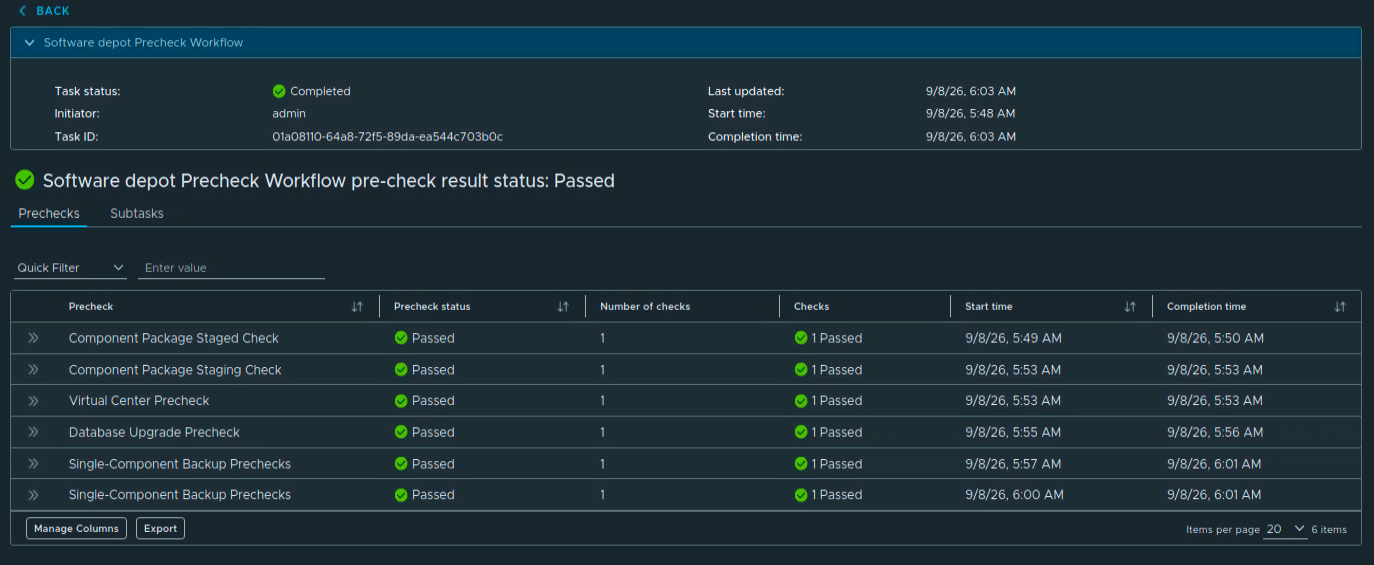
Once the prechecks pass, return to the upgrade list. The row should show Ready for upgrade.

Resolve any failed check before continuing, following Broadcom’s individual component upgrade procedure.
Starting the Upgrade
Click on Upgrade on the SDDC Lifecycle row.
The status changes to Upgrade in progress. Click on Upgrade details to follow the workflow.

The workflow sets the upgrade context, stages the SDDC Lifecycle plugin in VCF Services Runtime, runs the component prechecks, stages the package, prepares and performs the upgrade, and finishes with an inventory sync.
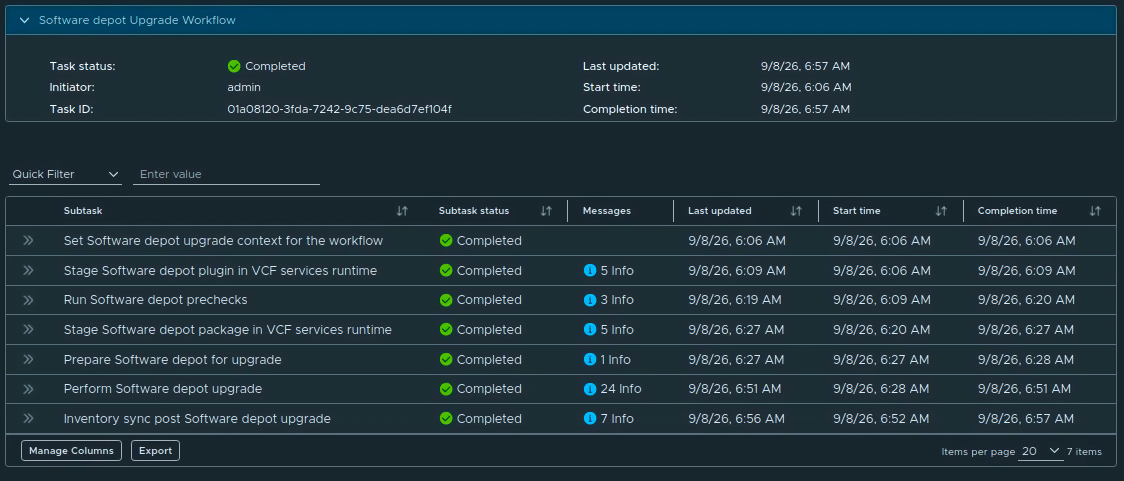
Wait for the workflow to finish. If a task fails, open its details, resolve the reported issue, and retry it before moving on.
Verifying the Upgrade
Once the upgrade is complete, the workflow shows Completed. In my lab all seven subtasks completed, including Inventory sync post SDDC lifecycle upgrade. The upgrade started at 9:15 AM and finished at 10:04 AM on September 8, about 49 minutes for the full workflow.
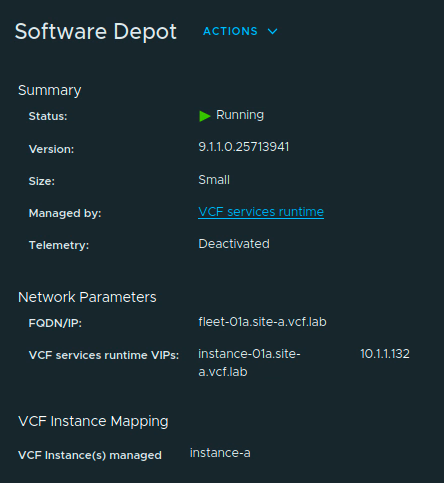
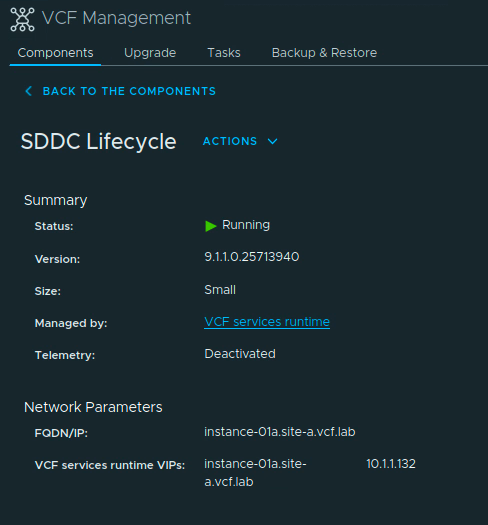
We can verify the installed version by going to Build -> Lifecycle -> VCF Management -> Components and opening SDDC Lifecycle for the instance.
Under Summary, check that the status is Running and the version is 9.1.1.0.25713940. Also confirm that it is managed by the expected VCF Services Runtime instance.
One known issue to keep in mind: if you plan to scale VCF Services Runtime from Small to Small (High Availability), upgrade SDDC Lifecycle to 9.1.1 before doing that. The VCF Operations 9.1.1 release notes document a failure when Fleet Lifecycle is on 9.1.1 while SDDC Lifecycle is still on 9.1.0.
SDDC Lifecycle in my lab is now on 9.1.1. We can continue with the remaining management components, following the release-specific dependencies above.
5. VCF Automation
Run this after the runtime required by your deployment and before Migration Service Engine. Take the VCF Automation backup first, and remove or remediate custom profiles from 9.0.1, 9.0.2.x, or 9.1.0.x by following KB 451147. Review the 9.1.1 behavior changes in the first subsection before starting.
A Few Things to Know About 9.1.1
VCF Automation 9.1.1 adds support for VLAN-backed VPCs consumed through VCF Automation. It also changes the default behavior for native public-cloud management: support for AWS, Azure, and GCP resources is deprecated and disabled by default in VM Apps organizations. If you use those capabilities, review Broadcom KB 448993 before upgrading so you understand the effect on existing deployments and how to restore the functionality.
The release also fixes several problems that are relevant to an upgrade window, including long waits with a generic timeout during the backup stage, mixed-case FQDN failures, services not recovering after a cluster power-on, and log buffers filling the logging disk. BYO Velero package installation is deprecated as well; the release notes recommend using the package deployed by VKS.
Selecting VCF Automation
Log in to VCF Operations with an Administrator account and go to Build -> Lifecycle -> VCF Management -> Upgrade.
The target version in my lab was already set to 9.1.1.*. If the target still shows 9.1.0.*, click Select Version, choose 9.1.1.*, and set the new target. If 9.1.1 is not listed, use Sync and wait for the lifecycle metadata task to finish.
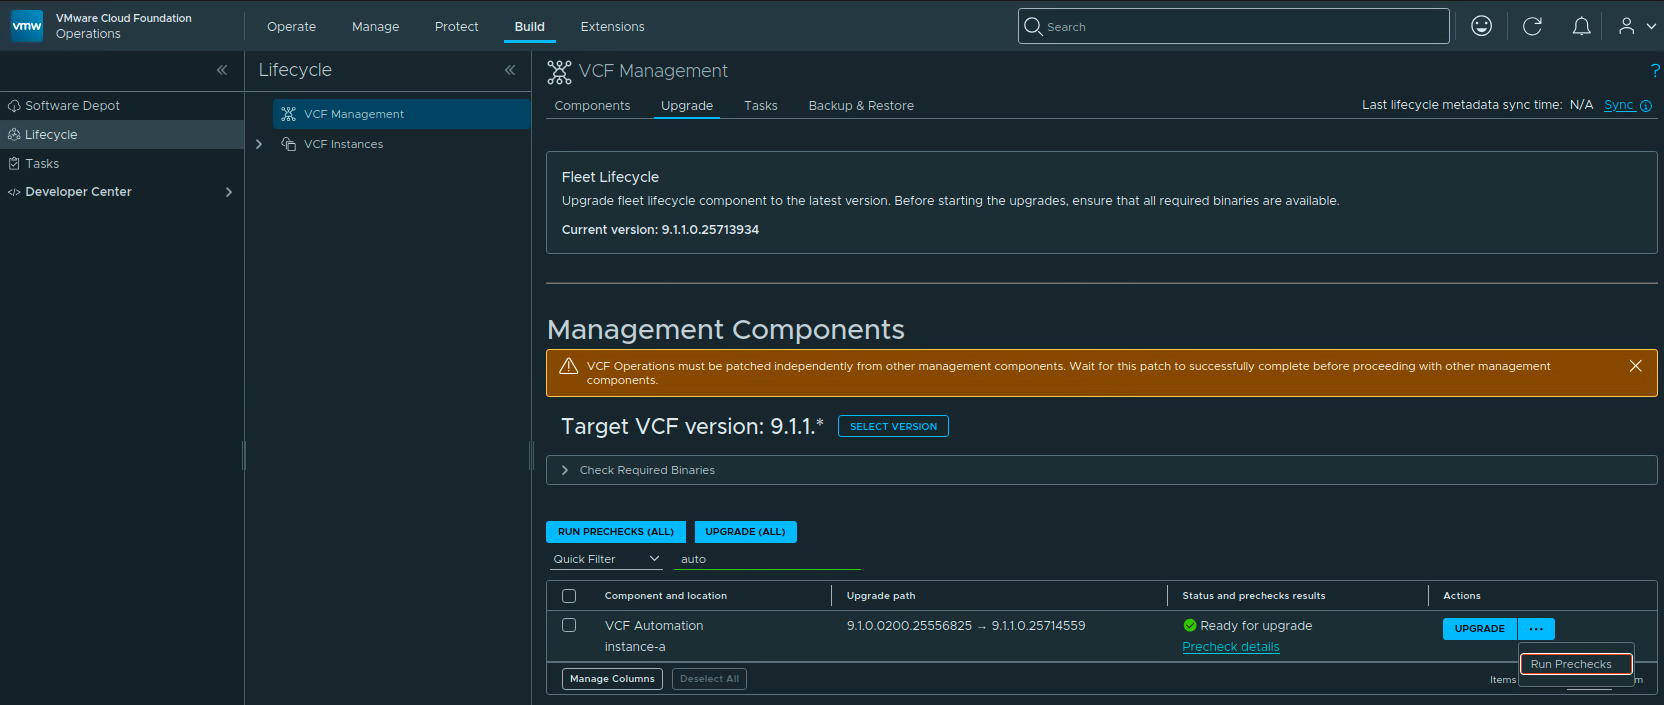
Under Management Components, filter the list for automation and select the VCF Automation row for the VCF instance you want to upgrade. In my lab this was instance-a. Expand Check Required Binaries and resolve any missing binary before continuing.
The upgrade path should read 9.1.0.0200.25556825 -> 9.1.1.0.25714559. The screenshot below shows the target version and the VCF Automation row ready for the precheck workflow.
Running the Prechecks
Make sure only the intended VCF Automation component is selected. The buttons should show Run Prechecks (1) and Upgrade (1). Click Run Prechecks (1) and open Precheck details to follow the task.
The precheck workflow validates the package, the vCenter connection, the VCF services platform, and the component backup requirements. Review every result and remediate any failure before starting the upgrade.
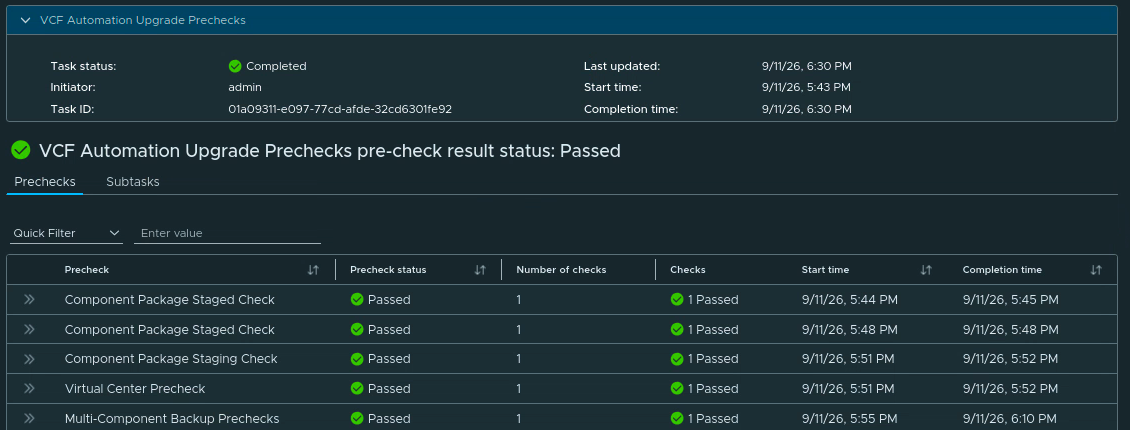
When the precheck is complete, return to the upgrade list. The row should show Ready for upgrade. In my lab the selected row showed the expected source and target builds and the precheck link remained available for review.

Starting the Upgrade
Click Upgrade on the VCF Automation row. The status changes to Upgrade in progress. Click Upgrade details to follow the workflow.

The workflow stages the VCF Automation binaries in the VCF services runtime, runs the component-stage prechecks, and continues through the package staging and upgrade tasks. The details view in my run showed Stage VCF Automation precheck binaries in progress, followed by the component checks.
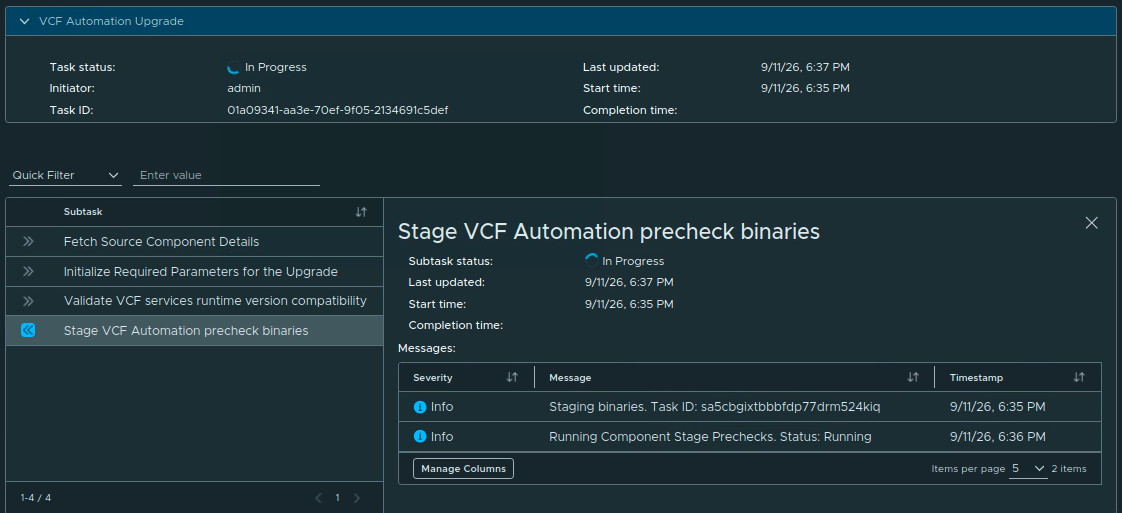
Wait for the task to finish. If a subtask fails, open its details, resolve the reported issue, and retry it before moving on. Do not start another management-component operation while this workflow is running.
Verifying the Upgrade
Once the task reports Completed, go to Build -> Lifecycle -> VCF Management -> Components and open VCF Automation for the upgraded instance.
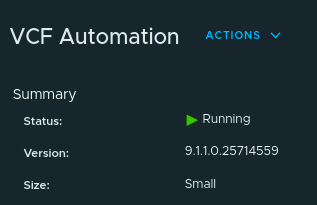
In the component Summary, verify that the status is Running and that the version is 9.1.1.0.25714559. The final capture from my lab shows the upgraded VCF Automation instance running at the expected version.

After the component reports Running, test the provider and tenant portals, logins, cloud accounts, catalog requests, representative deployments, and any integrations that are important in your environment. Also check the VCF services runtime health and confirm that fresh lifecycle tasks and backups work as expected.
Once validation is complete, remove any temporary snapshots you created or expire backup artifacts according to your retention policy. I also recommend clearing the browser cache before using the updated VCF Automation and VCF Operations interfaces.
VCF Automation in my lab is now on 9.1.1.0.25714559. If this is part of a complete VCF 9.1.1 maintenance run, continue with the remaining components while following the dependency boundaries in the release notes.
6. Migration Service Engine (VCD Migrator)
Run this immediately after VCF Automation when the row is installed. VCF Operations calls it Migration service engine; its workflow token is VCD_MIGRATOR. Confirm the migration backend binary VCF_SERVICE_VCD_MIGRATION_BACKEND is available. If the service was uninstalled and reinstalled, check KB 453702 before proceeding.
Selecting the Migration Service Engine
Log in to VCF Operations with an Administrator account and go to Build -> Lifecycle -> VCF Management -> Upgrade.
The target in my lab was already set to 9.1.1.*, and Fleet Lifecycle was already running 9.1.1.0.25713934. If your target still shows 9.1.0.*, click Select Version (shown as Change target version in some builds), choose 9.1.1.*, and set the new target. If 9.1.1 is missing, use Sync and wait for the lifecycle metadata task to finish.
Under Management Components, filter for migration and select the Migration service engine row for the VCF instance you want to upgrade. In my lab that instance was instance-a. Expand Check Required Binaries and resolve any missing binary before continuing.
The upgrade path should read 9.1.0.0200.25556825 -> 9.1.1.0.25714559.
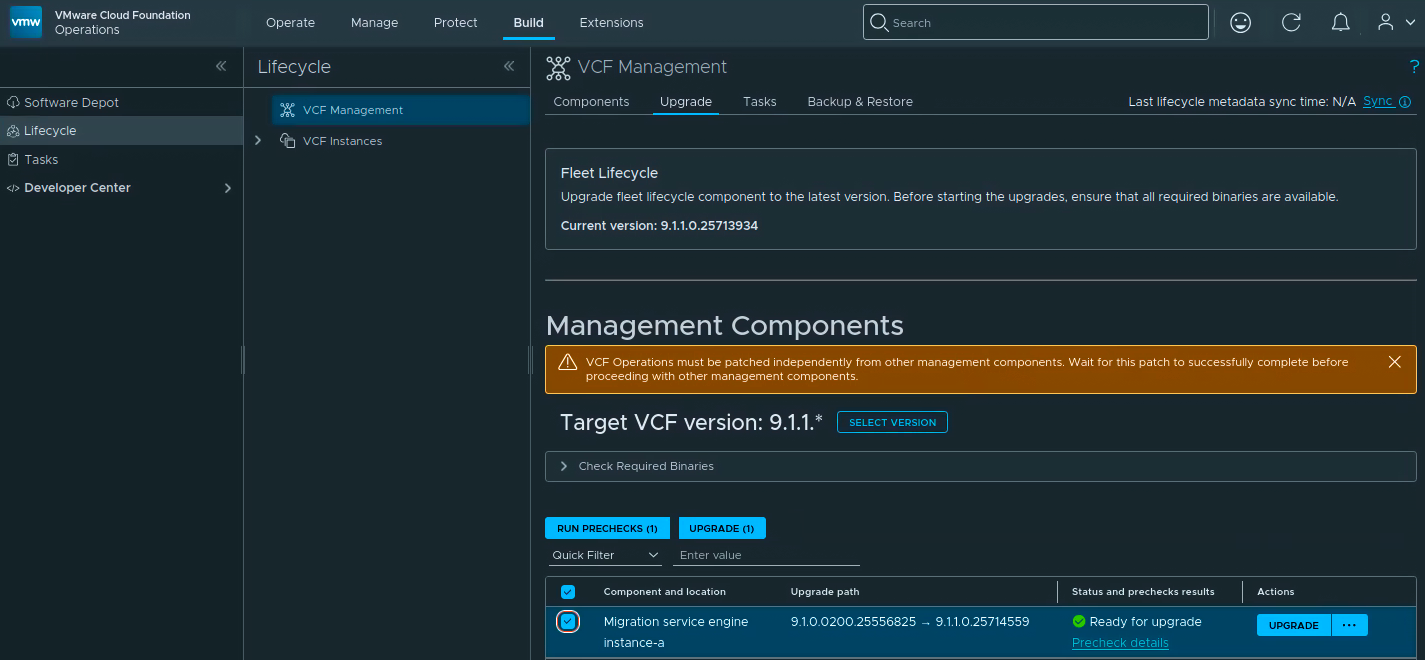
Select the row. The action bar shows RUN PRECHECKS (1) and UPGRADE (1), and the row reports Ready for upgrade after the precheck has passed.

Run the Prechecks
Click RUN PRECHECKS (1) and open Precheck details. Review every result before starting the upgrade. The VCD Migrator precheck covers the staged component package, the virtual center connection, and the database upgrade checks.
The precheck workflow in my run completed with an overall Passed result. The four checks shown in the task were Component Package Staged Check, Component Package Staging Check, Virtual Center Precheck, and Database Upgrade Precheck.
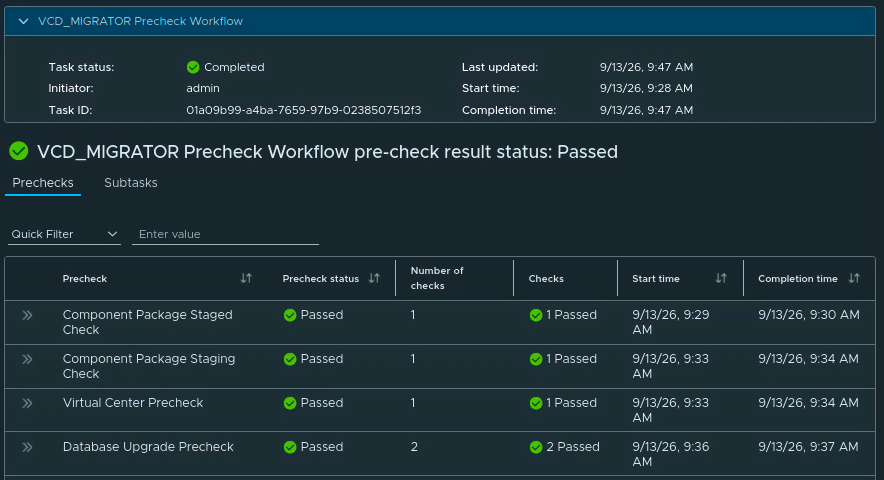
Return to the upgrade list and confirm that the row still reports Ready for upgrade. If a check fails, correct the underlying issue and run the precheck again. Start the upgrade only after the row is ready.
Start the Upgrade
Click UPGRADE on the selected row. The status changes to Upgrade in progress and an Upgrade details link appears.

Open Upgrade details and follow the task from the Tasks tab. The workflow is named VCF_MIGRATOR Upgrade Workflow. In the supplied capture, the active subtask is Stage VCD_MIGRATOR plugin in VCF services runtime. Its messages show the binaries staging first and then Running Component Stage Prechecks.
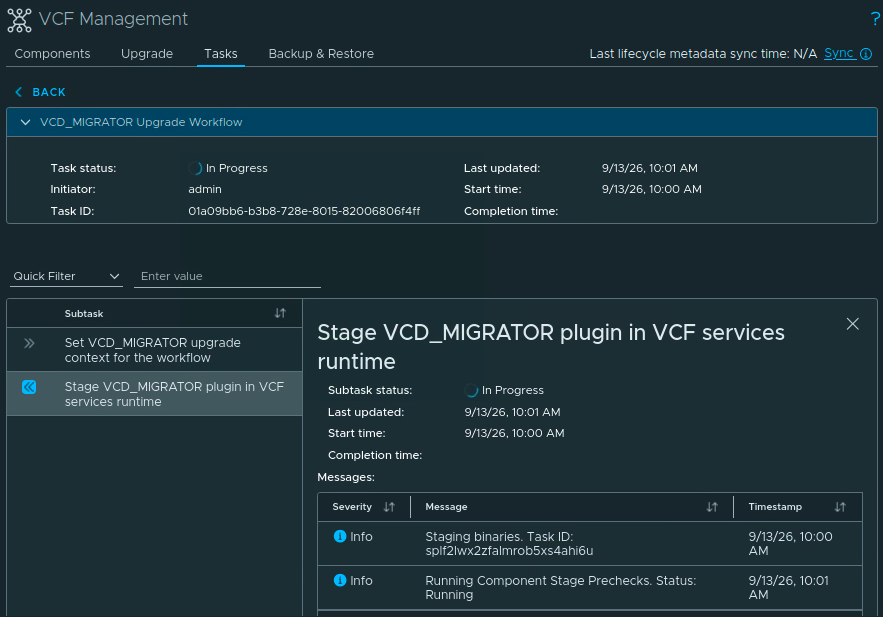
The exact number and names of subtasks can vary with the installed VCF Automation build. Wait for the overall task to report Completed, including its final inventory synchronization where shown. Do not start another management-component operation while this task is running. If a subtask fails, open its details, fix the reported issue, and retry it before proceeding.
If Stage VCD_MIGRATOR precheck binaries eventually times out instead of progressing, review KB 452122. Broadcom identifies pod starvation and Fluentd readiness failures as causes of this specific precheck timeout; resolve the underlying health issue before retrying.
Verify the New Version
The supplied captures end while the upgrade is In Progress, so the final version still needs to be verified after the task completes.
Go to Build -> Lifecycle -> VCF Management -> Components, open the Migration Service Engine component, and verify that it reports Status: Running and version 9.1.1.0.25714559. Also review VCF Management -> Tasks for failed, partial, or stale tasks.
For a workload-migration environment, test the VCF Automation provider and tenant portals, confirm the migration service health, validate the VCD and vCenter connections, and run the supported migration prechecks before moving any workload. The vCenter migration service account must be a member of the SSO group SupervisorProviderAdministrators; if you add it after the connection was created, refresh the VCF Automation vCenter connection as described in KB 444854.
The supplied run is still in progress. Once the task reports Completed and the component is Running at the target build, the next management-component upgrade can proceed within the dependency order in the VCF 9.1.1 release notes.
7. Identity Broker
Run this only after the hosting VCF Services Runtime is on 9.1.1.
Selecting Identity Broker
Log in to VCF Operations with an Administrator account and go to Build -> Lifecycle -> VCF Management -> Upgrade.
Set the target VCF version to 9.1.1.* if it is not already selected. If the release is not listed, use Sync to refresh the lifecycle metadata and wait for that task to finish before checking again.
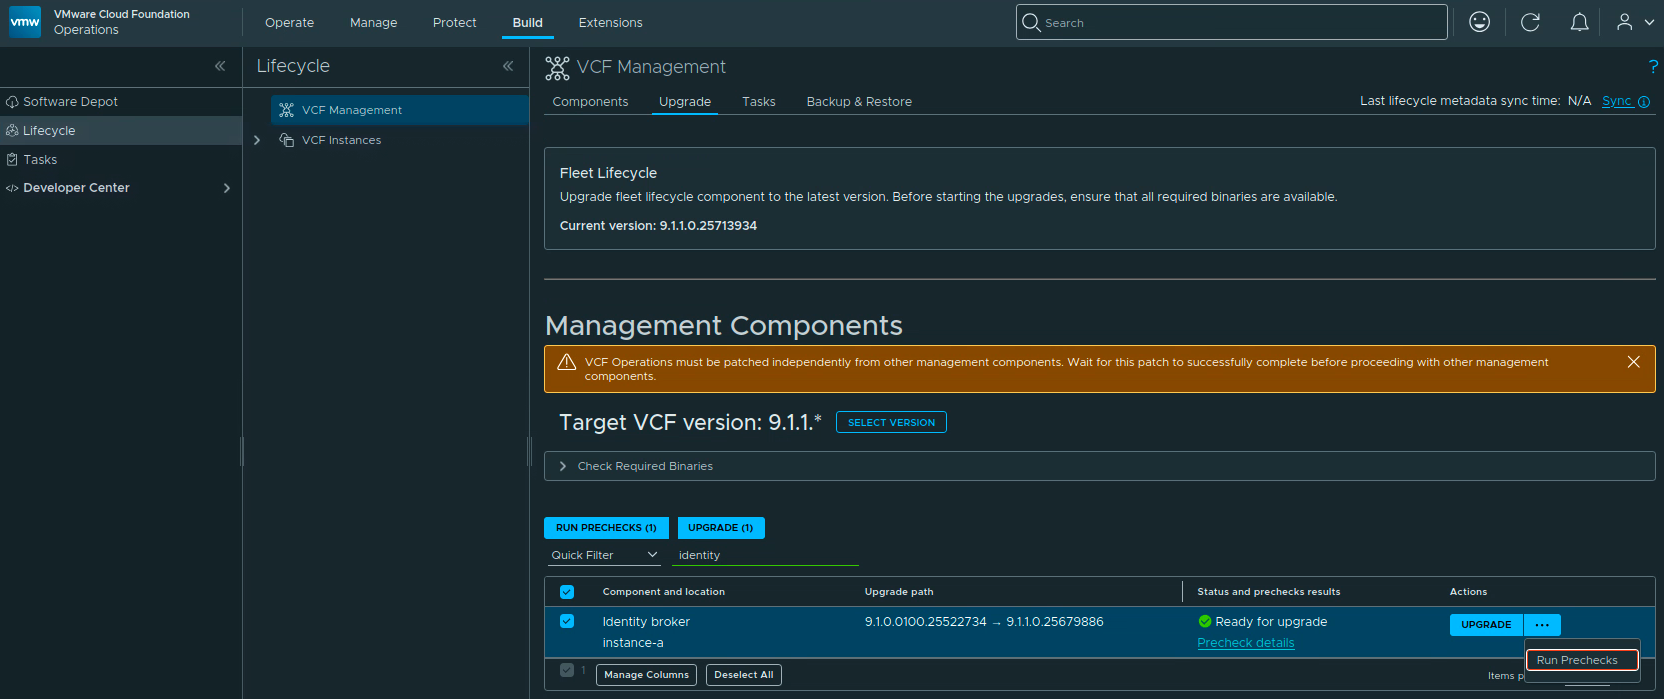
Filter the component list for identity and select Identity broker for the VCF instance you want to patch. In my lab the instance was instance-a. Expand Check Required Binaries and resolve any missing binary before continuing.
The upgrade path should read 9.1.0.0100.25522734 -> 9.1.1.0.25679886. The screenshot below shows Fleet Lifecycle on 9.1.1, the 9.1.1 target, and Identity Broker ready for upgrade.
Running the Prechecks
With only Identity Broker selected, click Run Prechecks (1). Open Precheck details and wait for the Identity broker Precheck Workflow to finish.
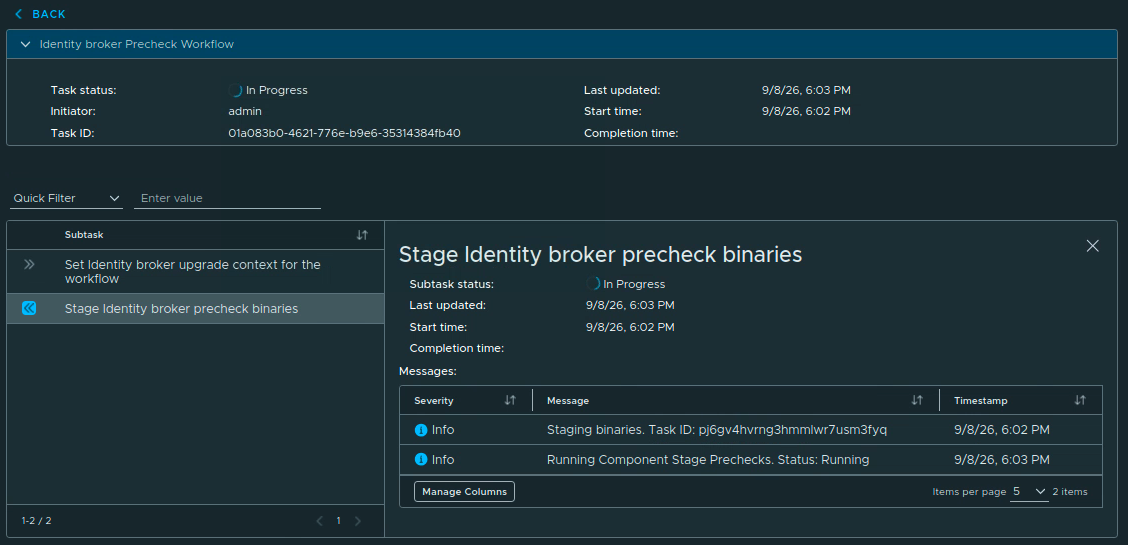
When the precheck completes, review the Prechecks tab and confirm that the overall result is Passed. In my run, the checks covered package staging, the vCenter connection, the database upgrade, the VCF services platform version, and the single-component backup requirement.
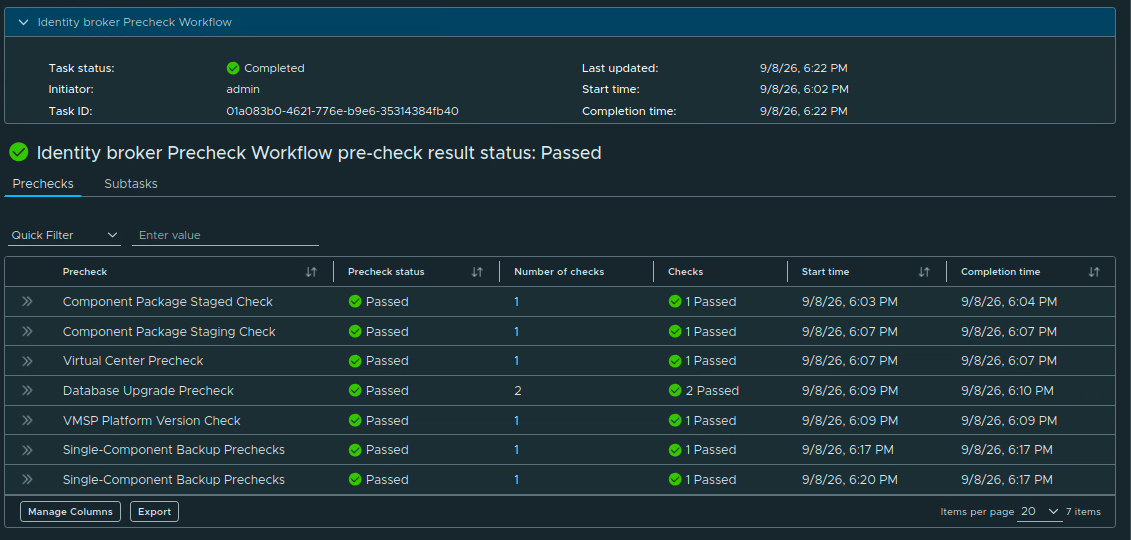
Return to the component list and confirm that Identity Broker is Ready for upgrade. Do not start the upgrade while the precheck is still running. If a check fails, open its details, fix the reported issue, and run the precheck again.

Starting the Upgrade
Click Upgrade on the Identity Broker row. The status changes to Upgrade in progress. Open Upgrade details to follow the workflow.
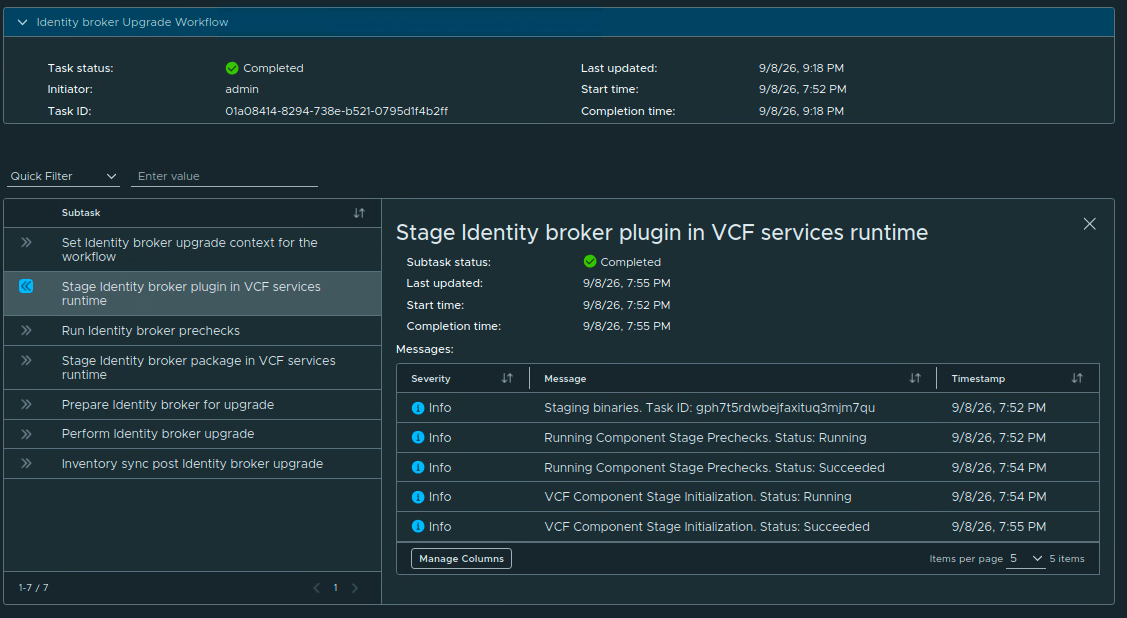
The workflow runs through these subtasks:
- Set Identity Broker upgrade context for the workflow.
- Stage the Identity Broker plugin in the VCF services runtime.
- Run the Identity Broker prechecks.
- Stage the Identity Broker package in the VCF services runtime.
- Prepare Identity Broker for upgrade.
- Perform the Identity Broker upgrade.
- Run the inventory sync after the Identity Broker upgrade.
The task details show the plugin staging and component-stage prechecks while the upgrade is in progress.
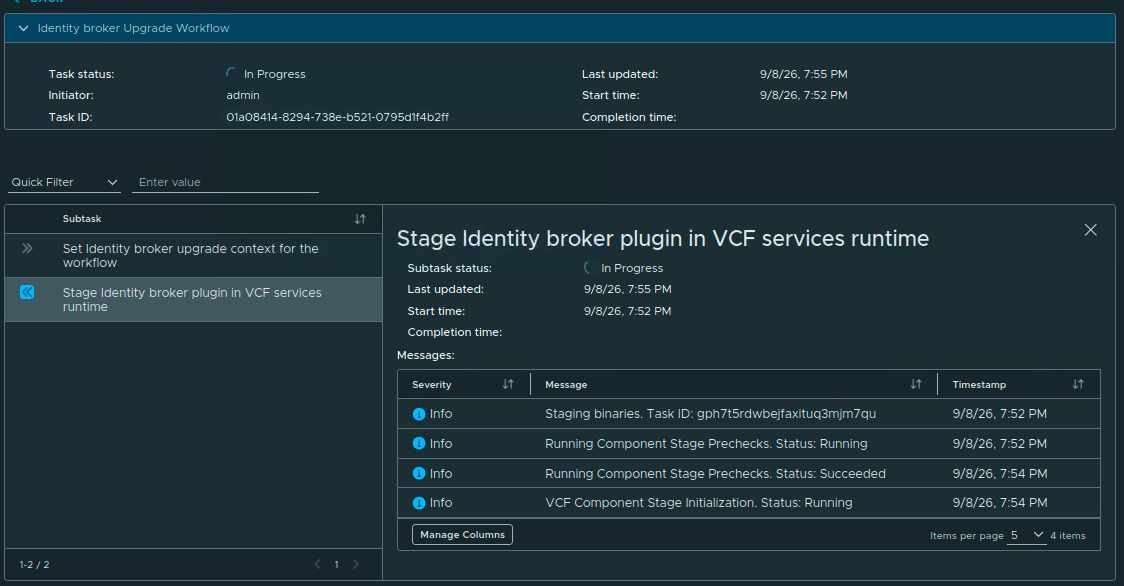
The workflow in my lab started at 7:52 PM and completed at 9:18 PM, for a total workflow time of about 1 hour and 26 minutes. That is the task duration shown in my lab, not a promise about service downtime in another environment. Wait for the final inventory sync and confirm that the overall task is Completed.
Verifying the New Version
Go to Build -> Lifecycle -> VCF Management -> Components and open the Identity Broker component for the instance you upgraded.
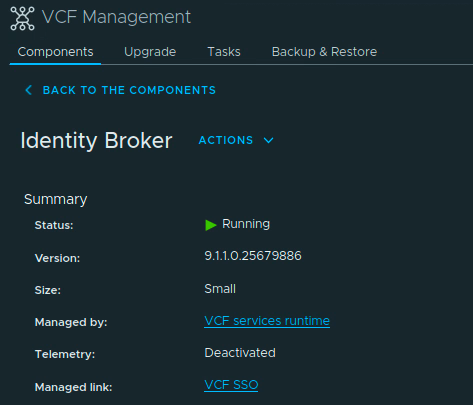
Under Summary, verify that the status is Running and the version is 9.1.1.0.25679886. In my lab the deployment size was Small, it was managed by the VCF services runtime, and the managed link was VCF SSO.
After the component reports Running, validate the authentication path that matters in your environment:
- Sign in to VCF Operations with the configured SSO identity provider.
- Test a directory user and a group-based role assignment.
- Confirm that the expected groups and permissions are still available.
- Test representative VCF component logins and any applications that use the Identity Broker integration.
- Check VCF Management -> Tasks for failed or partially completed tasks, and review VCF services runtime and Identity Broker health.
Treat the lifecycle task and the login checks as separate validations. A completed task confirms that the package workflow finished; successful SSO tests confirm that the broker is serving authentication correctly in your environment.
Once the component and authentication path have been validated, keep or expire the backup artifacts according to your retention policy. I also recommend clearing the browser cache before using the updated VCF Operations interface.
Identity Broker in my lab is now on 9.1.1.0.25679886. If this is part of a larger VCF 9.1.1 maintenance run, continue with the remaining components in the order and dependency boundaries documented in the VCF 9.1.1 release notes.
8. Salt RaaS
Run this only after the hosting VCF Services Runtime is on 9.1.1.
Selecting Salt RaaS
Log in to VCF Operations with an Administrator account and go to Build -> Lifecycle -> VCF Management -> Upgrade.
Set the target VCF version to 9.1.1.*. If the release is not listed, click Sync, wait for the lifecycle metadata task to complete, and check again. Setting the target only changes the available target; it does not start an upgrade.
Filter the component list for salt and select the Salt RaaS row for the VCF instance you want to patch. In my lab the instance is instance-a. Make sure only the intended component is selected, and expand Check Required Binaries to resolve any missing binary.
The upgrade path should read 9.1.0.0100.25434834 -> 9.1.1.0.25679895.

Running the Prechecks
With only Salt RaaS selected, click Run Prechecks (1). Open Precheck details and wait for the Salt RaaS Precheck Workflow to finish.
The first part of the workflow stages the precheck binaries. The task view reports the staging messages and the component stage precheck status while it runs.

The workflow then runs the Salt RaaS prechecks. Do not start the upgrade while this task is still running.

When the task completes, review the Prechecks tab and confirm that the overall result is Passed. In my run, the list included component package staging, package staging, Virtual Center, VMSP platform version, database upgrade, and single-component backup checks, all marked Passed.

Return to the component list and confirm that Salt RaaS is Ready for upgrade. If a check fails, open its details, fix the reported issue, and run the precheck again.

Starting the Upgrade
Click Upgrade on the Salt RaaS row. The status changes to Upgrade in progress. Open Upgrade details to follow the workflow.

The workflow runs through these subtasks:
- Set Salt RaaS upgrade context for the workflow.
- Stage the Salt RaaS plugin in the VCF services runtime.
- Run the Salt RaaS prechecks.
- Stage the Salt RaaS package in the VCF services runtime.
- Prepare Salt RaaS for upgrade.
- Perform the Salt RaaS upgrade.
- Run the inventory sync after the Salt RaaS upgrade.
While the upgrade prechecks are running, the task details show the component upgrade precheck messages. Wait for the workflow to move through package staging, preparation, and the upgrade itself.

When the final inventory sync completes, confirm that the overall task status is Completed. The supplied captures contain separate precheck and upgrade task timestamps from the lab, so I am not treating them as a single downtime measurement.

Verifying the New Version
Go to Build -> Lifecycle -> VCF Management -> Components and open Salt RaaS for the instance you upgraded.
Under Summary, verify that the status is Running, the version is 9.1.1.0.25679895, and the component is managed by the expected VCF services runtime. In my lab the deployment size is Small.

Before moving on, review VCF Management -> Tasks for failed or partially completed tasks, check the VCF services runtime and Salt health, and confirm that the management-services backup still works. Also verify the Salt Master separately if it is installed; the RaaS upgrade does not prove that every Salt component is on 9.1.1.
VCF Salt RaaS in my lab is now on 9.1.1.0.25679895. We can continue with the remaining management components by following the dependencies in the VCF 9.1.1 release notes.
9. Salt Master
Run this after the runtime and keep it separate from other lifecycle tasks.
Selecting Salt Master
Log in to VCF Operations with an Administrator account and go to Build -> Lifecycle -> VCF Management -> Upgrade.
Set the target VCF version to 9.1.1.*. If the release is not listed, click Sync, wait for the lifecycle metadata task to complete, and check again.
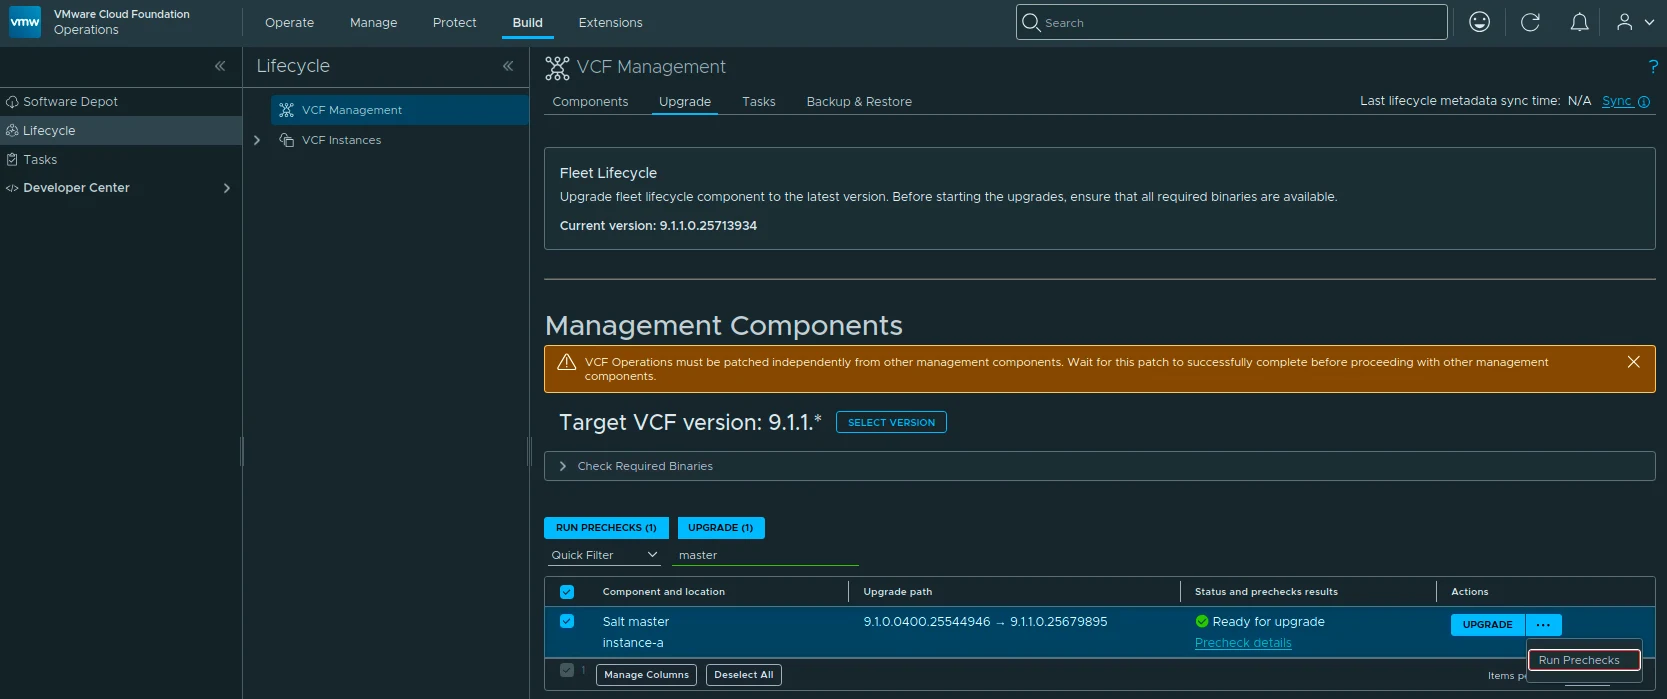
Filter the component list for master and select the Salt master row for the VCF instance you want to patch. In my lab the instance was instance-a. Make sure only the intended component is selected. Expand Check Required Binaries and resolve any missing binary before continuing.
The upgrade path should read 9.1.0.0400.25544946 -> 9.1.1.0.25679895.
Running the Prechecks
With only Salt Master selected, click Run Prechecks (1). Open Precheck details and wait for the Salt master Precheck Workflow to finish.
When the precheck completes, review the Prechecks tab and confirm that the overall result is Passed. In my run, the checks included component package staging, package staging, the vCenter connection, the database upgrade, and the single-component backup requirement.
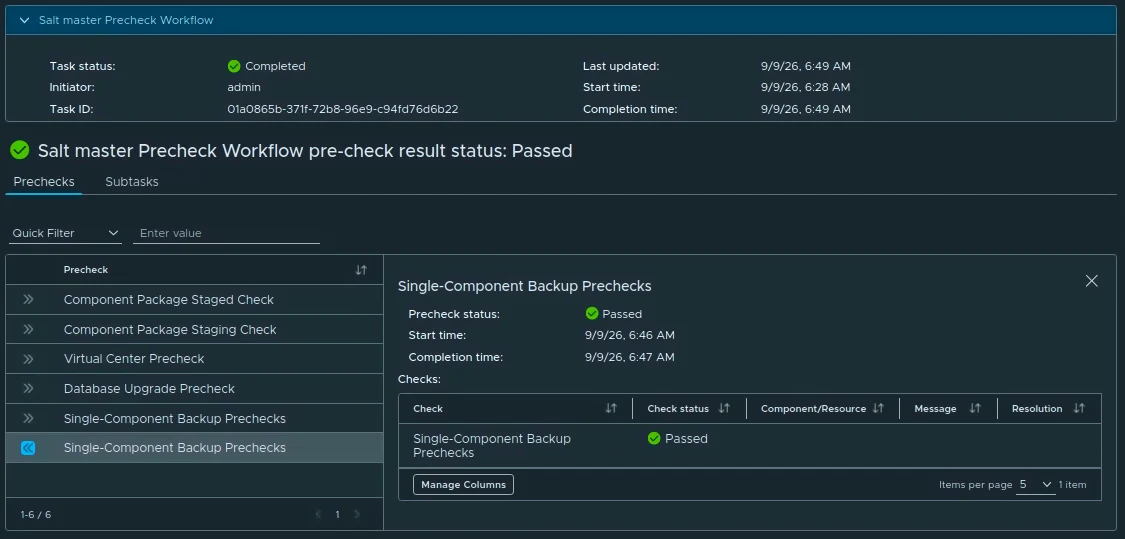
Return to the component list and confirm that Salt Master is Ready for upgrade. Do not start the upgrade while the precheck is still running. If a check fails, open its details, fix the reported issue, and run the precheck again.

Starting the Upgrade
Click Upgrade on the Salt Master row. The status changes to Upgrade in progress. Open Upgrade details to follow the workflow.
The workflow in my lab moved through these subtasks:
- Set Salt master upgrade context for the workflow.
- Stage the Salt master plugin in the VCF services runtime.
- Run Salt master prechecks.
- Stage the Salt master package in the VCF services runtime.
- Prepare Salt master for upgrade.
- Perform the Salt master upgrade.
- Run the inventory sync after the Salt master upgrade.

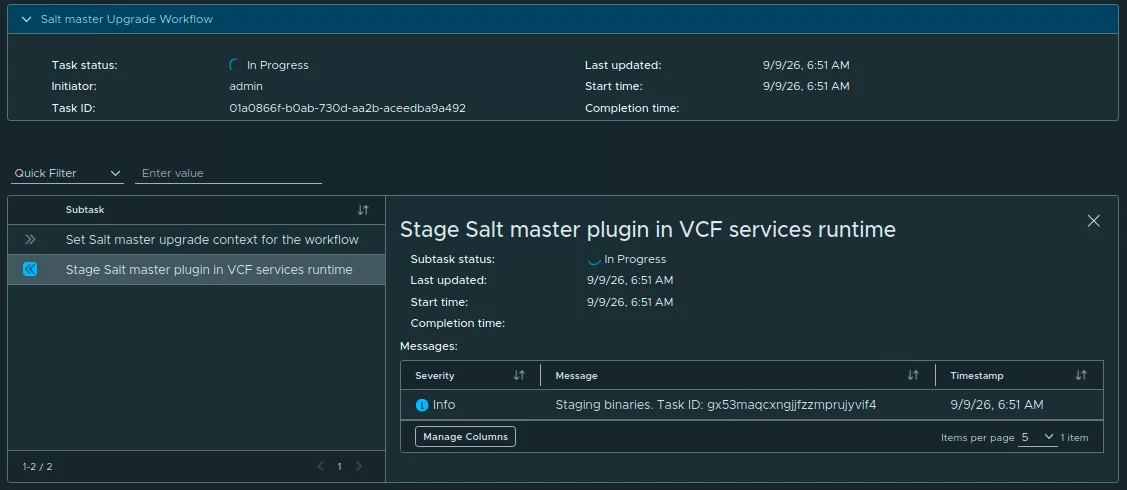
The workflow then advances through the Salt master prechecks, package staging, and preparation steps.
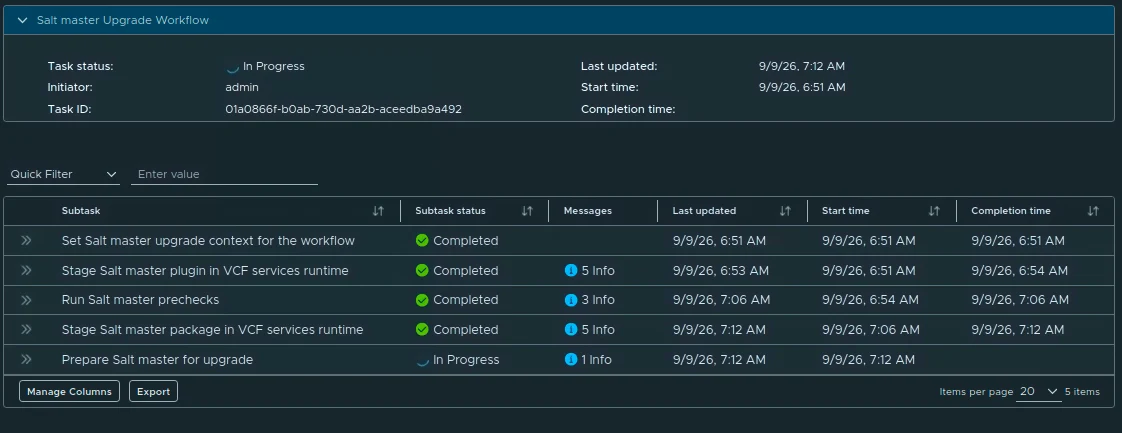
The task details show the package staging, prechecks, preparation, and upgrade subtasks. Wait for the final inventory sync and confirm that the overall task is Completed.
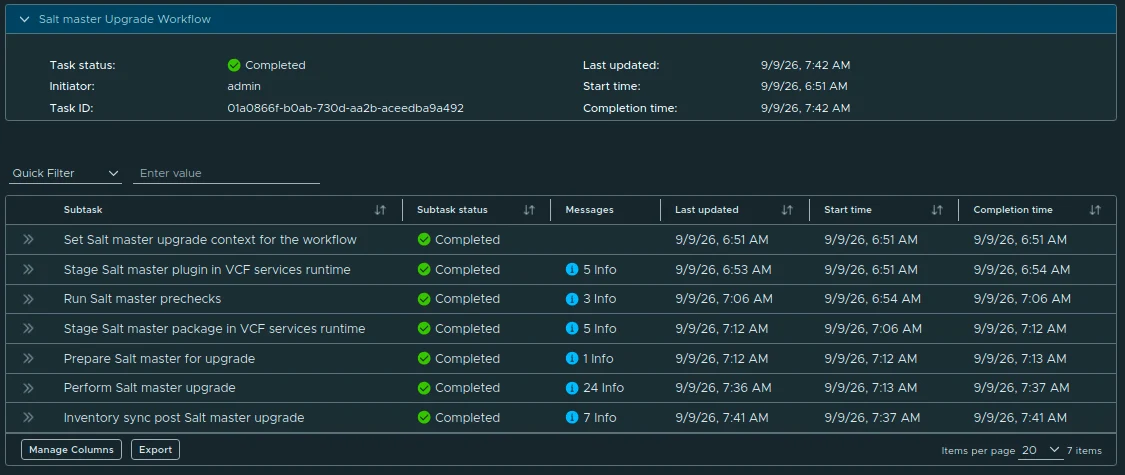
In my lab the workflow started at 6:51 AM and completed at 7:42 AM on September 9, for a total workflow time of about 51 minutes. That is the duration shown by my task, not a promise about service downtime in another environment.
Verifying the New Version
Go to Build -> Lifecycle -> VCF Management -> Components and open Salt Master for the instance you upgraded.
Under Summary, verify that the status is Running and the version is 9.1.1.0.25679895. In my lab the deployment size was Small and it was managed by the VCF services runtime.
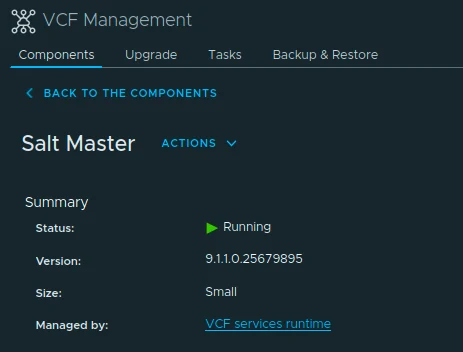
Before moving on, review VCF Management -> Tasks for failed or partially completed tasks, check the VCF services runtime and Salt health, and confirm that the management-services backup still works. If Salt RaaS is also present, verify its version and patch it only after its hosting runtime meets the 9.1.1 dependency.
10. Log Management
Run Log Management to completion before Operations for Networks when both are installed. Log data is not included in the component backup, so retain a separate archive.
Selecting Log Management
Log in to VCF Operations with an Administrator account and go to Build -> Lifecycle -> VCF Management -> Upgrade.
The target in my lab is already 9.1.1.*. If the target is still on an older release, click Select Version, choose 9.1.1.*, and apply the target before selecting the component. If the page shows a warning that VCF Operations must be patched independently, finish that patch and wait for it to succeed before continuing with the other management components.
Filter the component list for log, select Log management, and make sure the intended instance is selected. In my lab the instance is instance-a. Expand Check Required Binaries and resolve any missing binary before continuing.
The upgrade path should read 9.1.0.0400.25544947 -> 9.1.1.0.25679624. The screenshot below shows the target version, the selected Log Management instance, and the Ready for upgrade state.
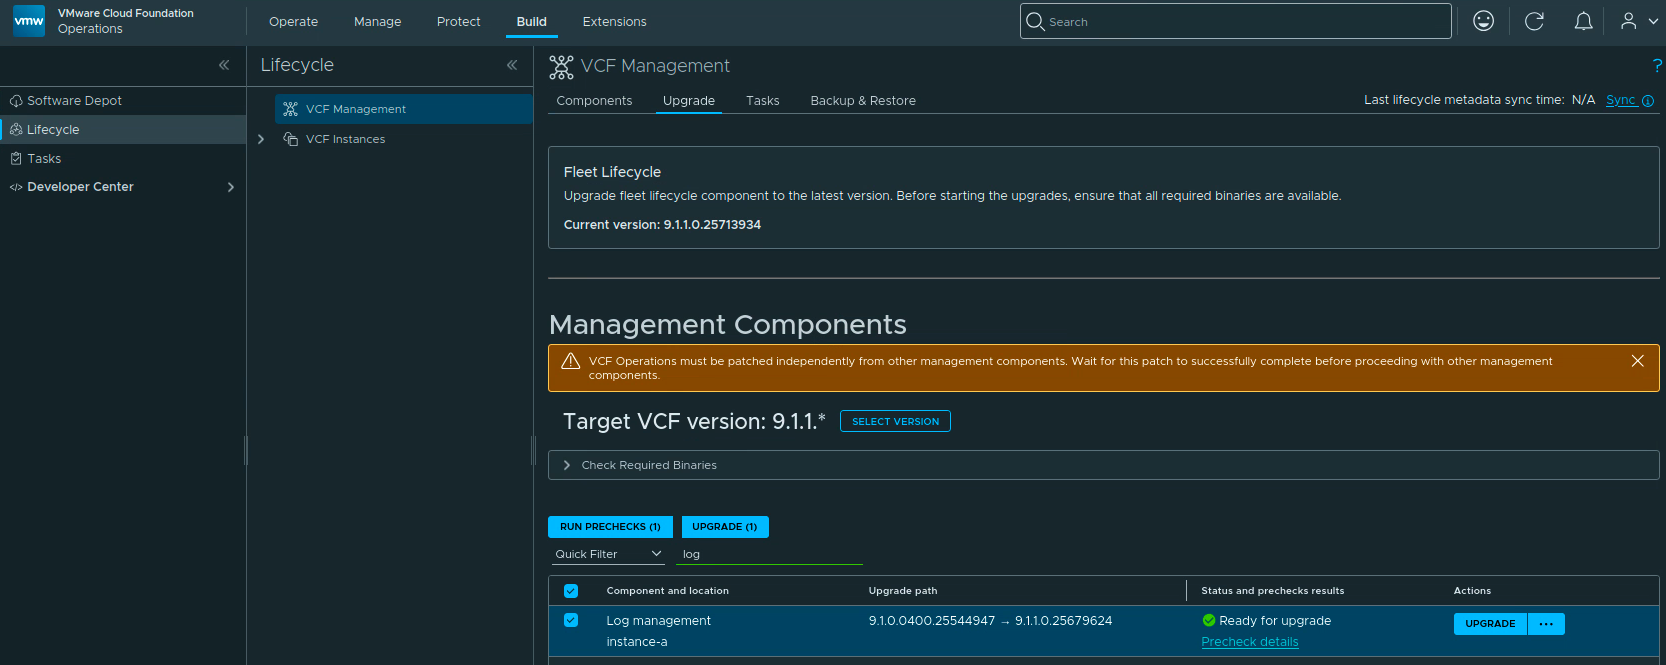
Running the Prechecks
With only Log Management selected, click Run Prechecks (1). Follow the task by opening Precheck details.
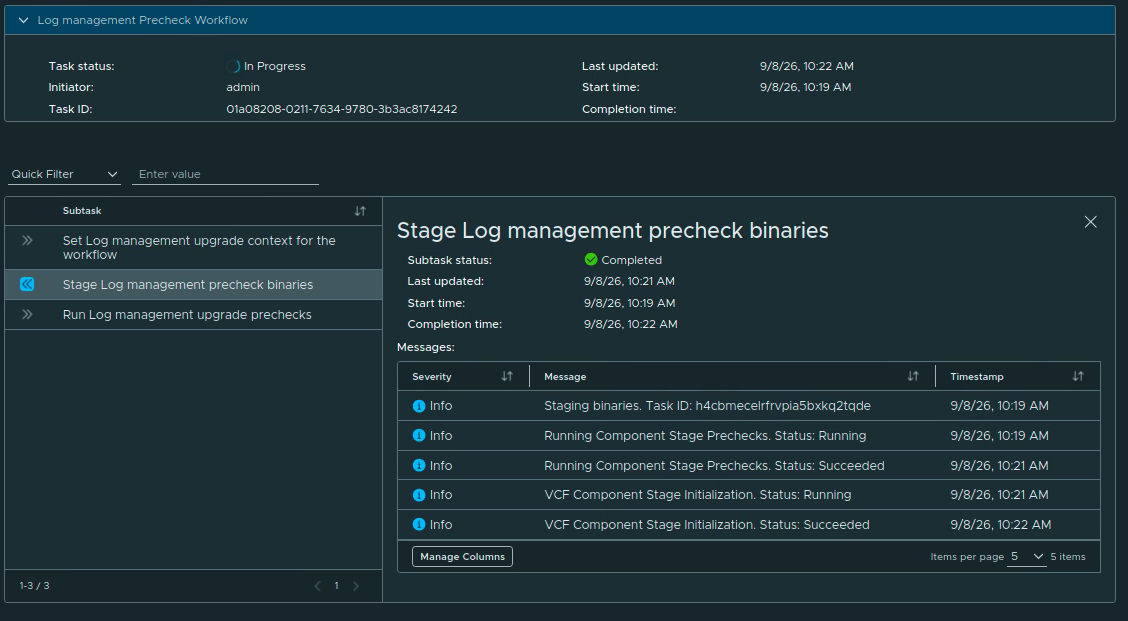
The precheck workflow in my lab completed successfully in about 14 minutes. It passed the package staging, vCenter, database upgrade, and single-component backup checks.
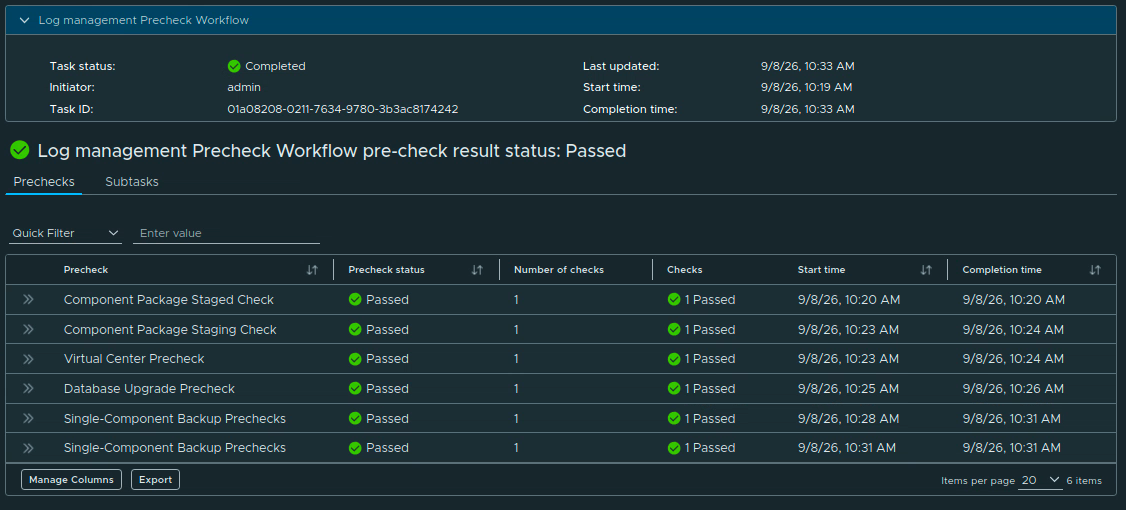
Do not start the upgrade until the precheck status is Passed. If a check fails, open its details, remediate the reported issue, and run the precheck again.
Starting the Upgrade
Return to the component list and click Upgrade on the Log Management row. The row changes to Upgrade in progress. Click Upgrade details to follow the workflow.
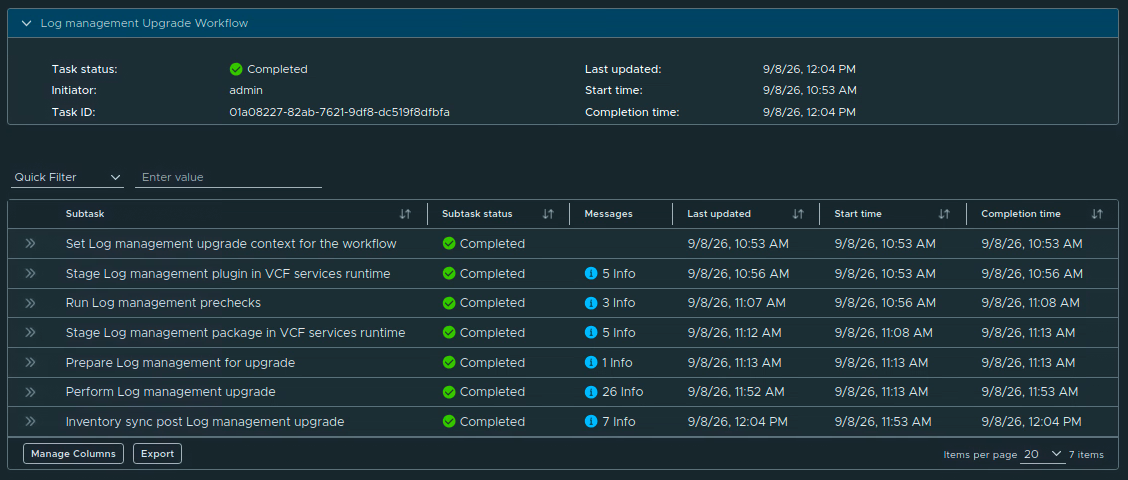
The workflow runs through these subtasks:
- Set Log Management upgrade context for the workflow.
- Stage the Log Management plugin in VCF services runtime.
- Run the Log Management prechecks.
- Stage the Log Management package in VCF services runtime.
- Prepare Log Management for upgrade.
- Perform the Log Management upgrade.
- Run the post-upgrade inventory sync.
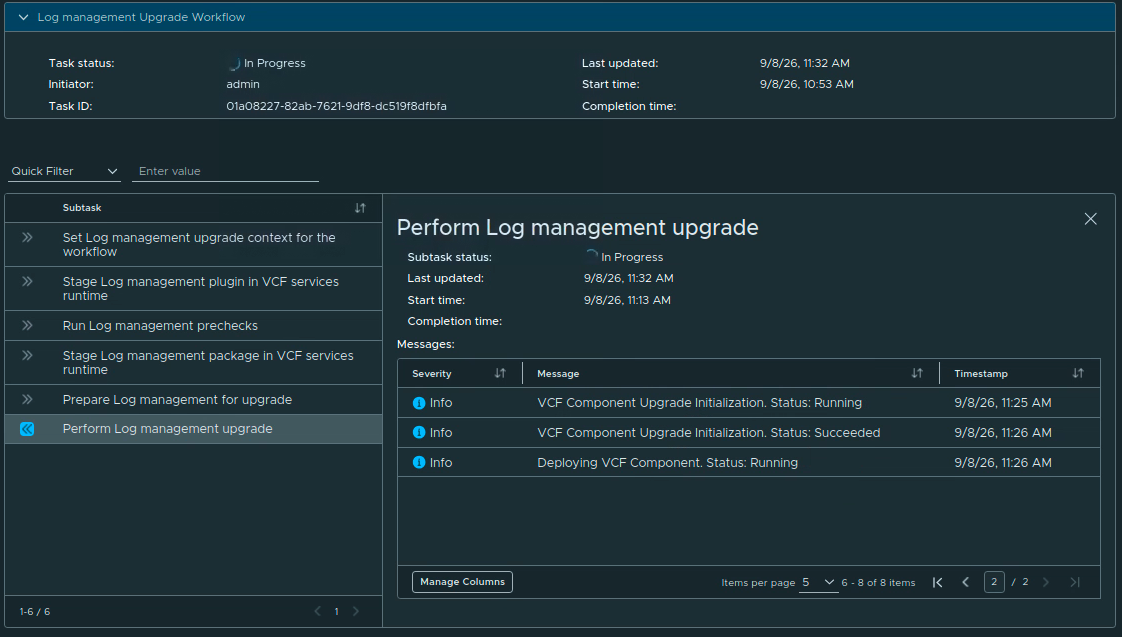
The workflow started at 10:53 AM in my lab. The task took about 1 hour and 11 minutes, completing at 12:04 PM. That is the total workflow time shown in my task, not a promise about service downtime in another environment. Wait for the final inventory sync and confirm that the overall task is Completed.
Verifying the New Version
Go to Build -> Lifecycle -> VCF Management -> Components and open the Log Management component for the instance you upgraded.
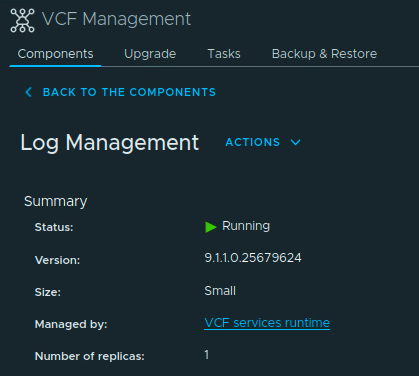
Under Summary, verify that the status is Running, the version is 9.1.1.0.25679624, and the component is managed by the expected VCF services runtime. In my lab the deployment size is Small with one replica.
After the component reports Running, validate the parts of the service that matter in your environment:
- Open Operate -> Logs and run a known query.
- Confirm that new events are arriving from representative vSphere, ESXi, and application sources.
- Check dashboards, alerts, notification targets, and any custom integrations.
- Verify that any custom log forwarding configuration still points to the correct Log Management instance.
9.1.1 Changes to Keep in Mind
11. Operations for Networks
Run this after Log Management has completed when both components are installed. For an XL deployment, if the system precheck reports system.health.status.check, apply KB 454602: add the required 1 TB disk, let the appliance detect it, and rerun the precheck.
Selecting VCF Operations for Networks
Log in to VCF Operations with an Administrator account and go to Build -> Lifecycle -> VCF Management -> Upgrade.
Set the target VCF version to 9.1.1.* if it is not already selected. If the release is not listed, use Sync to refresh the lifecycle metadata and wait for that task to finish before checking again.
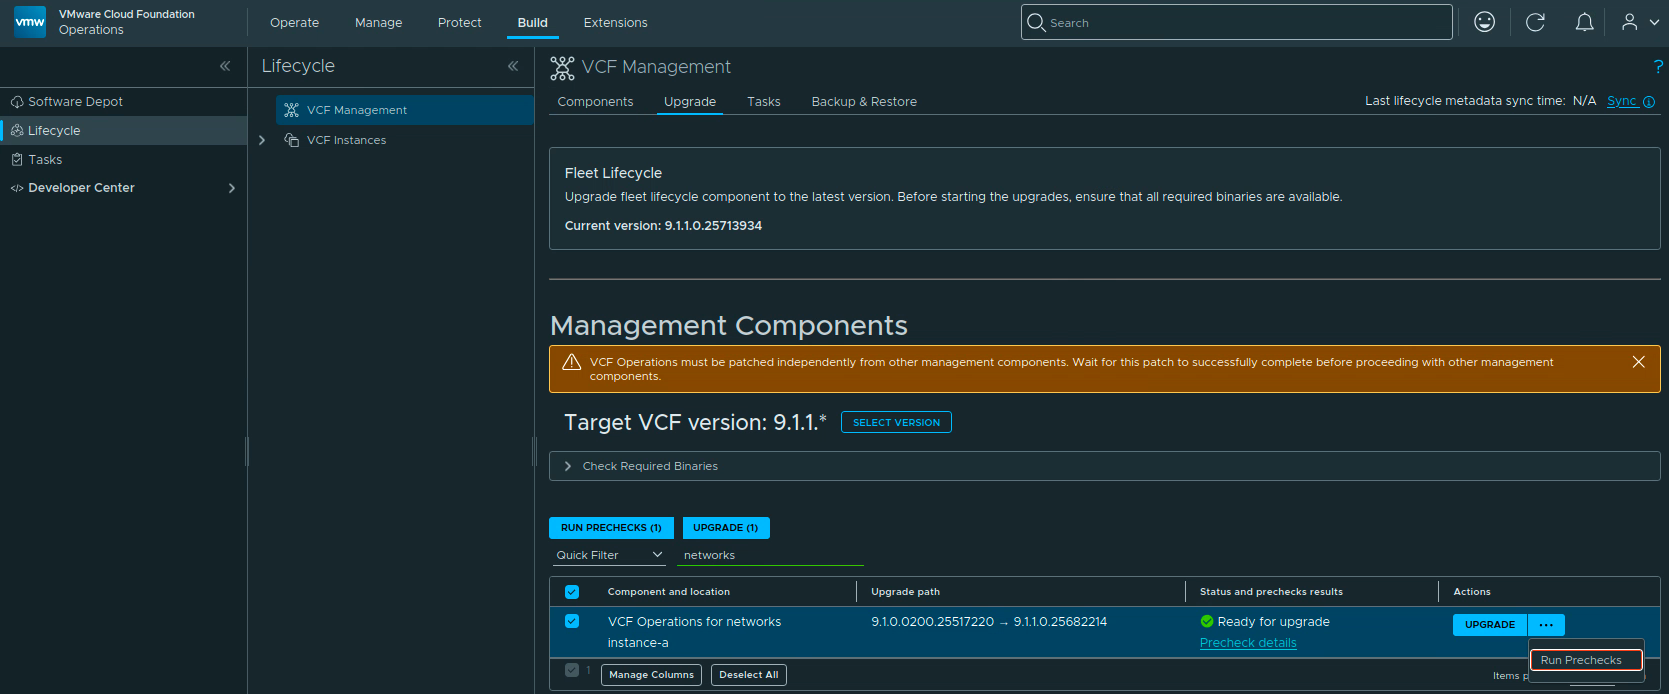
Expand Check Required Binaries, resolve any missing binary, and filter the component list for networks. Select the VCF Operations for networks row for the instance you want to patch. In my lab the instance is instance-a.
The upgrade path should read 9.1.0.0200.25517220 -> 9.1.1.0.25682214. The screenshot below shows Fleet Lifecycle on 9.1.1, the 9.1.1 target, the selected Networks instance, and the Ready for upgrade state.
Running the Prechecks
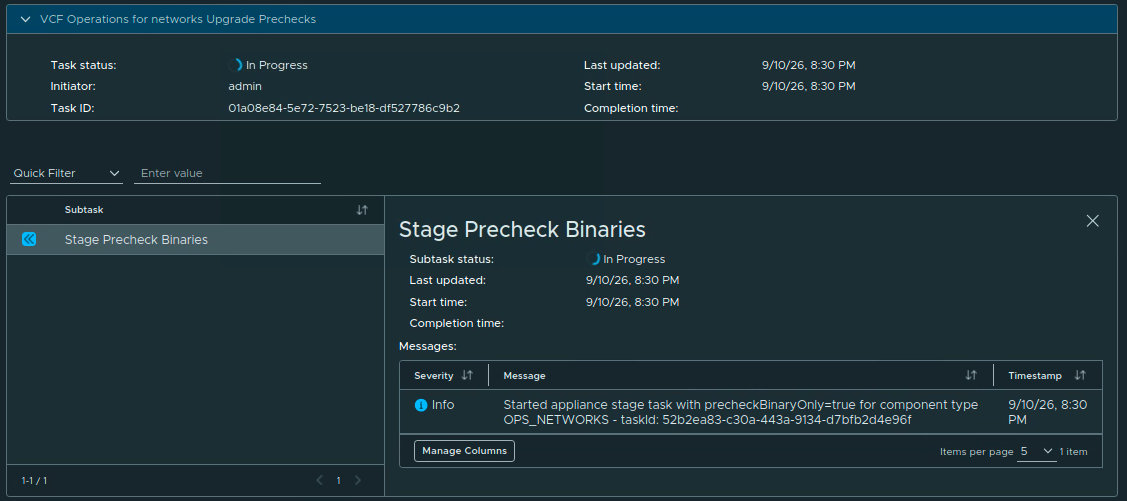
With only VCF Operations for Networks selected, click Run Prechecks (1). Open Precheck details and wait for the workflow to finish.
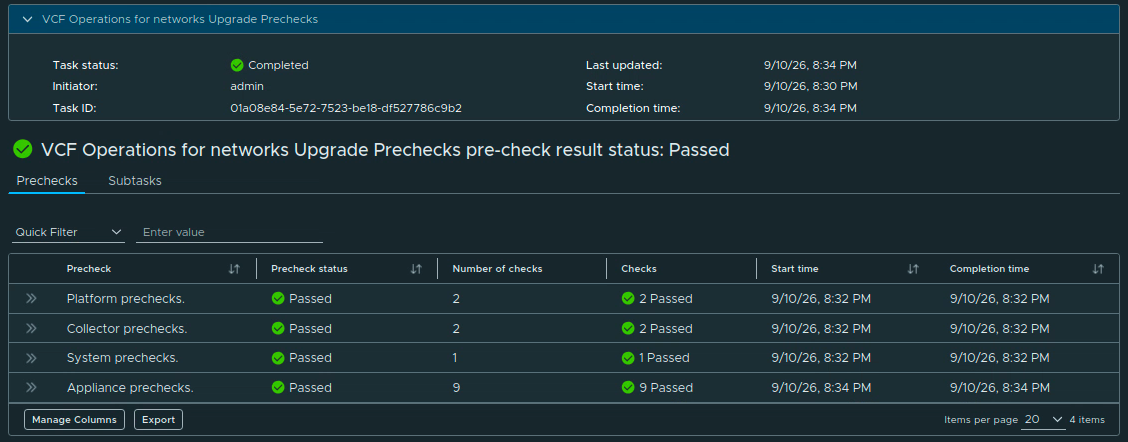
The precheck in my lab started at 8:30 PM and completed at 8:34 PM. The result was Passed. Platform, collector, system, and appliance prechecks all passed; the appliance checks contained nine individual checks.
Return to the component list and confirm that the Networks row is Ready for upgrade. Do not start the upgrade while the precheck is still running. If a check fails, open its details, fix the reported issue, and run the precheck again.

Starting the Upgrade
Click Upgrade on the Networks row. The status changes to Upgrade in progress. Open Upgrade details to follow the workflow.

The workflow runs through these subtasks:
- Run Component Upgrade Prechecks.
- Prepare Component for Upgrade.
- Stage Upgrade Binaries.
- Perform Component Upgrade.
- Run the Inventory Sync Post Upgrade.
The Perform Component Upgrade task is the part that takes the longest. The workflow in my lab started at 9:02 PM and completed at 11:11 PM, for a total task time of about 2 hours and 9 minutes. That is the duration shown by my task, not a promise about service downtime in another environment.
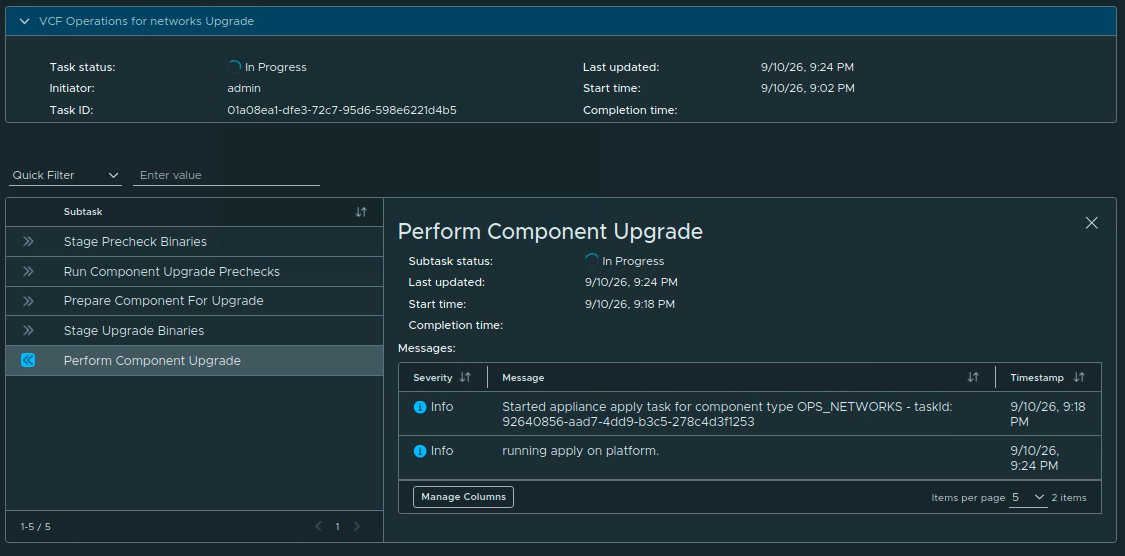
Wait for the final inventory sync and confirm that the overall task is Completed. The completed workflow also refreshes the component endpoint and checks whether the VCF Operations for Networks service account needs to be created.
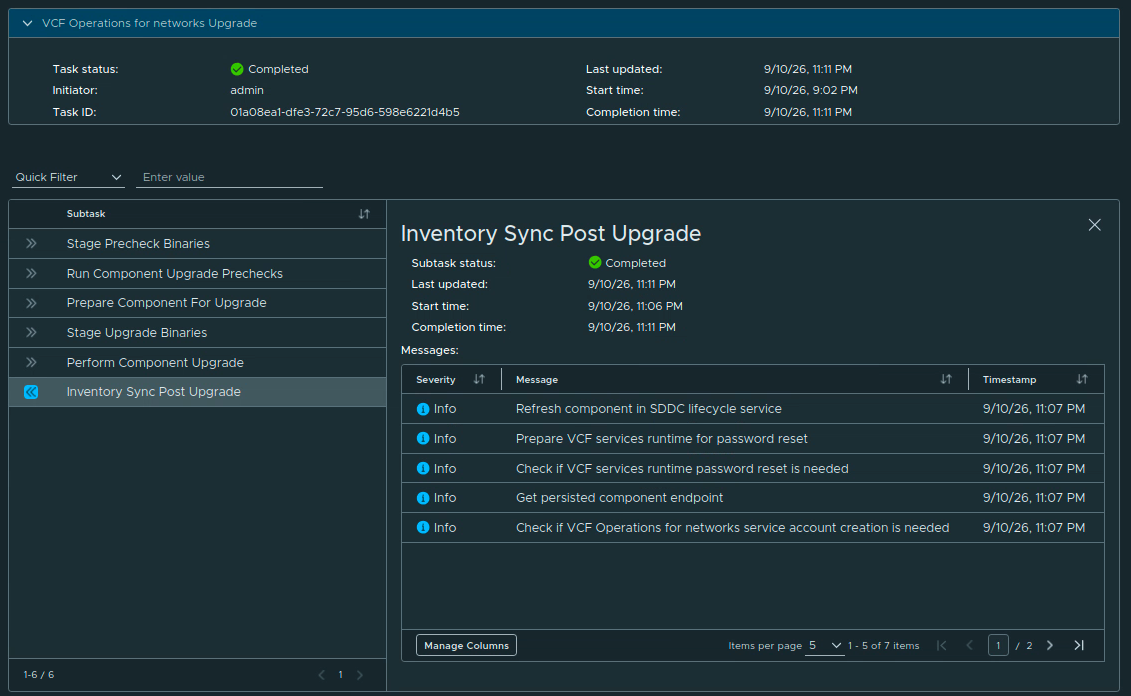
Verifying the New Version
Go to Build -> Lifecycle -> VCF Management -> Components and open VCF Operations for Networks for the instance you upgraded.
Under Summary, verify that the status is Running and the version is 9.1.1.0.25682214. In my lab the deployment size is XL and the summary shows Telemetry: Deactivated. That value is a configuration state displayed by the component; review it against your organization’s telemetry policy rather than assuming the upgrade changed it.
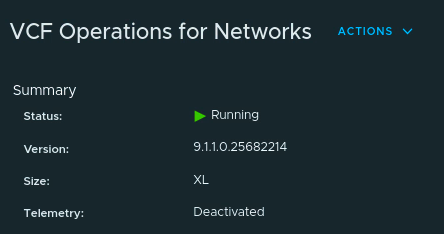
After the component reports Running, validate the parts of the service that matter in your environment:
- Confirm that representative vSphere, NSX, and physical-network data sources are connected and collecting.
- Run a known search query and open a recent flow or path result.
- Check dashboards, alerts, notification targets, and any custom integrations.
- Verify that the collectors are healthy and that new flow data continues to arrive.
- Review VCF Management -> Tasks for failed or partially completed tasks.
With an integrated Networks instance on 9.1.1 or later, VCF Operations uses the VIM Adapter path for certificate collection. This removes the older same-node placement dependency described in KB 454096. Check the certificate status after the upgrade so that you know the new collection path is working.
If Fleet Lifecycle still shows the upgrade as in progress after the appliance is already reporting the new version, do not immediately repeat the upgrade. KB 432678 describes the case where the appliance does not report back to Fleet Manager; after confirming the new version, the documented recovery is to reboot the VCF Fleet Manager appliance and allow the next inventory sync to clear the stale task state.
Keep or expire the backup artifacts according to your retention policy. VCF Operations for Networks in my lab is now on 9.1.1.0.25682214. If this is part of a larger VCF 9.1.1 maintenance run, continue with the remaining components in the order and dependency boundaries documented in the VCF 9.1.1 release notes.
12. Real-Time Metrics Store
This is a separate component from Real-Time Metrics. Patch and validate the store row independently.
Selecting Real-Time Metrics Store
Log in to VCF Operations with an administrator account and go to Build -> Lifecycle -> VCF Management -> Upgrade.
Set the target VCF version to 9.1.1.* if it is not already selected. Expand Check Required Binaries and resolve any missing binary before continuing.
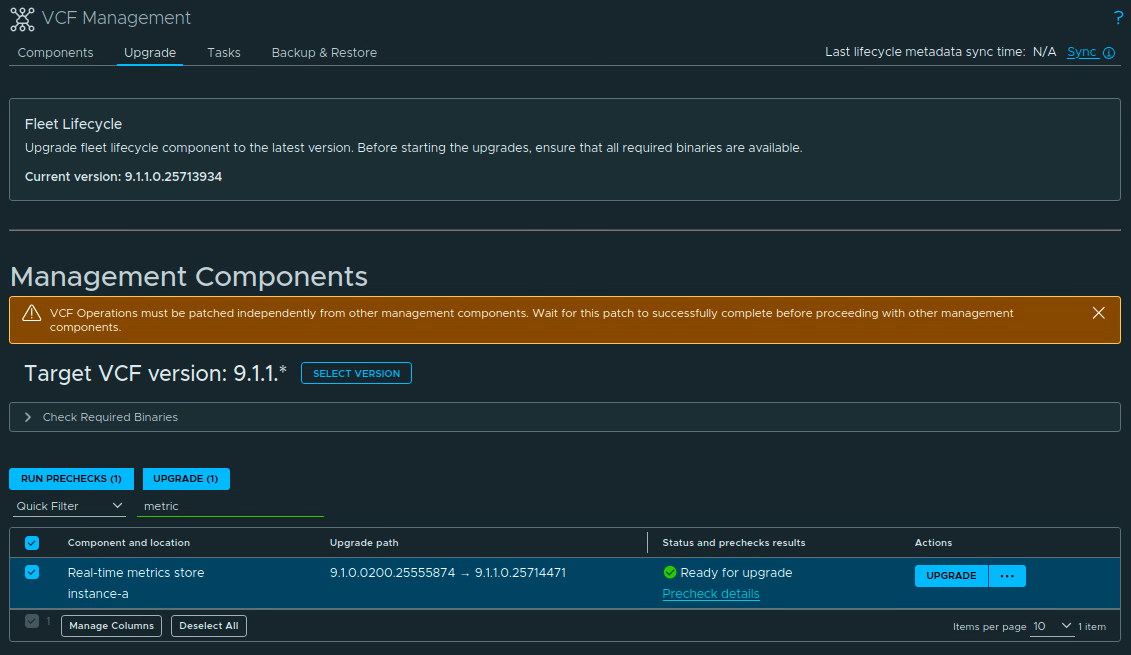
Filter the component list for metric, select Real-time metrics store, and confirm that the intended instance is selected. In my lab the instance is instance-a. The upgrade path should read 9.1.0.0200.25555874 -> 9.1.1.0.25714471.
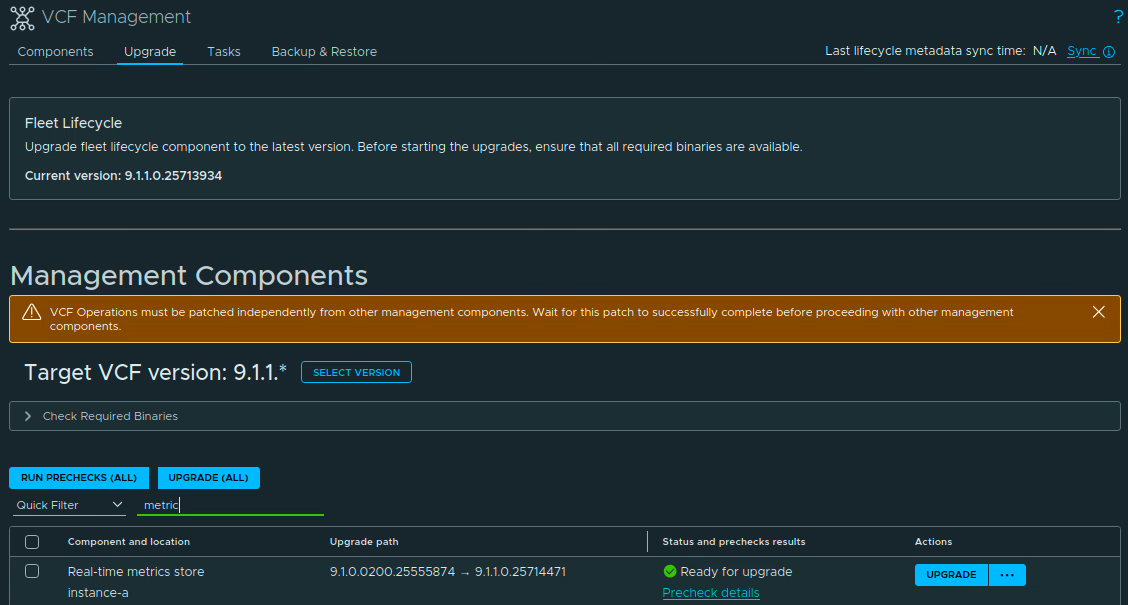
Select the row and click Run Prechecks (1). The selected row shows the component and the same source and target builds before the precheck starts.
Running the Prechecks
Open the task details and wait for the Real-time metrics store Precheck Workflow to finish. The workflow runs the component upgrade prechecks before the upgrade is allowed to start.
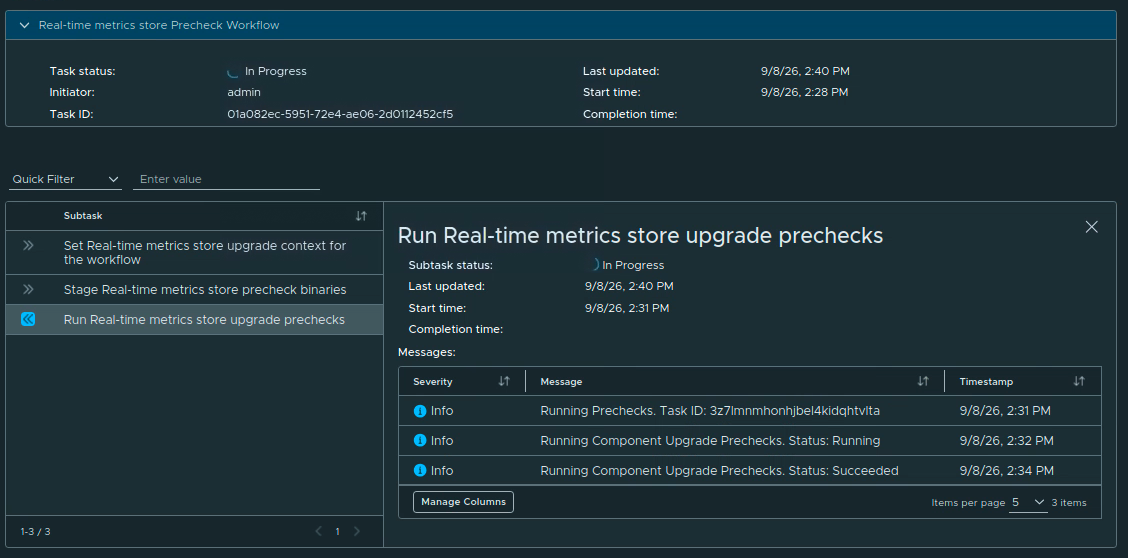
When the precheck completes, return to the component list and confirm that the row is Ready for upgrade. Do not click Upgrade while the precheck is still running. If a check fails, open its details, fix the reported issue, and run the precheck again.

Starting the Upgrade
Click Upgrade on the Real-Time Metrics Store row. The row changes to Upgrade in progress. Open Upgrade details to follow the workflow.
The workflow runs through these subtasks:
- Set Real-Time Metrics Store upgrade context for the workflow.
- Stage the Real-Time Metrics Store plugin in the VCF services runtime.
- Run the Real-Time Metrics Store prechecks.
- Stage the Real-Time Metrics Store package in the VCF services runtime.
- Prepare Real-Time Metrics Store for upgrade.
- Perform the Real-Time Metrics Store upgrade.
- Run the inventory sync after the Real-Time Metrics Store upgrade.
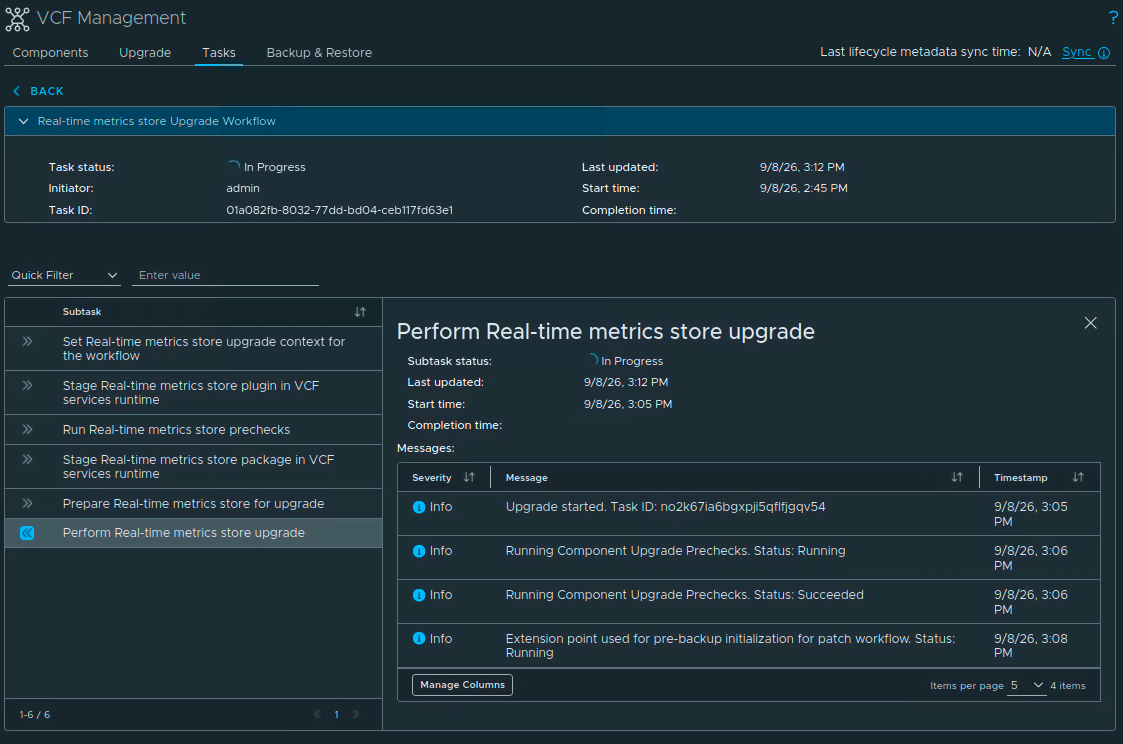
The task in my lab started at 2:45 PM and completed at 3:29 PM, for a total workflow time of about 44 minutes. That is the duration shown by my task, not a promise about service downtime in another environment. Wait for the final inventory sync and confirm that the overall task is Completed.
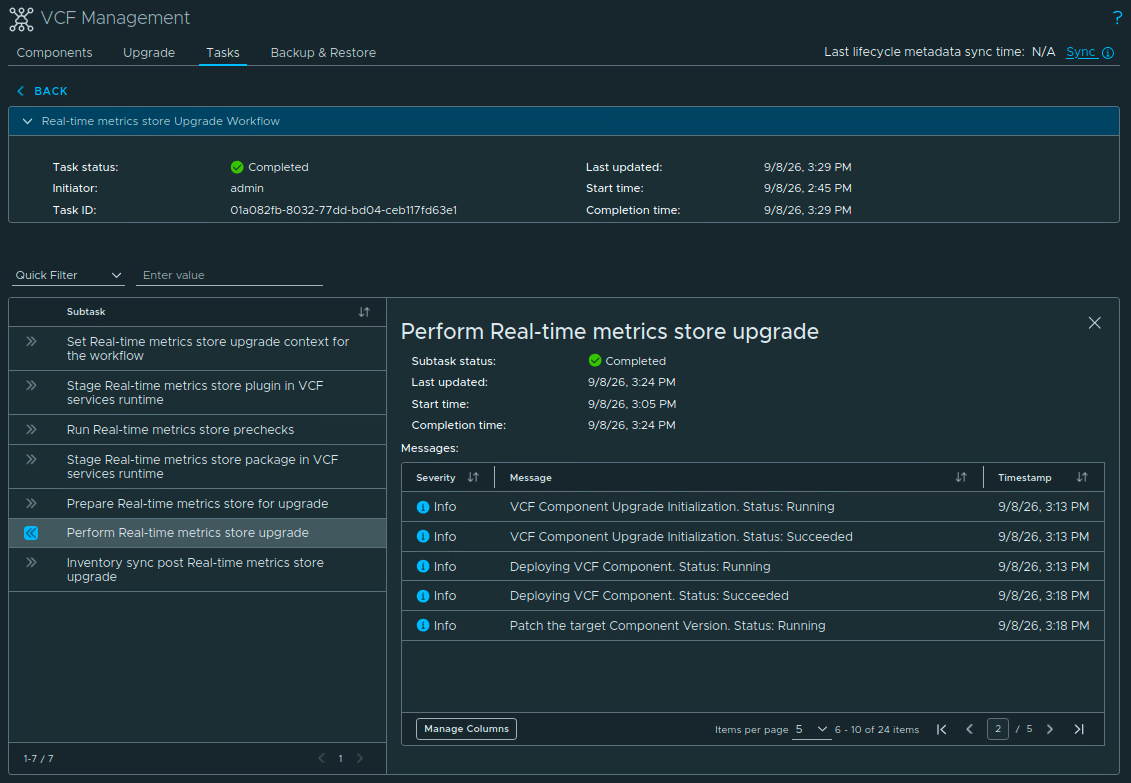
Verifying the New Version
Go to Build -> Lifecycle -> VCF Management -> Components and open Real-Time Metrics Store for the instance you upgraded.
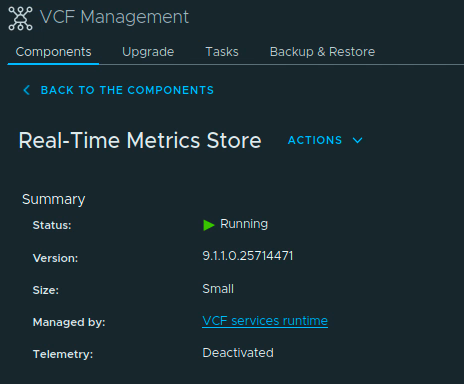
Under Summary, verify that the status is Running and the version is 9.1.1.0.25714471. In my lab the deployment size is Small, it is managed by the VCF services runtime, and telemetry is Deactivated.
13. Real-Time Metrics
Patch this row independently from Real-Time Metrics Store and validate fresh data after the task completes.
Selecting Real-Time Metrics
Log in to VCF Operations with an administrator account and go to Build -> Lifecycle -> VCF Management -> Upgrade.
Set the target VCF version to 9.1.1.* if it is not already selected. If the page shows that VCF Operations itself must be patched first, finish that operation and wait for it to complete before continuing.
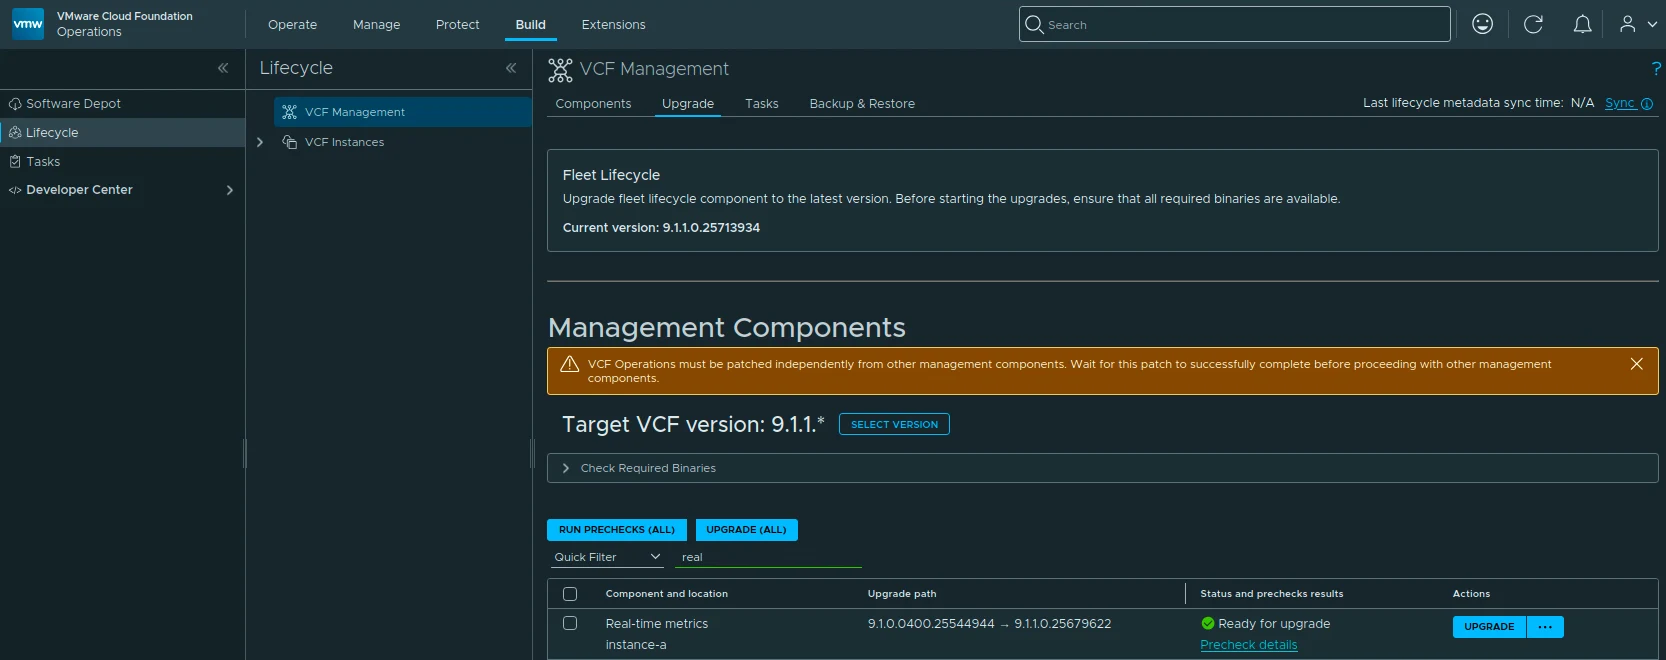
Filter the component list for real or metrics and select Real-time metrics. In my lab the instance was instance-a. Expand Check Required Binaries and resolve any missing binary before continuing.
The upgrade path should read 9.1.0.0400.25544944 -> 9.1.1.0.25679622. The screenshot below shows Fleet Lifecycle already at 9.1.1, the 9.1.1 target, and Real-Time Metrics ready for upgrade.
Running the Prechecks
With only Real-Time Metrics selected, run the prechecks for that component. Open the task details and wait for the Real-time metrics Precheck Workflow to finish.
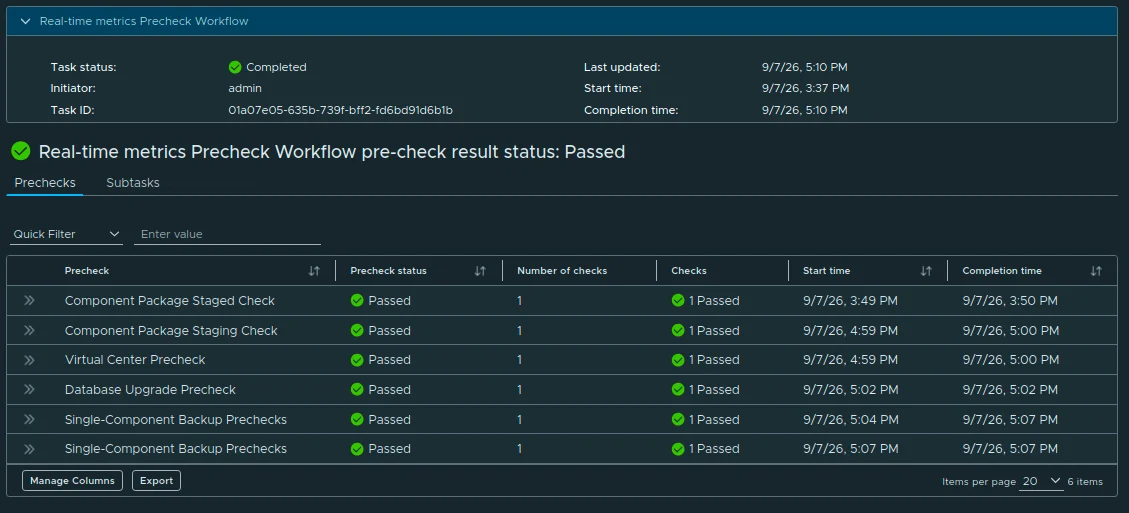
The precheck in my lab completed successfully. It checked the component package staging, vCenter, database upgrade, and single-component backup requirements.
Do not start the upgrade until the precheck result is Passed. If a check fails, open its details, fix the reported issue, and run the precheck again.
Starting the Upgrade
Return to the component list and click Upgrade on the Real-Time Metrics row. The row changes to Upgrade in progress. Open Upgrade details to follow the workflow.
The workflow runs through these subtasks:
- Set Real-Time Metrics upgrade context for the workflow.
- Stage the Real-Time Metrics plugin in the VCF services runtime.
- Run the Real-Time Metrics prechecks.
- Stage the Real-Time Metrics package in the VCF services runtime.
- Prepare Real-Time Metrics for upgrade.
- Perform the Real-Time Metrics upgrade.
- Run the inventory sync after the Real-Time Metrics upgrade.
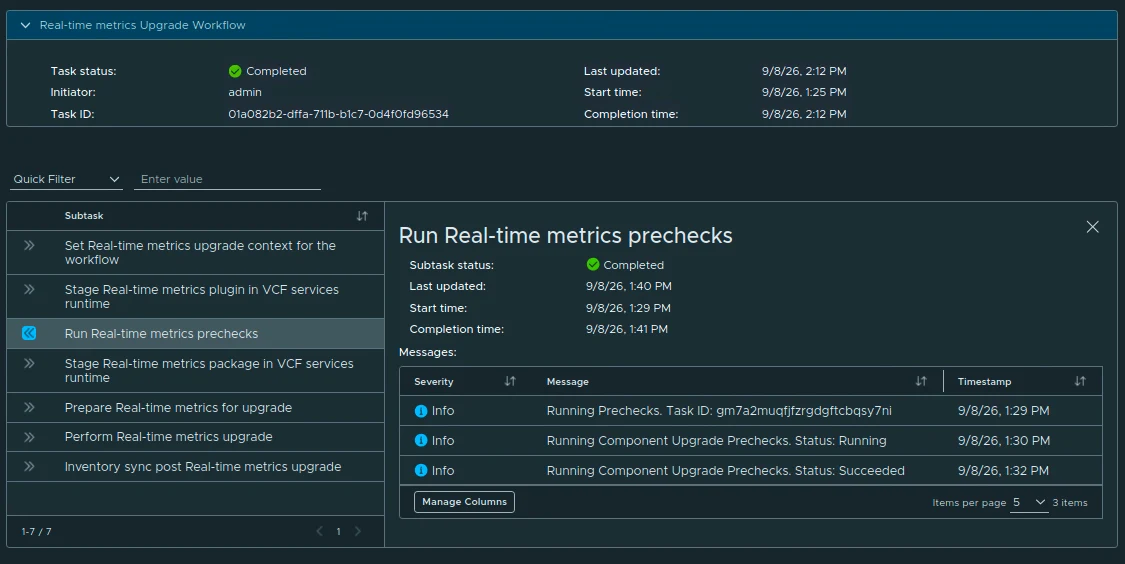
The first part of the workflow runs the component prechecks and reports the result in the task panel.
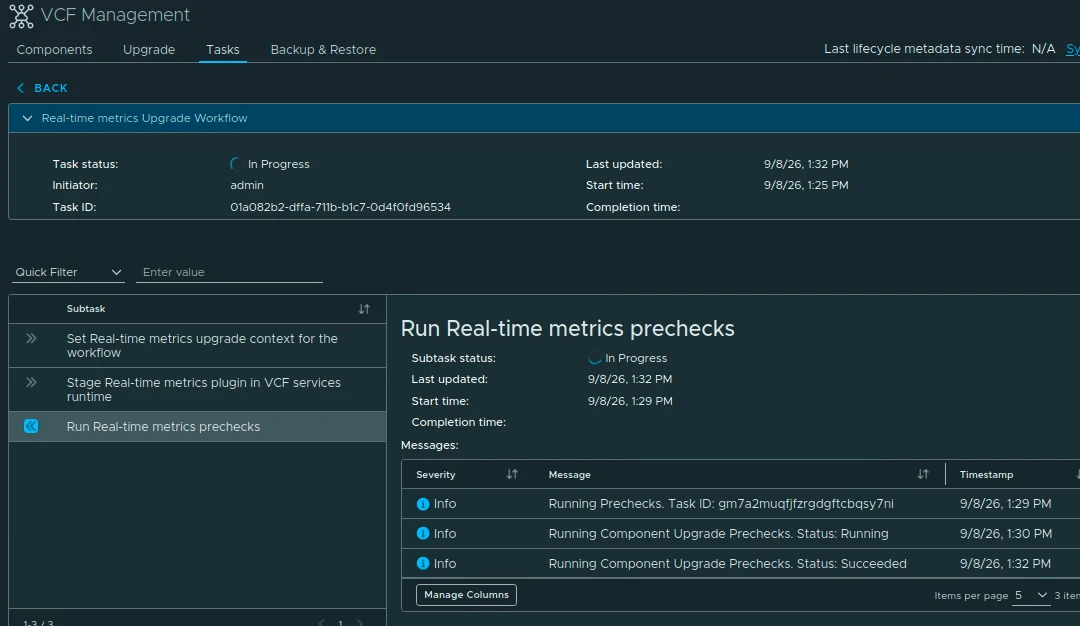
The task in my lab started at 1:25 PM and completed at 2:12 PM, for a total workflow time of about 47 minutes. That is the duration shown by my task and is not a promise about service downtime in another environment. Wait for the final inventory sync and confirm that the overall task is Completed.
Verifying the New Version
Go to Build -> Lifecycle -> VCF Management -> Components and open the Real-Time Metrics component you upgraded.
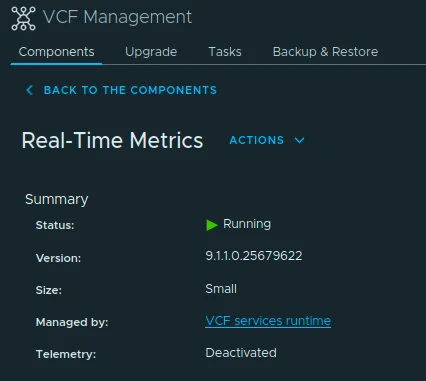
Under Summary, verify that the status is Running and the version is 9.1.1.0.25679622. In my lab the deployment size was Small and the component was managed by the VCF services runtime.
After the component reports Running, validate the data path that matters in your environment:
- Open Operate -> Real-Time Metrics and query a known resource.
- Confirm that fresh samples are arriving and that the expected time range is available.
- Check the dashboards, saved views, Top-N views, custom PromQL queries, and any integrations that use the Real-Time Metrics data.
- Confirm that related vCenter, ESX, vSAN, and NSX resources still show current data where your environment collects those metrics.
14. Telemetry
Telemetry is listed as N/A in Broadcom’s component backup-method table; keep the supporting VCF Operations and management-service recovery points current.
Selecting Telemetry
Log in to VCF Operations with an Administrator account and go to Build -> Lifecycle -> VCF Management -> Upgrade.
Set the target VCF version to 9.1.1.* if it is not already selected. If the release is not listed, use Sync to refresh the lifecycle metadata and wait for that task to finish before checking again.
Filter the component list for telemetry and select the Telemetry row for the VCF instance you want to patch. In my lab the instance was instance-a. Expand Check Required Binaries and resolve any missing binary before continuing.
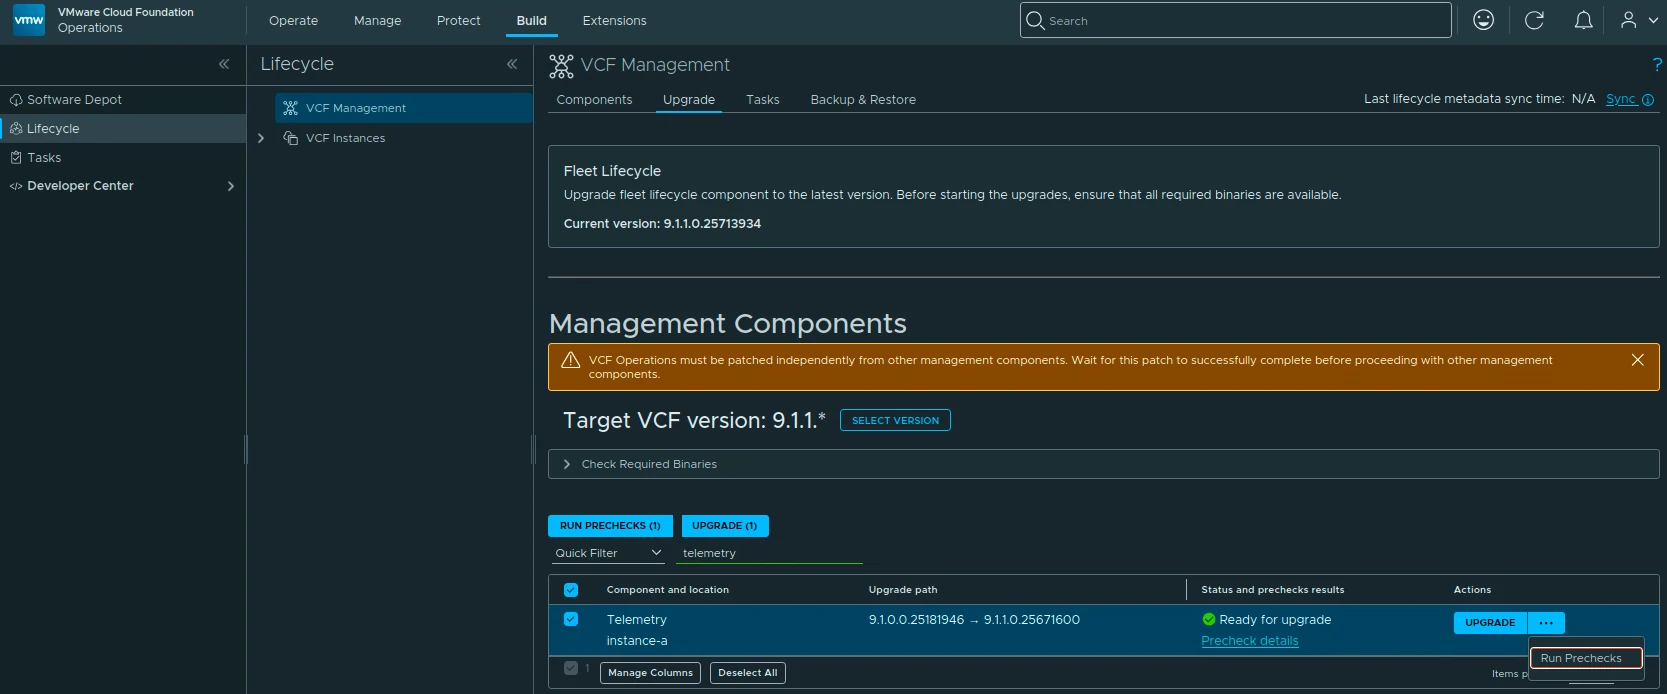
The upgrade path should read 9.1.0.0.25181946 -> 9.1.1.0.25671600. The screenshot below shows Fleet Lifecycle on 9.1.1, the 9.1.1 target, and Telemetry ready for upgrade.
Running the Prechecks
With only Telemetry selected, click Run Prechecks (1). Open the task details and wait for the Telemetry Precheck Workflow to finish.
When the precheck completes, review Prechecks and confirm that the result is Passed. The checks in my run covered package staging, the vCenter connection, the database upgrade, and the lifecycle backup precheck shown by the UI. Telemetry itself is listed as N/A for backup in the current backup-method table.
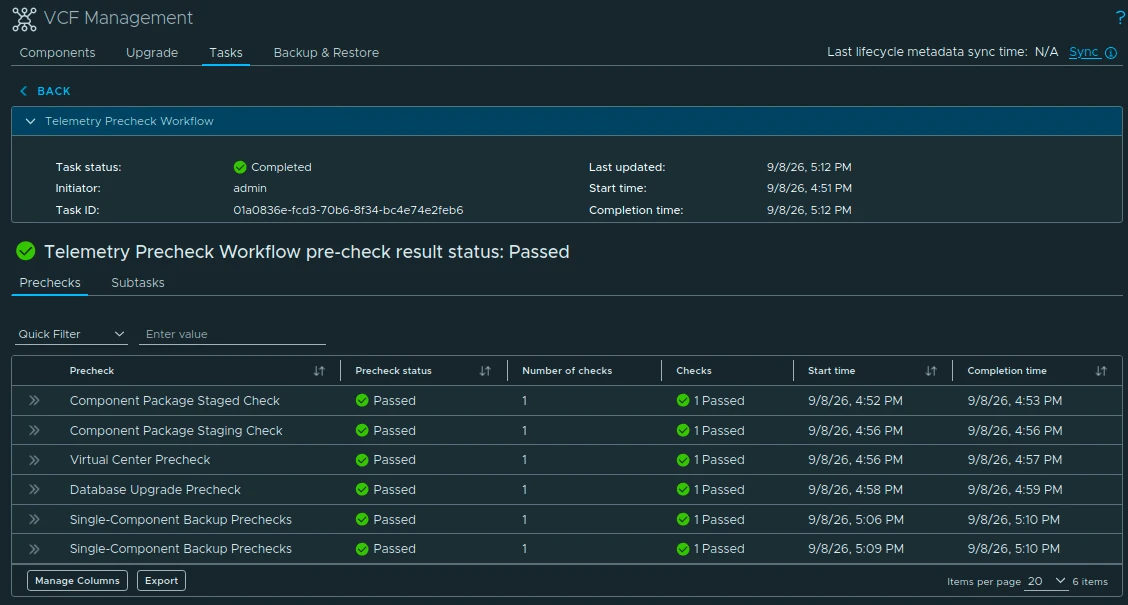
Return to the component list and confirm that Telemetry is Ready for upgrade. Do not start the upgrade while the precheck is still running. If a check fails, open its details, fix the reported issue, and run the precheck again.

Starting the Upgrade
Click Upgrade on the Telemetry row. The status changes to Upgrade in progress. Open Upgrade details to follow the workflow.

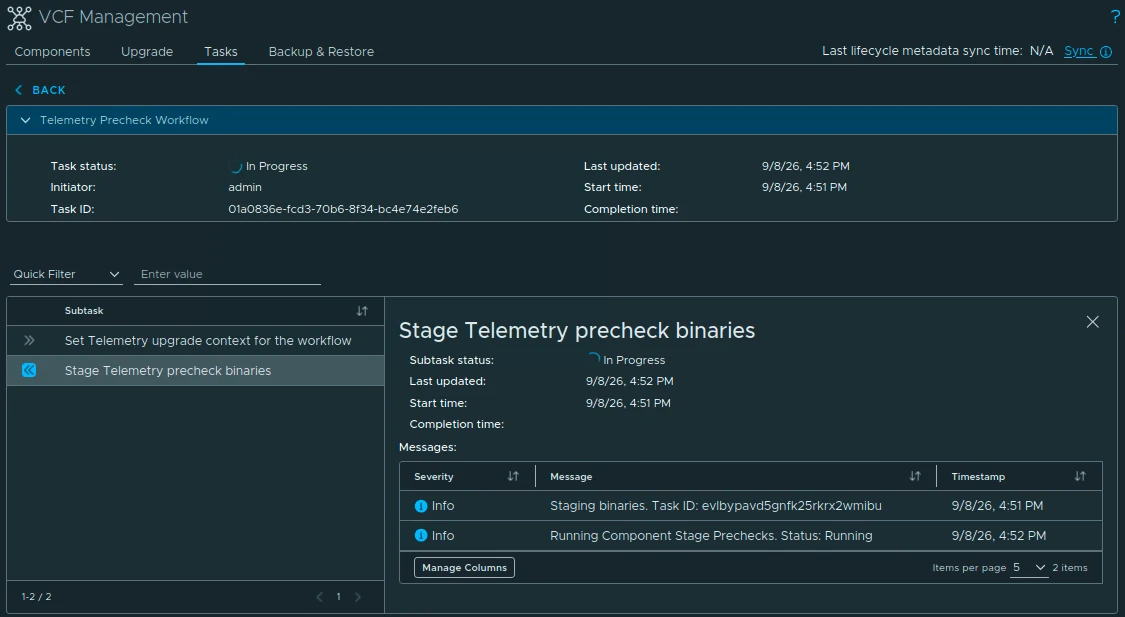
The task details can be used to watch the plugin staging and component stage prechecks:
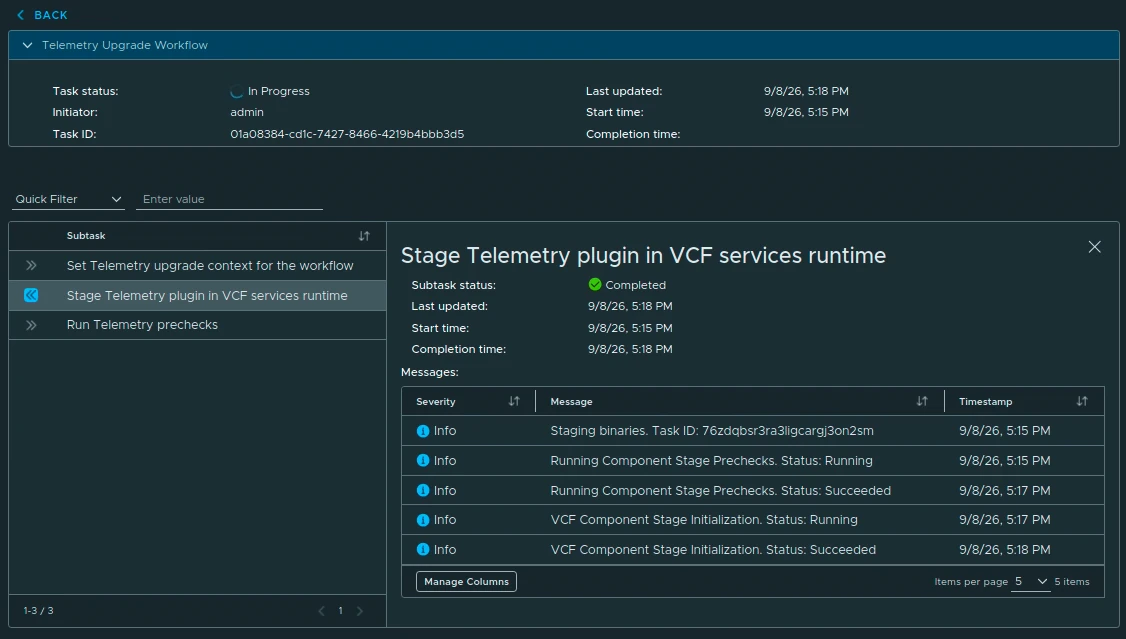
The overall workflow then moves through these subtasks:
- Set Telemetry upgrade context for the workflow.
- Run Telemetry prechecks.
- Stage the Telemetry package in the VCF services runtime.
- Prepare Telemetry for upgrade.
- Perform the Telemetry upgrade.
- Run the inventory sync after the Telemetry upgrade.
The task in my lab started at 5:15 PM and completed at 5:59 PM, for a total workflow time of about 44 minutes. That is the duration shown by my task, not a promise about service downtime in another environment. Wait for the final inventory sync and confirm that the overall task is Completed.
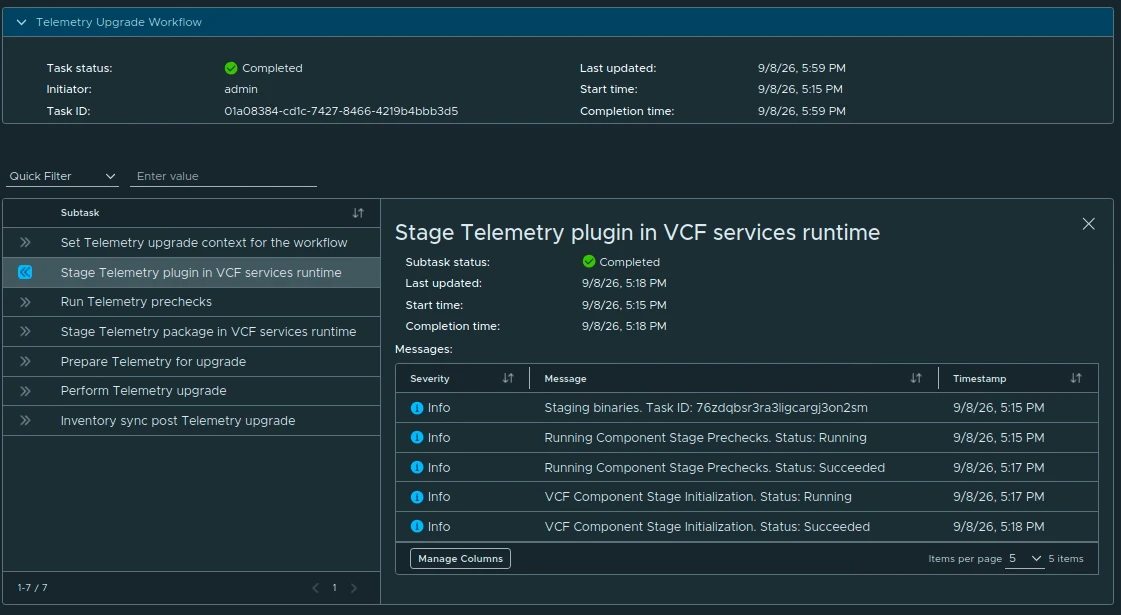
Verifying the New Version
Go to Build -> Lifecycle -> VCF Management -> Components and open the Telemetry component for the instance you upgraded.
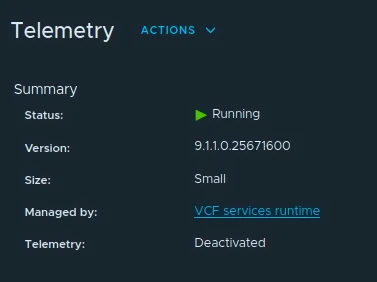
Under Summary, verify that the status is Running and the version is 9.1.1.0.25671600. In my lab the deployment size was Small, it was managed by the VCF services runtime, and the summary showed Telemetry: Deactivated.
Post-Upgrade Validation
Once all selected components report 9.1.1:
- Check Build -> Lifecycle -> VCF Management -> Components for a consistent inventory and no component still showing an old target.
- Review Build -> Lifecycle -> Tasks for failed, partial, or stale tasks. If a component is already on the target but remains stuck as Ready for upgrade, do not edit the lifecycle database; open Broadcom Support and reference KB 453246.
- Test SSO through Identity Broker, VCF Operations logins and dashboards, Log Management ingestion, Operations for Networks collection, Automation portals and a representative deployment, Salt health, Telemetry behavior, and the services-runtime health dashboard.
- If VCF Operations was upgraded, check the precheck result for affected Management Packs. KB 454432 lists packs that need a 9.1.1-compatible update, and KB 454434 covers custom packs built with an older MP Builder.
- Confirm that a new management-services backup completes and that the backup artifacts are retained according to your policy.
- If the VCF Operations Build -> Lifecycle page is blank or spins after an appliance update, test an incognito window or clear the browser cache. Broadcom tracks that behavior in KB 441205.
And with that, we have one repeatable plan for the VCF Management 9.1.1 maintenance window. The UI still gives us a single place to see every component, every precheck, and every task, while the execution stays within the current Broadcom guidance for 9.1.1.