Booting Mac mini M1 in DFU mode

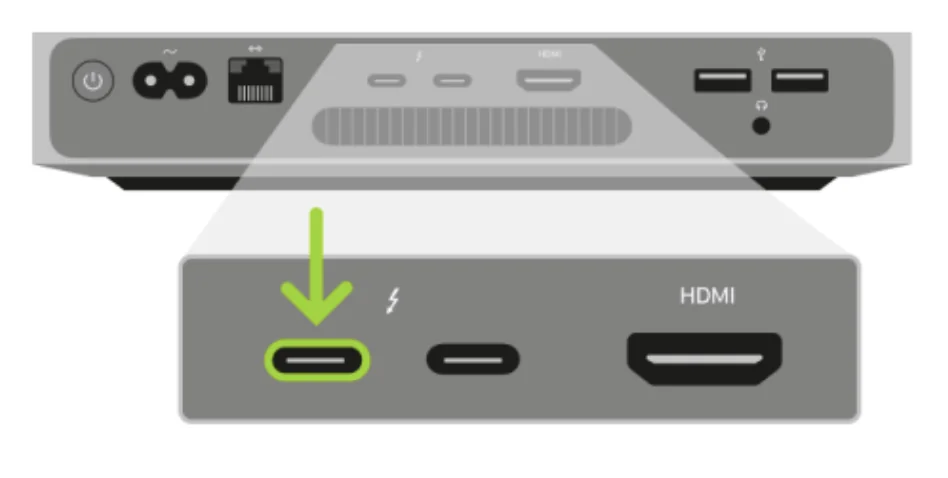
Disconnect the power cord from the Mac Mini. Plug USB-C/Thunderbolt cable into the USB-C port next to the ethernet port. Plug the other end into the Host Mac. While holding down the power button, connect the Mac Mini to power and continue to hold the power button for about 3-5 seconds You should now see the DFU logo on the Host Mac. Once the Mac mini is in DFU mode, you can do a full restore of the Mac mini M1.

 · Updated  · 
Booting Mac mini M1 in DFU mode
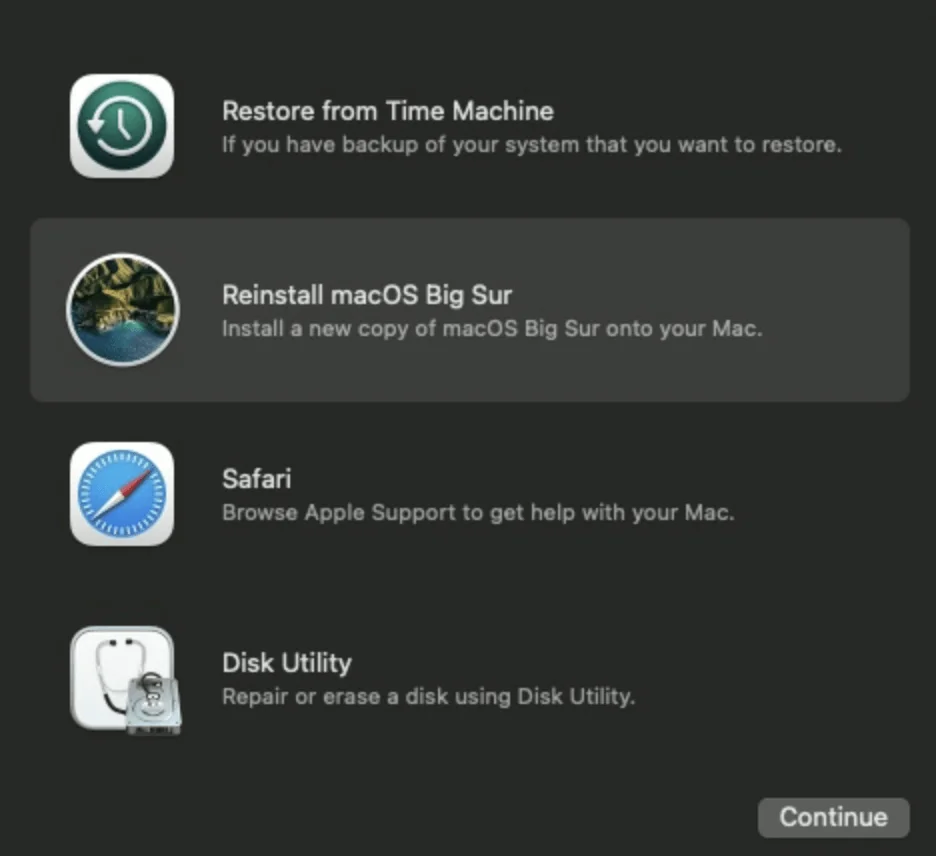
Recovery mode options for a Mac, including Time Machine restore, macOS reinstall, Safari for support, and Disk Utility.

How to restart the new Mac mini M1 in recovery mode?

I recently purchased one of the newer Mac mini devices with the new M1 chipset. Unfortunately I went with the lower edition that had 256 GB and I wanted to send it back to purchase the bigger 512 GB edition, but I wanted to clean my installation. In order to to boot in the recovery mode to reinstall the os I had to perform the following steps: Make sure the Mac mini is off, if its not off just shut it off Hold the power button until the options appear, it might seem like a long time but keep holding it. It took about 15 seconds for me. A menu should appear that shows the hard drive and Options. Select options and continue You will see the apple logo and then a new menu should appear with additional options. It would look like this: ...

 · Updated  · 
How to restart the new Mac mini M1 in recovery mode?
Failed to update bootloader due to no space left on device; refer to log for details.

ESXi No space left on device error when upgrading

While I was trying to perform an upgrade to my ESXi installation I ran in to the below error: The fix was pretty simple. The hypervisor doesn’t have enough space to download and install the package so we need to enable one of the available datastores for the function. For vCenter go to the host in question to Configure -> System -> System Swap ...

ESXi No space left on device error when upgrading
VMware Cloud Foundation Update 4.1.0.0 details: Released 10/06/2020, 11 GB, available for download.

Upgrading VCF 4.0.1.1 to 4.1.0.0

With the release of of VCF 4.1 I wanted to get my lab upgraded. The release blog can be found here and the release notes are here Downloading the 4.1.0.0 Update Bundle In my case I pre downloaded the VMware Cloud Foundation Update 4.1.0.0 by going to Repository -> Bundle management -> Download now Applying the VCF 4.1.0.0 Update The next step is to upgrade VCF by going to Inventory -> Workload Domains -> Select the workload domain -> Update/Patches -> Update Now ...

 · Updated  · 
Upgrading VCF 4.0.1.1 to 4.1.0.0
Error stack shows a sync depot failure due to 'integrity.fault.HostPatchInvalidVendorCode'.

Unable to Sync Lifecycle Manager 'integrity.fault.HostPatchInvalidVendorCode'

After upgrading my vCenter Server to the latest vSphere 7.0 Update 1, I was unable to see ESXi 7.0 Update 1 Image. When I attempted to sync the updates I got the error “Download patch definitions task failed while syncing depots. Error: ‘integrity.fault.HostPatchInvalidVendorCode’.” Seeing as the error mentioned the depots, navigate to Menu->Lifecycle Manager and then select the Settings tab and then Patch Setup. ...

 · Updated  · 
Unable to Sync Lifecycle Manager 'integrity.fault.HostPatchInvalidVendorCode'
Recent Tasks shows "Power On virtual machine" with "Insufficient resources" error.

vCLS not starting with Insufficient resources message

With the release of vCenter 7 Update 1, VMware introuced the vCLS (vSphere Clustering Service). More information can be found here. The Insufficient Resources Error Looking at the error details it looks like it is looking for a feature called cpuid.mwait Root Cause: EVC on the vCLS VMs Reviewing the VMX file it seems like EVC is enabled on the vCLS VMs. I didn’t want to enable EVC on the whole cluster so I wanted to do it only on the specific VMs. ...

 · Updated  · 
vCLS not starting with Insufficient resources message

Extracting SSL Thumbprint

I recently ran in to an issue where I had to re-register my NSX server with vIDM. The ask was to extract the Thumbprint from vIDM. The command I ran to extract it was: echo -n | openssl s_client -connect hostname:443 2>/dev/null | openssl x509 -noout -fingerprint -sha256 This can be used across multiple products where the Thumbprint needs to be extracted

 · Updated  · 
Extracting SSL Thumbprint
Error message shows server registration failure due to server error during vRealize Operation Endpoint Agent setup.

vRealize Operation Endpoint Agent (EPops) Unable to register error

While I was doing the operations endpoint install on a new vROPS environment I experienced an strange error that I didn’t see before - Unable to register the agent due to server error. In order to find the issue I had to log in to my vROPS server in order to review the logs. I was able to find the End Point Adapter log file here: ...

 · Updated  · 
vRealize Operation Endpoint Agent (EPops) Unable to register error
License tab in vRealize Lifecycle Manager with options to add or refresh licenses.

Adding keys in vRealize Lifecycle Manager in a VCF 4 Environment

From a lifecycle manager perspective we have a couple of ways to add keys to the environment If the my vmware user that is added to lifecycle manager has access to they keys, the keys can automatically discovered and imported. For this we can go to the locker from Home -> Locker -> License. If the keys are not discovered we can click on the refresh button up top to perform a manual sync ...

 · Updated  · 
Adding keys in vRealize Lifecycle Manager in a VCF 4 Environment
Creating a new environment in vRealize Lifecycle Manager for vRA deployment in a VCF 4 setup.

Deploying vRA with vRealize Lifecycle Manager in a VCF 4 Environment

If you followed my previous posts Deploying the vRealize suite using VCF 4.0 and enabling product downloads in vRealize Lifecycle Manager, you should now have vRA and vIDM already downloaded. In my previous post I went over the installation of vIDM which is a pre requisite for vRA. You can find the link here Creating a New Environment Next, we need to create a new environment that will be used to deploy vRA. For this we can go to Lifecycle Operations -> Create Environment. Fill in the necessary information and click next ...

 · Updated  · 
Deploying vRA with vRealize Lifecycle Manager in a VCF 4 Environment