As organizations adopt VMware Cloud Foundation 9.0, a common question comes up: what do I do with my existing vCenter 8.x environments? The good news is that VCF 9.0 supports backwards compatibility with 8.x vCenter instances. You can import them as workload domains directly from the VCF Operations console, bringing your legacy infrastructure under VCF management without rebuilding from scratch.
In this post I will walk through the full import process — from prerequisites and networking requirements to NSX deployment and validation — so you know exactly what to expect before you hit the “Import” button.
Note on terminology: When the action is performed within the VCF Operations console, it is referred to as an Import. When using the VCF Installer appliance, the same action is called a Converge. This post covers the Import workflow.
Prerequisites
Before starting, make sure your existing vSphere environment meets the following requirements. Missing any of these will cause the prechecks to fail.
Minimum Versions
| Component | Minimum Version |
|---|---|
| VCF Instance | 9.0.x |
| vCenter | 8.0 Update 1 or later |
| ESXi Hosts | 8.0 Update 1 or later |
| NSX Manager (if existing) | 4.1.0.2 or later |
Infrastructure Requirements
- Shared Datastore — At least one datastore shared across all hosts in the cluster, accessible and writable by all hosts. VCF supports vSAN, NFS v3, VMFS, NFS 4.1, iSCSI, and vVols. If multiple datastore types are present, VCF determines the principal storage using this priority: vSAN > NFS v3 > VMFS > NFS 4.1 > iSCSI > vVols.
- vSphere Distributed Switch (VDS) — Version 8.0 or later with at least 2 uplinks attached from all hosts. Standard switches alone are not supported — if you are still using a VSS, migrate to VDS first.
- DRS — Must be set to Fully Automated. Partially automated or manual DRS is not supported for import. You can change this in the cluster settings before starting.
- Static VMkernel IPs — All VMkernel interfaces must use statically assigned IP addresses (except NSX Host TEPs, which can use DHCP).
- Dedicated vMotion Network — vMotion traffic must be on its own dedicated network, not shared with management.
- DNS Records — Forward and reverse DNS records must be configured for all VCF management components. All FQDNs must resolve to unique IPs. If deploying a new NSX instance, you will need 4 DNS records and 3 reserved IPs for the NSX cluster.
- SSH Enabled — SSH must be enabled on the vCenter being imported.
What Is NOT Supported
Before you start, be aware of these blockers:
- Cisco virtual switches
- vCenter instances without a VDS
- Custom vCenter ports for client connections
- Enhanced Linked Mode (ELM) — you must break ELM before importing (see Broadcom TechDocs for the deactivation procedure)
- Clusters managed by Dell VxRail
- Multiple NSX Manager instances on a single vCenter
- NSX Bare Metal Edge nodes
Supported with Caveats
These configurations are supported but require preparation:
- Baseline-based lifecycle management — Clusters using baselines can be imported, but you will get a warning during prechecks. SDDC Manager will take over lifecycle management post-import, and you should plan to convert to vSphere Lifecycle Manager images before upgrading to ESXi 9.0.
- vCenter VM on the imported cluster — If the vCenter appliance VM lives on one of the clusters being imported, this is supported. However, if it resides on the default management domain cluster, you will need to vMotion it to a supported location first.
- Standalone or single-host clusters — Supported only if your vCenter has an additional cluster that meets the import requirements.
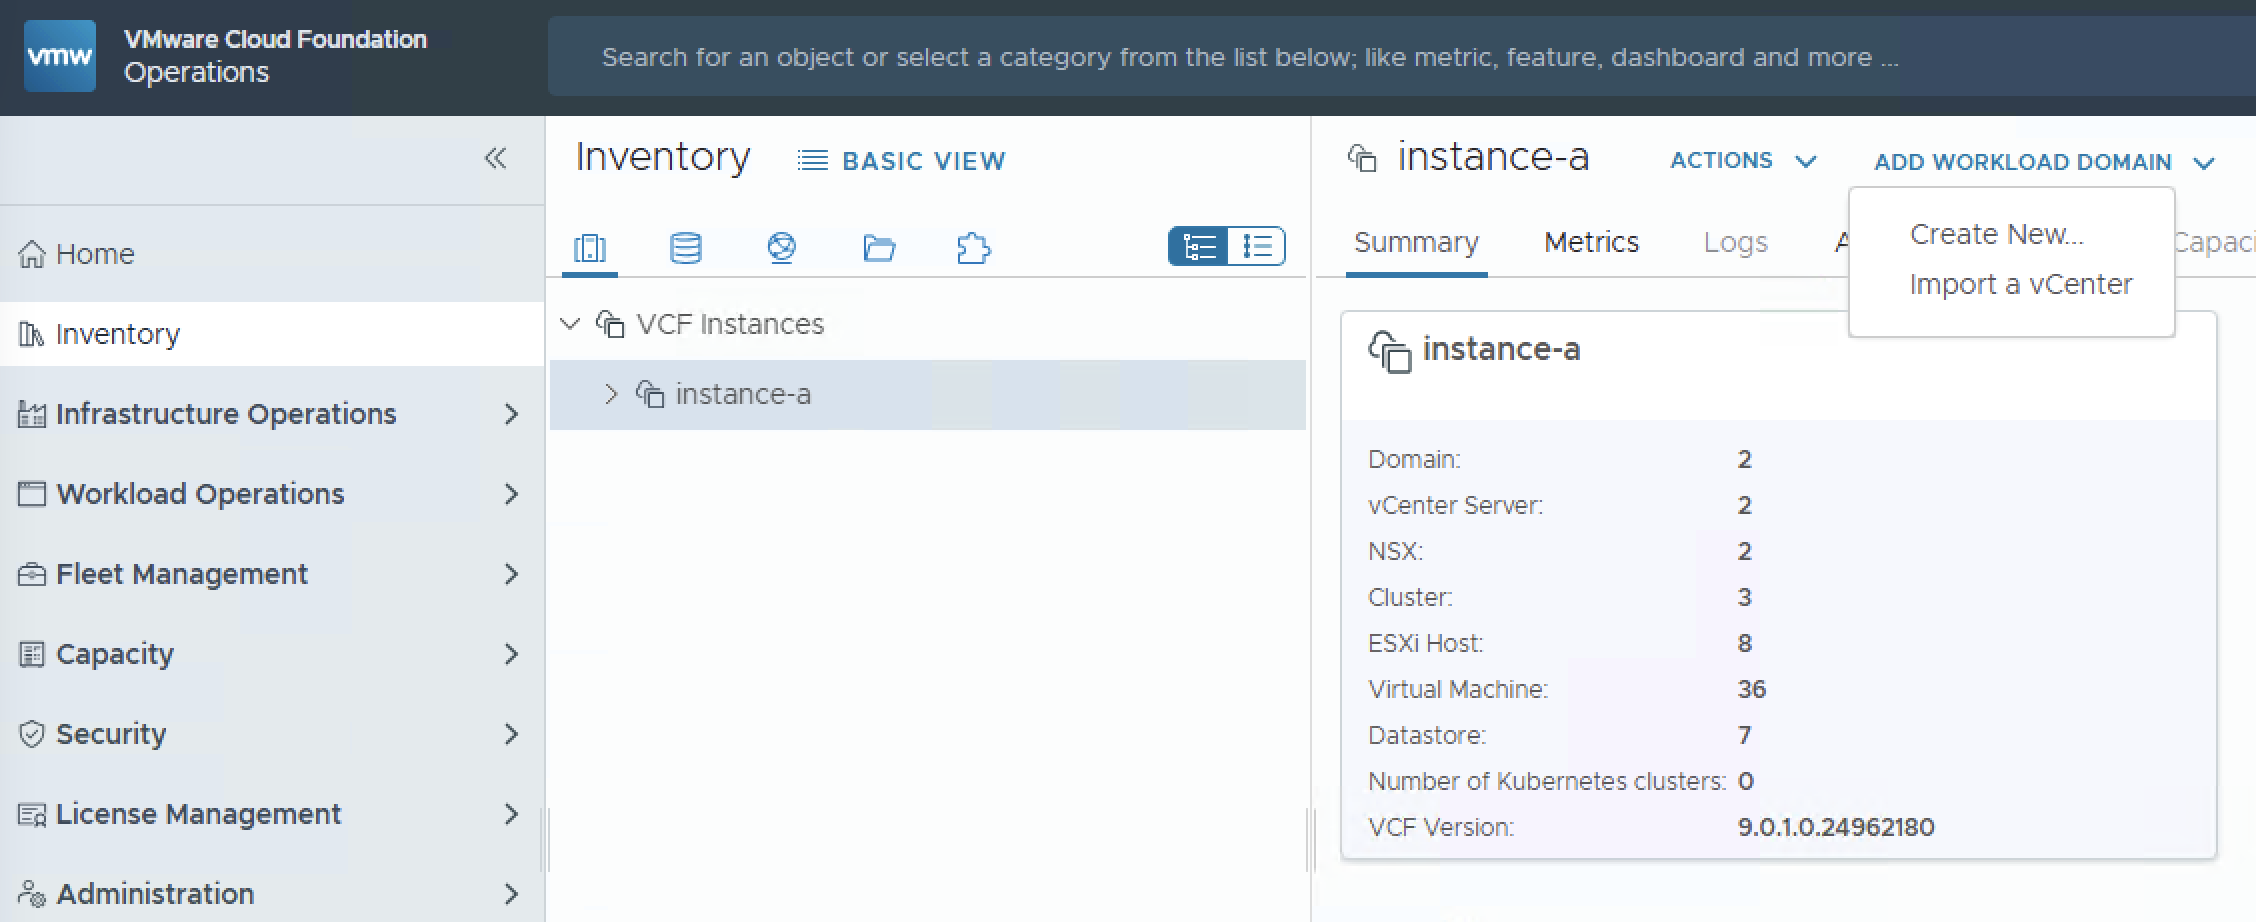
Step 1 — Initiate the Import from VCF Operations
All import actions are performed from the VCF Operations 9 console.
- Log in to the VCF Operations home page.
- Navigate to Inventory > Detailed View.
- Expand VCF Instances and select the Organization (VCF Instance) into which you want to import the workload domain.
- Click the Add Workload Domain dropdown and select Import a vCenter.
Step 2 — Define the Workload Domain
- Enter a unique name for the new Workload Domain (e.g.,
WD-Prod-DC2). - Click Next.
Step 3 — Specify the vCenter
You have two options here:
- Select an existing standalone vCenter — If the vCenter is already visible in the VCF inventory, select it from the table.
- Specify an external vCenter — For a vCenter that is not yet registered, enter the following:
- vCenter Server FQDN
- vCenter Server Root Password
- SSO Username
- SSO Password
If the vCenter is connected to an existing NSX Manager instance, toggle the NSX option and provide:
- NSX Manager VIP FQDN
- NSX Administrator Password
- NSX Root Password
- NSX Audit Password
If your existing NSX Manager is version 9.0 or later and has Edge clusters, VCF will discover and import the Edge node VMs, including their credentials. The passwords will be reset during import — you can retrieve the new ones from the VCF credential store afterward.
- Confirm the certificate thumbprints for vCenter and NSX Manager (if applicable) and click Next.
Step 4 — Run Prechecks
Once you click Next, VCF Operations will run a series of automated prechecks against your environment. These verify:
- Network connectivity and port requirements
- DNS resolution for all FQDNs
- DRS configuration
- Datastore accessibility
- VDS compatibility
Tip: You may see warnings related to upgrade policy settings if you are importing an 8.x environment. These are informational and typically allow you to resume. If you see errors, resolve them before proceeding.
Step 5 — Configure NSX Networking
If your vCenter is not already connected to an NSX instance, VCF will need to deploy one. For a vCenter 8.x import, NSX 4.x is required, which means a 3-node NSX Manager cluster (High-Availability deployment).
NSX Manager Cluster Configuration
| Setting | Value |
|---|---|
| Deployment Size | High-Availability (3 nodes, recommended) — Standard (single node) is only available for vCenter 9.0+ imports |
| Appliance Size | Medium, Large, or Extra Large depending on your environment size |
| Appliance FQDNs | 3 unique FQDNs for each NSX Manager node |
| Cluster FQDN | The VIP FQDN for the NSX Manager cluster |
| Network | The NSX Manager nodes will deploy on the same management network as the vCenter |
Passwords
Set passwords for the NSX Administrator, Root, and Audit accounts. The password requirements are strict:
- Minimum 12 characters
- At least one uppercase, one lowercase, one digit, one special character
- At least 5 different characters
- No dictionary words, no palindromes, no more than 4 sequential characters
NSX Overlay Networking
Choose whether to use the existing management VMkernel for NSX overlay networking or to configure a dedicated overlay transport. For most production environments, keeping the default overlay options is reasonable for the initial import — you can reconfigure overlay networking after the import is complete.
Step 6 — Download Required Binaries
This is a step that can catch you off guard. During validation, you may encounter errors indicating that specific NSX binaries are not available.
- Navigate to Fleet Management in the VCF Operations console.
- In the version dropdown, select VCF 5.2 (yes, 5.2 — this is the version that maps to NSX 4.x binaries for 8.x vCenter imports).
- Look inside Patch Binaries for the specific NSX version required.
- Start the download and wait for it to complete before re-running validation.
Important: This step is version-specific. The binary version required depends on your target NSX version, which is determined by the vCenter version being imported. Check the VCF 9 Bill of Materials if you are unsure which binary to download.
Step 7 — Validate and Review
- Run the final validation — this verifies all networking, binaries, and configuration.
- Review the full configuration summary.
- Click Finish to start the import.
The import process will:
- Deploy the NSX Manager cluster (if no existing NSX was specified)
- Configure networking and overlay transport
- Register all clusters and hosts with SDDC Manager
- Add the workload domain to your VCF Organization
You can monitor the progress under Tasks in the Fleet Management section. Once complete, the new workload domain will appear in your Organization inventory.
Post-Import Considerations
After the import completes, there are a few things to address:
Lifecycle Management
SDDC Manager now manages lifecycle for the imported workload domain. If your clusters were using baselines for host patching, plan to convert them to vSphere Lifecycle Manager images before upgrading to ESXi 9.0. See the Broadcom TechDocs on converting from baselines to images for the procedure.
Password Management
ESXi host root credentials for imported hosts may not automatically appear in the VCF credential store. If you need SDDC Manager to manage these passwords, follow the workaround in Broadcom KB 388859 to add the missing credential entries.
Upgrading to VCF 9.0.x
Once the 8.x environment is imported, you can plan an upgrade path to bring the vCenter and ESXi hosts up to 9.0.x. This is a separate workflow managed through SDDC Manager and is covered in detail in the Broadcom TechDocs upgrade guides.
Quick Reference: Import Checklist
| Item | Status |
|---|---|
| vCenter 8.0 U1+ with SSH enabled | ☐ |
| ESXi hosts 8.0 U1+ | ☐ |
| VDS 8.0+ with 2+ uplinks | ☐ |
| DRS set to Fully Automated | ☐ |
| Static VMkernel IPs | ☐ |
| Dedicated vMotion network | ☐ |
| Forward + reverse DNS records for all components | ☐ |
| 4 DNS records + 3 IPs reserved for NSX cluster | ☐ |
| No ELM, no Cisco switches, no VxRail | ☐ |
| Required NSX binaries downloaded in Fleet Management | ☐ |
| Shared datastore accessible from all hosts | ☐ |