If you manage a VMware Aria Operations (formerly vROps) environment, you know how quickly alert fatigue can set in. In this guide i will focus specifically on the “Guest OS Experiencing CPU queue” alert. While helpful in identifying CPU-constrained VMs, it can quickly generate thousands of entries if you have a heavily over provisioned environment.
Inspired by Brock Peterson’s excellent guide on Alert Hygiene, we are going to look at exactly how to cancel and delete these specific CPU queue alerts, both via the User Interface and programmatically via the API.
Why is this Alert So Noisy? (The False Positive Bug)
According to Broadcom (KB 376641), Aria Operations versions 8.18.X and earlier suffer from a low sensitivity threshold for this specific alert.
By default, the alert triggers if the Peak vCPU Queue exceeds a threshold of 10 and the overall CPU Usage goes beyond a mere 250 MHz. In modern environments, a VM can easily hit 250 MHz without actually experiencing any tangible performance degradation, resulting in massive alert spam. (Note: Broadcom notes this underlying issue is resolved in VCF Operations 9.0).
Before we go nuclear and delete the existing alerts, let’s look at how to tune it properly.
The Official Fix: Tuning the Alert Definition
Instead of disabling the alert entirely, Broadcom recommends tuning the alert symptoms so it only triggers when there is sizable CPU utilization.
Broadcom provides an XML file in KB 376641 that replaces the CPU Usage > 250 Mhz symptom with CPU Net Run > 75%. It also increases the Wait Cycle to 10 minutes (to avoid alerting on quick CPU spikes) and drops the Cancel Cycle to 1.
How to apply the fix:
- Download the
Guest OS CPU Queue Alert.xmlfile from the Broadcom KB article. - In Aria Operations, navigate to Configure > Alerts > Alert Definitions.
- Click the three dots (…) menu next to Add and select Import.
- Browse and select the XML file you downloaded.
- Check the box for “Overwrite existing Alert Definition” and click Import.
Now that the alert is fixed going forward, let’s clean up the thousands of old alerts sitting in your database.
Here is your step-by-step guide to cleaning up the noise.
Method 1: Clearing the Alerts via the UI
If you just want to do a quick manual clean-up, the UI is the easiest path.
- Step 1: Log into your VMware Aria Operations console.
- Step 2: Navigate to the Troubleshoot tab on the left-hand menu and select Alerts.
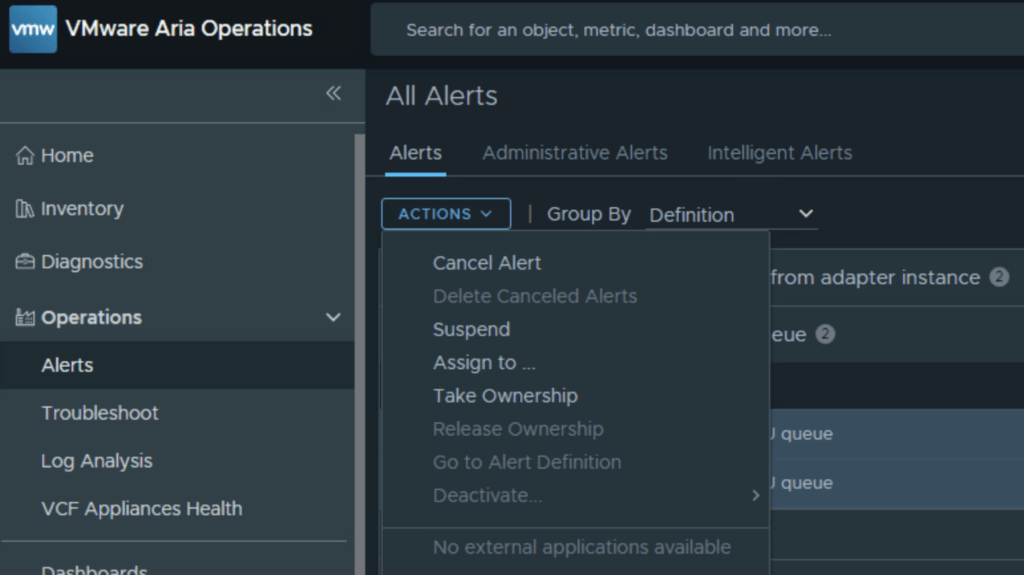
- Step 3: To isolate our noisy alerts, use the Group by dropdown menu and select Alert Definition.
- Step 4: Scroll down or use the quick filter to find the Guest OS Experiencing CPU queue grouping.
- Step 5: Select that specific grouping.
- Step 6: Click on the ACTIONS dropdown menu at the top of the list and select Cancel Alert. Note: Once canceled, you will notice the lightbulb icon in the Status column turns gray, indicating the alerts are now Inactive.

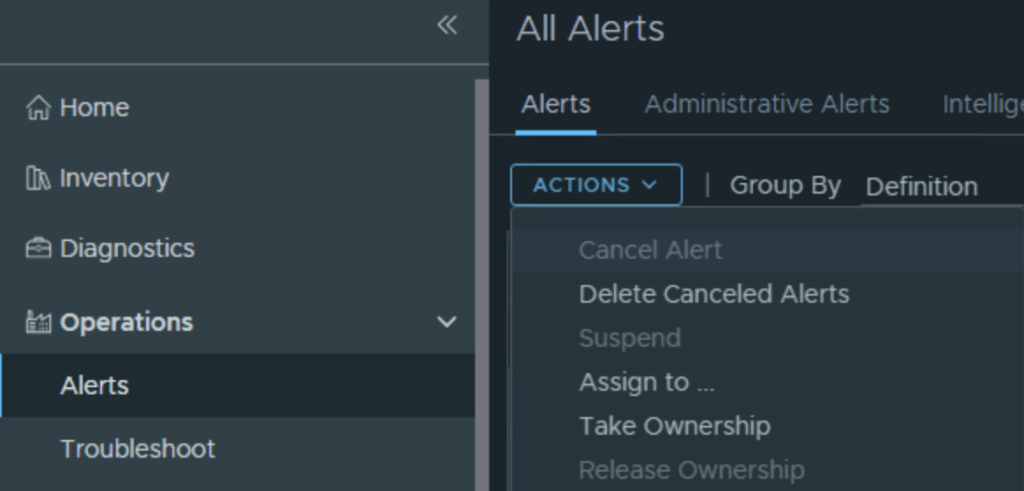
- Step 7: With the grouping still selected, click on the ACTIONS menu one more time and select Delete Canceled Alert.
Just like that, all your historical CPU queue alerts are gone!
Method 2: Clearing the Alerts via the API (Programmatic Approach)
If you have tens of thousands of alerts or want to build a scheduled script to handle this automatically, you can use the Aria Operations REST API. For ease of use i will use the swagger API. the swagger API can be found by going to the Operations URL https://vra_master/suite-api/doc/swagger-ui.html
Step 1: Identify the Alert UUIDs
First, we need to find the active alerts to cancel them. You will use the POST /api/alerts/query endpoint. The response will provide you with a list of alerts, each containing an alertId string.
As an example my JSON for Querry looks like this:
{
 "activeOnly" : true,
 "alertCriticality": [ "CRITICAL", "IMMEDIATE", "WARNING", "INFORMATION" ]
}
Step 2: Cancel the Alerts the Alerts
Now that you have your list of alertId values, you need to make them Inactive. You will use the POST /api/alerts endpoint. In your JSON payload, you will include the alertId strings within the uuids field and set the action to cancel.
Step 3: Bulk Delete Inactive Alerts (Targeted vs. Global)
Once the alerts are canceled, they sit in the database as “Inactive”. You have two ways to delete them depending on your goal:
Option A: Targeted Delete (Safest): If you only want to delete the CPU queue alerts you just canceled, send a DELETE request to the standard /api/alerts endpoint and pass the exact same list of alertId UUIDs you gathered in Step 1.
{
 "alert-query": {
        "alertStatus": {
              "alertStatus" : "CANCELED",
              "alertId": "alert-uuid"
              }
        }
}
Option B: The Global Purge: If you want to use this opportunity to clean house and delete ALL inactive alerts across your entire Aria Operations environment, simply run an empty DELETE request against the /api/alerts/bulk endpoint. Warning: This will wipe out all canceled alerts, regardless of the alert type!
{
 "alert-query": {
        "alertStatus": {
              "alertStatus" : "CANCELED"
              }
        }
}
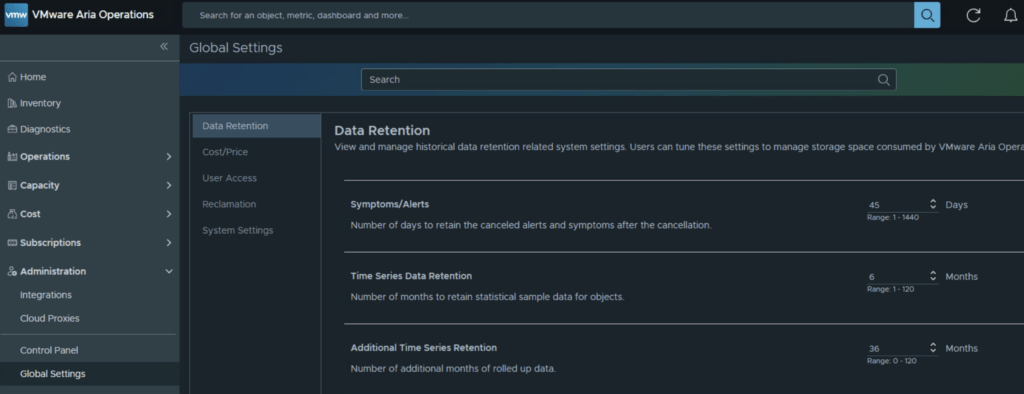
Pro-Tip: Adjusting Global Retention:
If you don’t want to manually do this every week, you can instruct Aria Operations to clean up Inactive alerts faster.
- Go to Administration > Global Settings > Data Retention.
- Look for the Symptoms/Alerts setting.
- By default, Aria Operations keeps canceled/inactive alerts for 30 days. You can safely lower this (Brock recommends 10 days) to keep your database lean and your troubleshoot tabs clean.
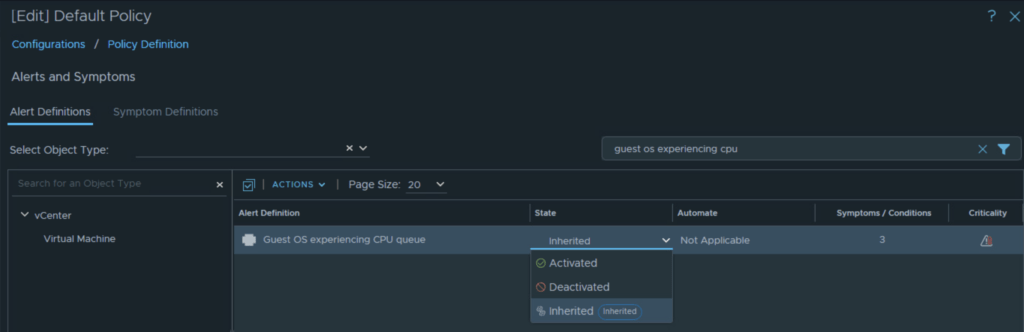
Bonus: How to Stop the Alert from Triggering Altogether
If you don’t care about “Guest OS Experiencing CPU queue” alerts at all and want to stop them from coming back permanently, you should disable them in your active policy:
- Navigate to Configure > Policies.
- Edit your active/default policy.
- Click on the Alerts and Symptoms tile.
- Search for “Guest OS Experiencing CPU queue”.
- Change the state to Deactivated (represented by a crossed-out circle) and save the policy.